Introduction
In today's fast-paced world, our insatiable thirst for energy threatens both our planet and our pockets. Every whirring appliance, every illuminated screen, contributes to a looming shadow of unsustainable resource depletion and rising energy bills.
But why is energy conservation so crucial in this era? Our dependence on fossil fuels is not only depleting reserves at an alarming rate, but also fueling climate change with its noxious emissions. This threatens ecosystems, disrupts weather patterns, and puts entire communities at risk. Additionally, spiraling energy costs squeeze household budgets, leaving families vulnerable to financial hardship.
We introduce GridIQ, a network of intelligent nodes monitoring energy usage in real-time. Using sophisticated k-means anomaly detection, GridIQ identifies the energy guzzlers lurking in your home, those appliances exceeding normal consumption with hidden inefficiencies. It's like having an eagle-eyed detective sniffing out energy leaks and pointing them out for repair or replacement.
But GridIQ doesn't stop there. It empowers you with deeper insights, providing detailed data on your energy consumption patterns. See which appliances drain the most, understand peak usage times, and discover how daily habits influence your energy bill. This knowledge becomes your weapon against waste, allowing you to make informed decisions to optimise your energy use. Turn off lights when leaving a room, adjust thermostat settings wisely, and unplug idle devices – every small step, empowered by GridIQ's insights, paves the way for significant savings.
Ultimately, GridIQ is not just about saving money; it's about taking a proactive stance towards a sustainable future. By minimising energy consumption, we collectively reduce our dependence on fossil fuels, lessen our environmental footprint, and create a healthier planet for generations to come. GridIQ equips you with the tools and knowledge to be a part of this vital mission, making energy conservation not just a choice, but a lifestyle.
Take control of your energy use, reduce your carbon footprint, and watch your savings grow, all while contributing to a brighter future for our planet. Let's turn the tide against energy waste, one smart node at a time.
Features
- Nodes will monitor the voltage and current usage of connected devices continuously.
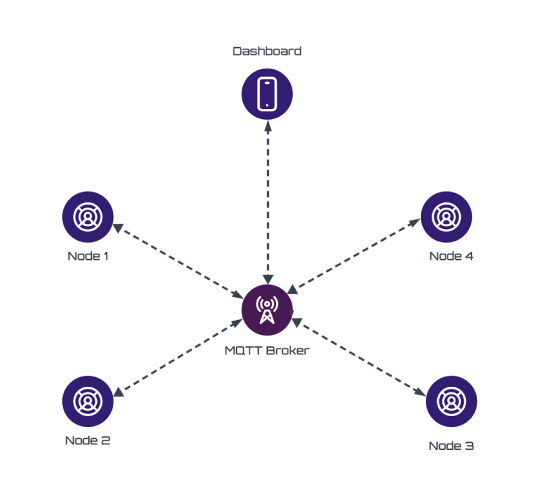
- Realtime update of voltage and current usage in the dashboard via MQTT
- Energy usage calculation and real-time update in the dashboard.
- Detects short circuits, anomalous voltage and current spikes, faulty devices, hidden leaks etc with machine learning and instantly notifies the user via dashboard and SMS.
- Automatically turn off low priority nodes in peak usage hours, enhancing energy saving practices.
- Customisable dashboard for visualisation and remote control.
Demo Video
What is GridIQ and How Does It Work?
GridIQ is a network of smart nodes designed to monitor energy usage, detect faulty devices using machine learning, and provide detailed insights into your power consumption thus enabling you to optimise the energy usage and contribute to global energy conservation. Each node is a self-contained modular unit that easily connects to different power lines. It includes vital components like voltage and current sensors, a single-channel relay, a hi-link step-down power supply, and an ESP32 MCU.
The node can be connected to a power line ahead of any device. Once connected, it initiates an analysis of the energy usage of the connected device by leveraging sensor data and embedded machine learning capabilities.
Functions of Each Node
1. Voltage and Current Sensing
The device accurately measures voltage and current flowing through the power line using dedicated sensors.
2. Data Processing and Analysis
The ESP32 microcontroller (MCU) receives and analyses the sensor data.
3. Machine Learning for State Classification and Anomaly Detection
A tiny ML model running on the ESP32 classifies the connected load's operation into three categories.
- Normal Working: Indicates the appliance is functioning as expected.
- Off: Detects when the appliance is switched off.
- Anomalous Working: Identifies unusual power consumption patterns, potentially indicating malfunction.
4. Real-Time Monitoring and Alerts:
- Dashboard Updates: Data is transmitted directly to a user-friendly dashboard for real-time visualization of voltage, current, and energy consumption.
- Alert System: When the machine learning model detects anomalous behavior, an alert is instantly sent to both the dashboard and the user's phone via Twilio as SMS.
5. Energy Usage Tracking
The device calculates and tracks the energy consumption of the connected load while it's on, providing valuable insights into your appliance's efficiency.
Benefits of GridIQ
- Enhanced Appliance Awareness: Gain deeper understanding of your connected appliances' operation and identify potential issues.
- Energy Efficiency Optimization: Track energy consumption and identify opportunities for saving.
- Proactive Maintenance: Early detection of anomalies allows for preventive maintenance and reduces the risk of equipment failure.
- Remote Monitoring and Convenience: Access real-time data and receive alerts remotely for effortless appliance management.
- Remote Control: The custom developed dashboard provides widgets like buttons, sliders etc. to control the connected devices from anywhere in the world using the dashboard.
- Energy Usage Reduction in Peak Usage Hours: With the help of data visualization, users can identify the peak usage hours.
Then the user can decide which are low priority devices that can be automatically turned off in the peak usage hours saving an enormous amount of energy worldwide.
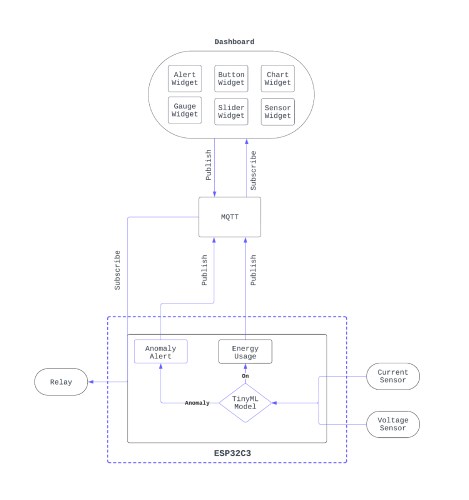
Data Flow within GridIQ
Hardware Components
ESP32-C3-DevKit boards
The ESP32-C3-DevKit is used as the microcontroller in this project. It is a development board based on the ESP32-C3, an advanced Wi-Fi and Bluetooth Low Energy (BLE) microcontroller by Espressif Systems. It provides a convenient platform for developers to prototype and experiment with the ESP32-C3's features, including Wi-Fi and BLE connectivity.
Here we are using two variants of the ESP32-C3-DevKit
Remaining all other sensors and actuators are the same for the devices, even the enclosure and power supply.
ACS712 Current Sensor
The ACS712 current sensor is used in this project to measure the current flowing in the circuit. The ACS712 utilizes the Hall effect to measure current. When a current flows through the conductor, a magnetic field is generated perpendicular to the current flow. The Hall sensor detects this magnetic field and produces an output voltage proportional to the current. The interesting fact is that it can measure both AC and DC currents.
It is available in different models, each designed to measure a specific range of current. Common versions include ACS712-5A, ACS712-20A, and ACS712-30A, where the number indicates the full-scale current rating.
This project utilizes the ACS712-5A module which can measure up to 5 Ampere current and has a sensitivity of 185mv/A. To measure smaller currents using a smaller range module gives more accurate results than using high range module.
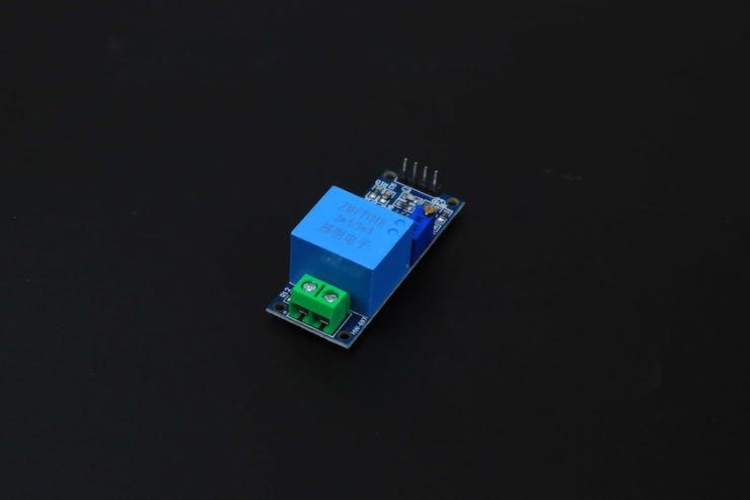
ZMPT101B Voltage Sensor Module
ZMPT101B Voltage Sensor is used for measuring the voltage from the AC line. This voltage sensor module uses a ZMPT101B voltage transformer with an output proportional to the input current. The input and output currents follow a 1:1 ratio. The output can be directly read with an ADC and the AC voltage can be calculated.
Relay Module
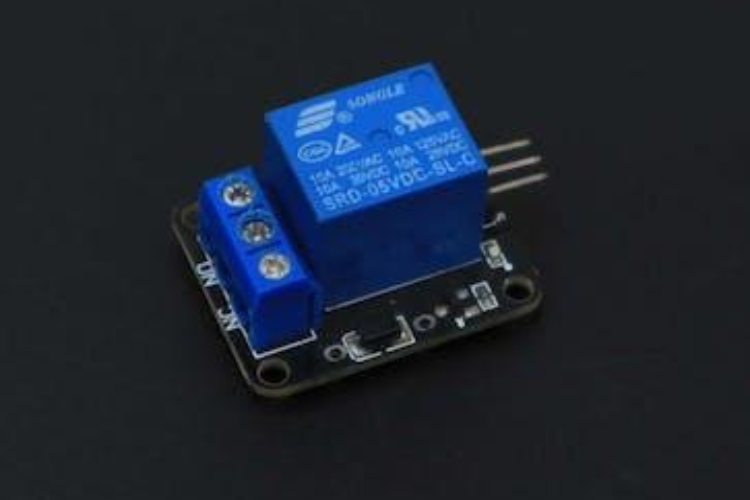
The SRD-05VDC-SL-C relay is used for controlling the devices from the dashboard. Operating on direct current, it features a single-pole, double-throw (SPDT) relay with a common terminal, normally open (NO) terminal, and normally closed (NC) terminal.
Power Supply

The power supply which we are using is the HLK-PM01 from Hi-Link. This AC-to-DC converter has a 5V output at a maximum current of 1A (total 5 Watts).
Schematics
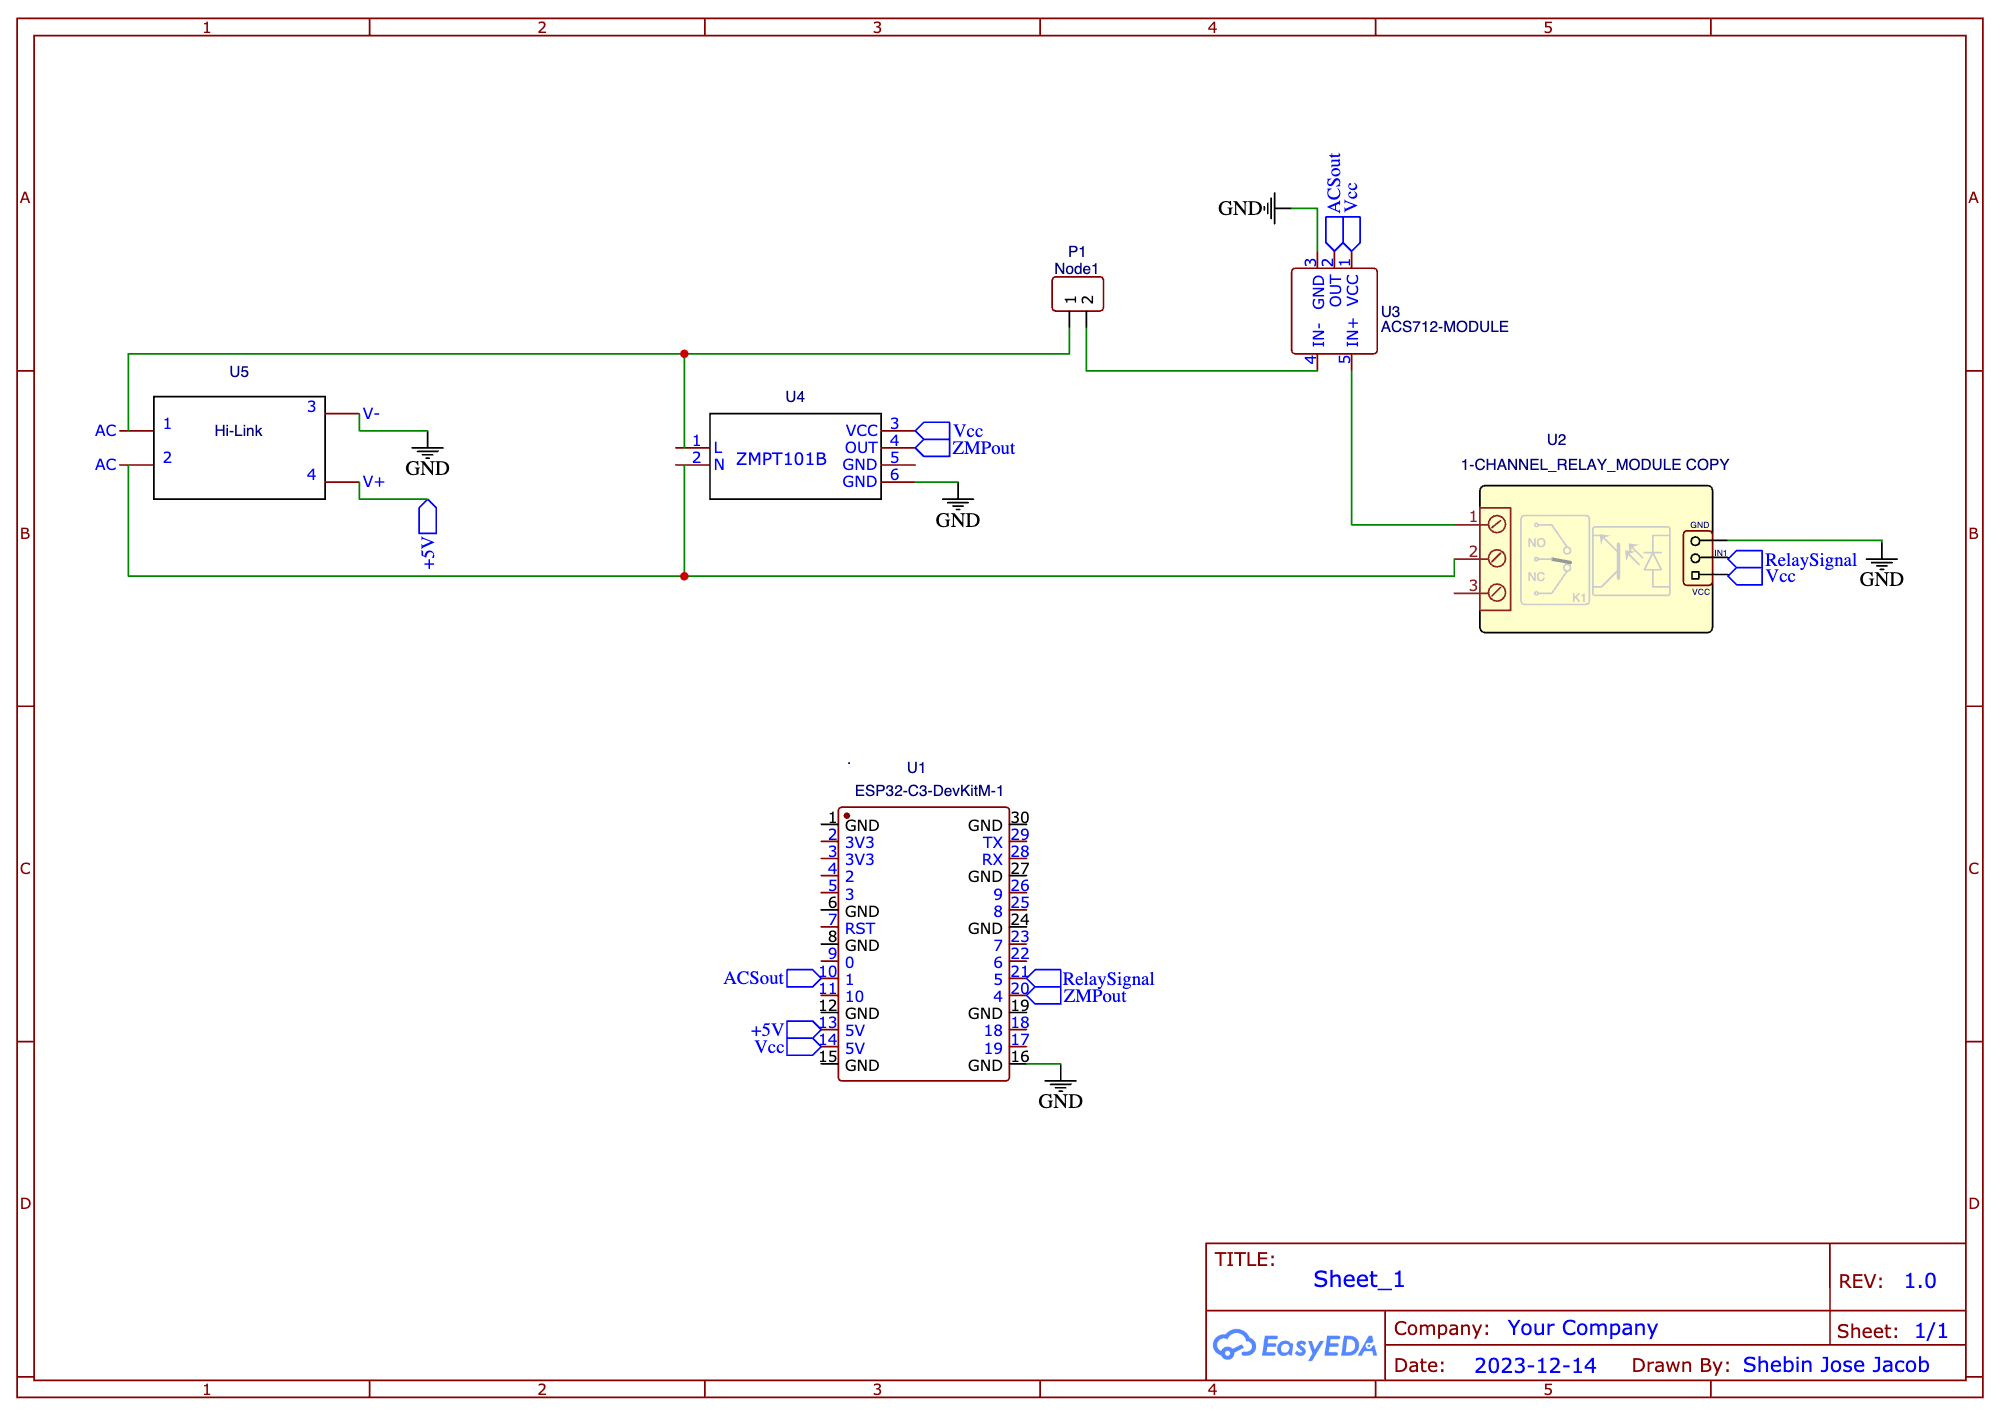
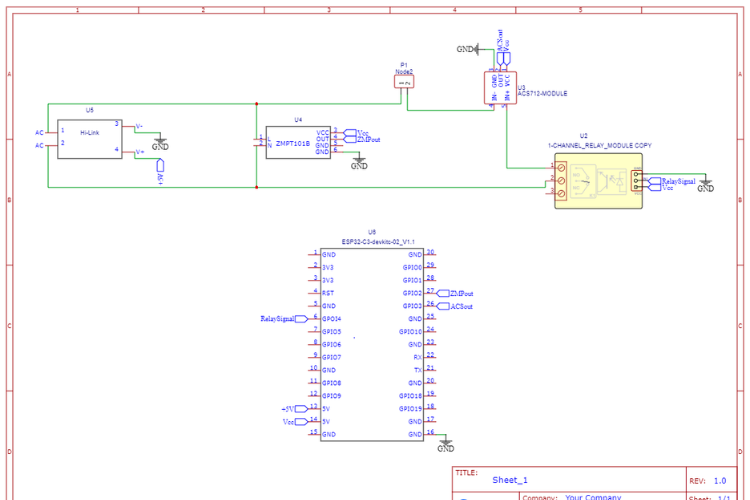
The following schematics can be used for reference. The schematic was designed in Easy EDA. You can find this below in the download section. Both the devices share the same schematics with some minor changes.
Enclosure
We have used this type of switch box for assembling the sensors and controller.

Device Assembly
Since this is a prototype, we did not opt for a dedicated PCB. Instead, we went with jumper cables to connect the sensors with the microcontroller and also used a tiny perf board for making the common ground and VCC connection.
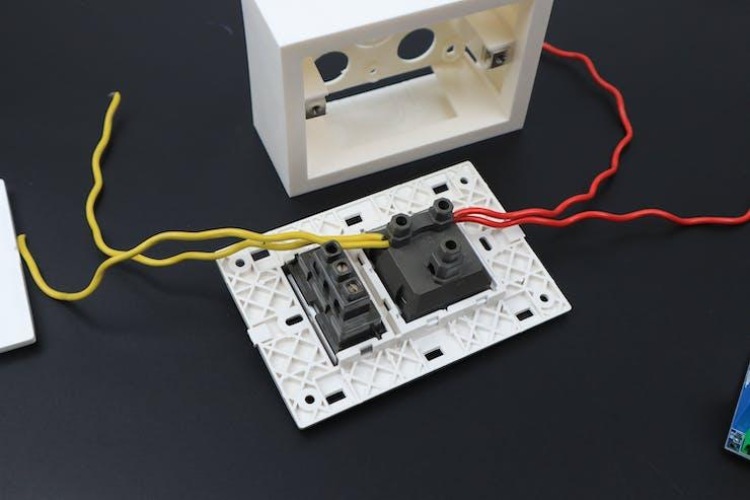
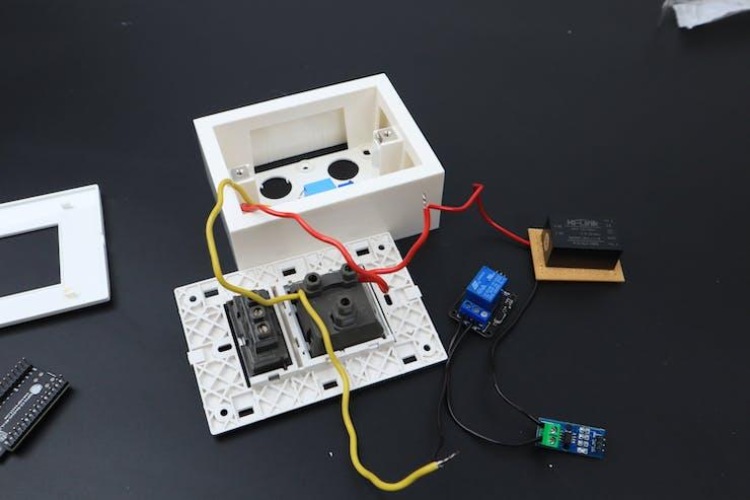
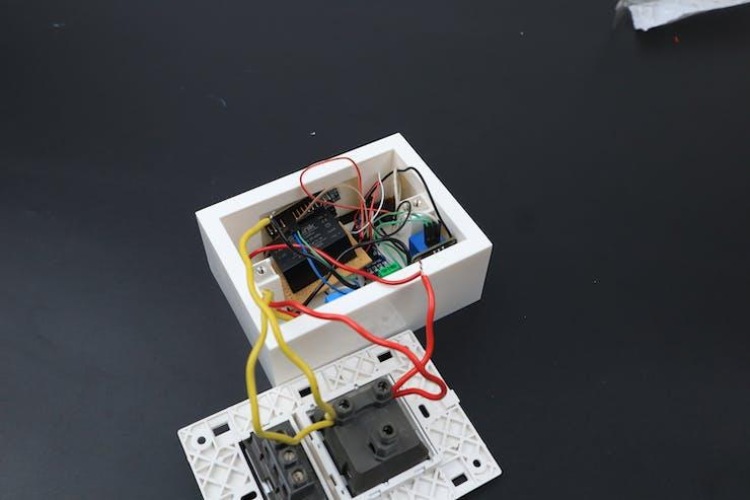
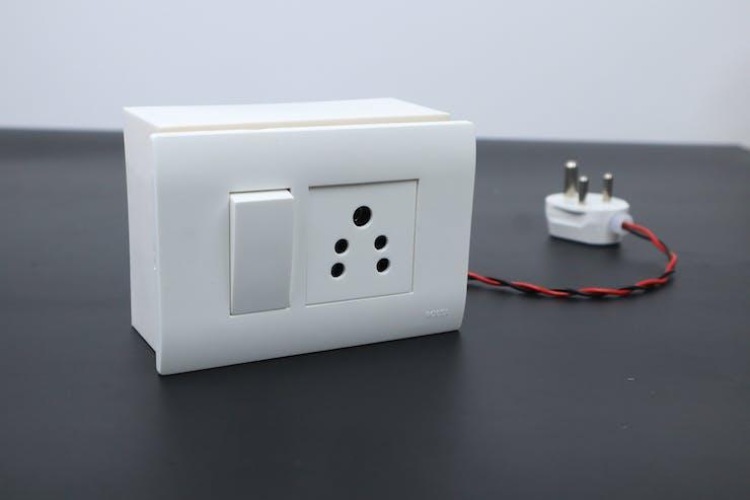
This is the first node and also, we made another node which is similar to this, but the only difference is the controller used. In the second node, we used the ESP32-C3-DevKitC.
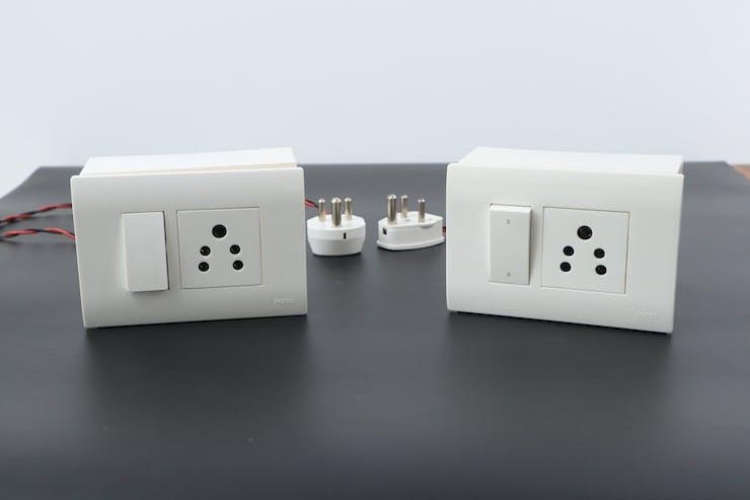
Any device can be easily plugged into this device, here we plugged the Light to the Node 1 and Fan to the Node 2.
Anomaly Detection with Embedded Machine Learning
GridIQ's embedded machine learning (ML) model elevates energy monitoring by analysing current and voltage waveforms. Utilising k-means anomaly detection, the model identifies deviations from established patterns of healthy device operation.
K-means anomaly detection is a method used to identify anomalies or outliers within a dataset by employing the K-means clustering algorithm. The K-means algorithm is typically known for its ability to partition data into K clusters based on similarities in features. However, when used for anomaly detection, its goal shifts to recognizing data points that significantly differ from the established clusters.
The process begins by initially partitioning the dataset into K clusters, where K represents the predetermined number of clusters. Data points are assigned to the nearest cluster centroid based on their similarity in feature space. Once clusters are formed, the algorithm calculates the distance between each data point and its respective cluster centroid.
Anomalies are identified based on their distance from the centroid. Data points that lie significantly farther away from their assigned centroid compared to the average distance within that cluster are flagged as potential anomalies or outliers. These outliers represent instances where the data deviates substantially from the typical behavior observed in that cluster.
This technique acts as a diagnostic tool, pinpointing potential malfunctioning devices based on their unique current and voltage signatures. Irregularities like unexpected current spikes or abnormal voltage dips become indicators of potential energy inefficiency. By leveraging this ML capability, GridIQ proactively identifies hidden energy drains, empowering users to take corrective action and optimize their energy consumption.
To use anomaly detection, we should train our embedded machine learning model first.
Developing a TinyML Model with Edge Impulse
With Edge Impulse, you can swiftly gather real-world sensor data, conduct machine learning model training in the cloud using this data, and subsequently implement the model onto your Edge device seamlessly with just a single function call.
The initial step in training a machine learning model is data collection, which holds paramount importance. High-quality, well-curated data directly influences the performance of the model, cleaner data results in better model performance.
1. Data Collection
We have current and voltage sensors connected to the ESP32 which measures current, and voltage used by the connected device. We are using 'edge-impulse-data-forwarder' to capture this data from the edge impulse dashboard.
We are collecting data of two operational states of a connected device ( Godox SL60) - Normal Working Mode and Off which seem to be distinguishable by the model.
Prerequisites:
- Edge Impulse Account, if you don't have one create it here.
- Edge Impulse CLI installed on your computer, if not installed follow this guide.
To collect data for your project, follow these steps:
- Upload DataCollection.ino to your ESP32 board that has current and voltage sensors connected.
- Plug in your ESP32 board to your computer.
- Open a terminal and type in edge-impulse-data-forwarder and connect your device to your dashboard
- Go to the Data Acquisition tab in Edge Impulse Studio and you'll see the connected device.
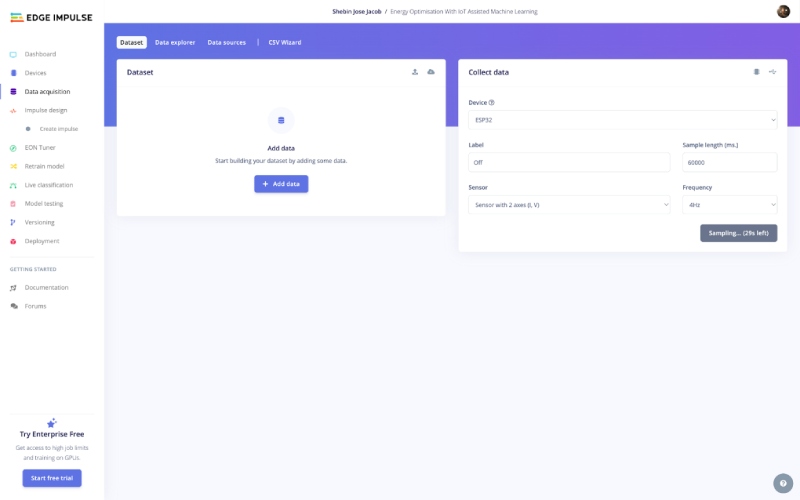
- Now start recording the data
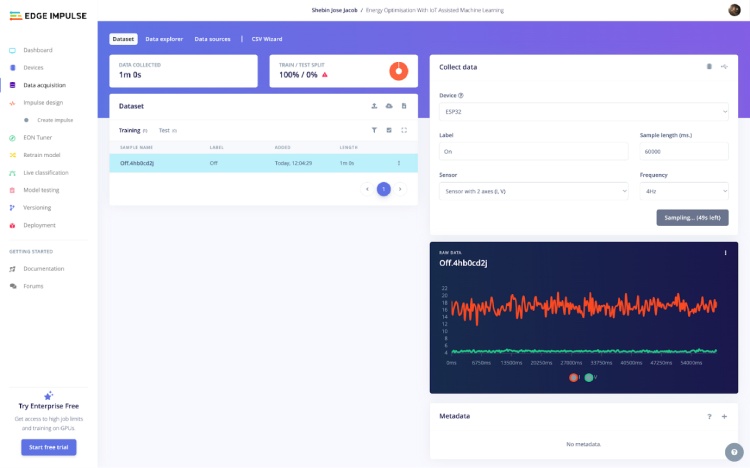
- After we have collected enough data for different classes, we can split them into samples of 6s length.
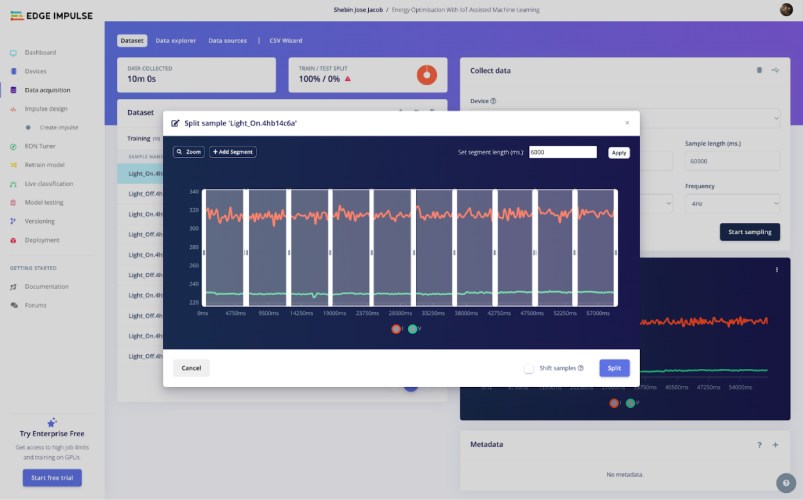
- Then we split the whole dataset into training and testing datasets. Now we have a clean dataset to start our model training.
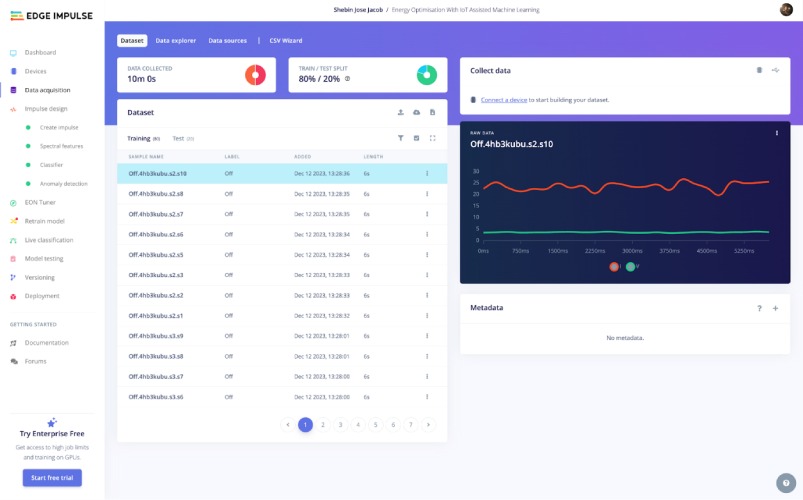
2. Impulse Design
An impulse represents a machine learning pipeline that begins with raw data, undergoes signal processing to extract pertinent features, and then utilizes a learning block to categorize incoming data.
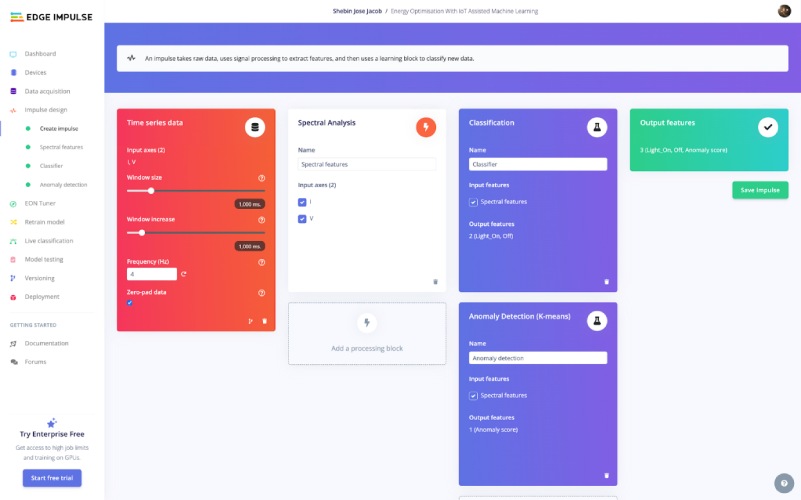
Here we are using the Time Series Data as the input block. We are using Spectral Analysis as the processing block. As we have to classify the operational state into different states, we are using Classification as the learning block. Also, we have an Anomaly Detection (K-means) to detect anomalies in the data. Now we have an impulse that takes voltage and current as input and categorizes them into one of two classes and detects if an anomaly occurs.
Now move to the Spectral Features tab. We can change the parameters like the scale axis, but we are keeping the default settings and continue to Generate features.
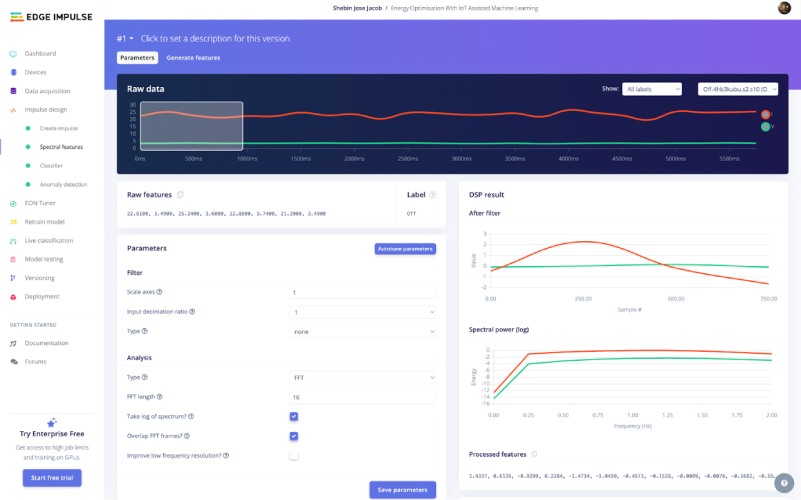
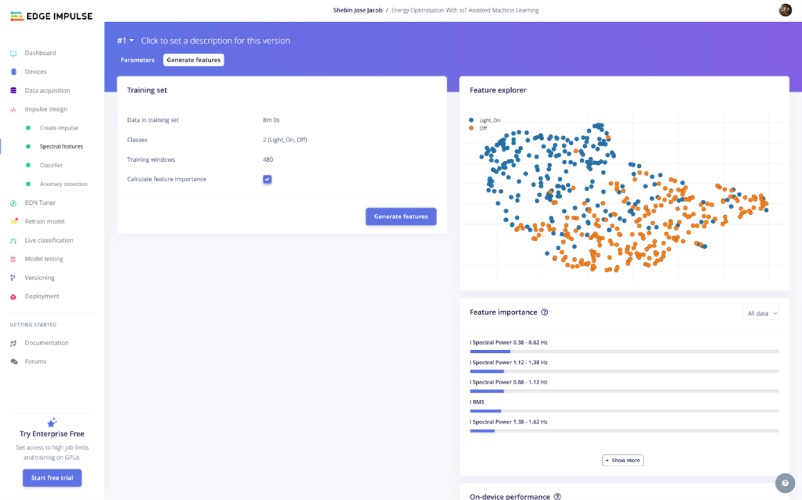
The features are generated, and we have a good dataset for model generation. So, let's proceed to train the model.
3. Model Training
Move on to the Classifier tab. Here we have 3 parameters to modify. Modify them and try training the model multiple times until satisfactory training accuracy is obtained. Here are our training settings.
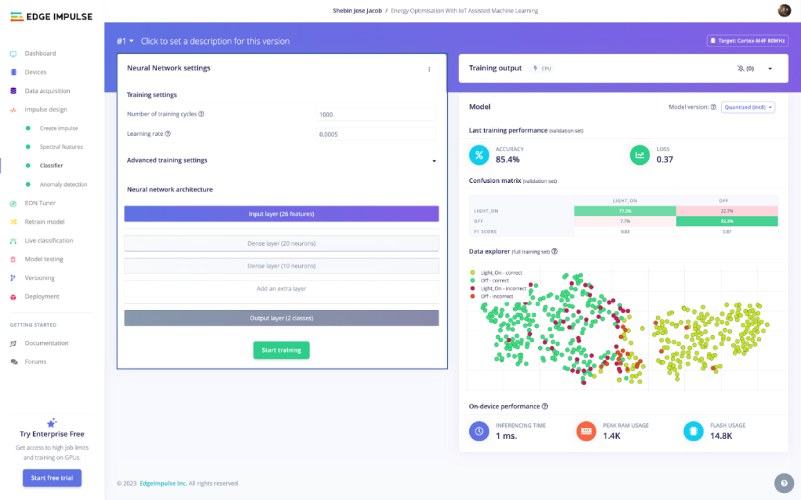
Now we have a well-functioning model. Let's test its performance with some previously unseen data. Navigate to Model Testing and Classify All. Here are the results.
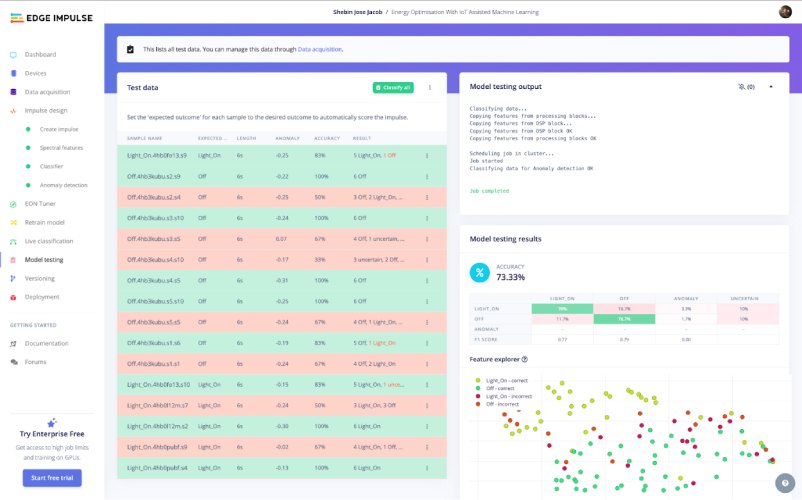
We have a good model with an accuracy of 73.33%, which is enough for our purposes.
4. Anomaly Detection
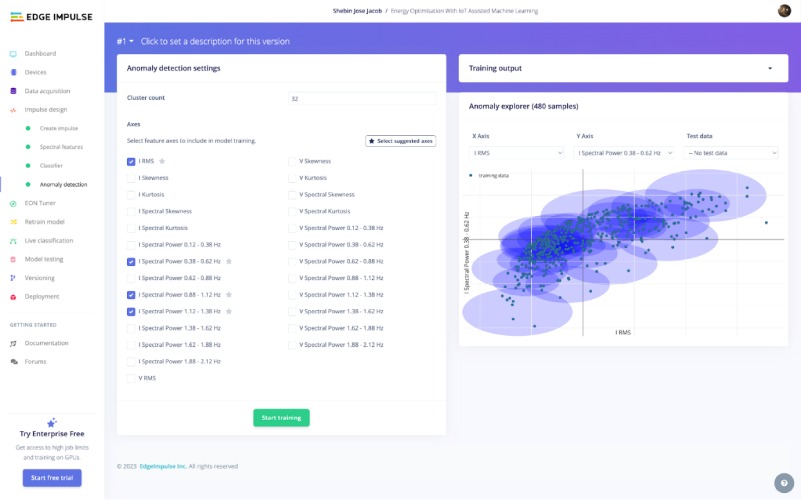
After the model is trained, move to the Anomaly Detection tab and there you'll see different anomaly detection settings. We proceeded with suggested axes and trained an anomaly detection model.
5. Deployment
From the Deployment tab, build an Arduino Library. You can enable optimisations with EON Compiler if you like, but it is optional.
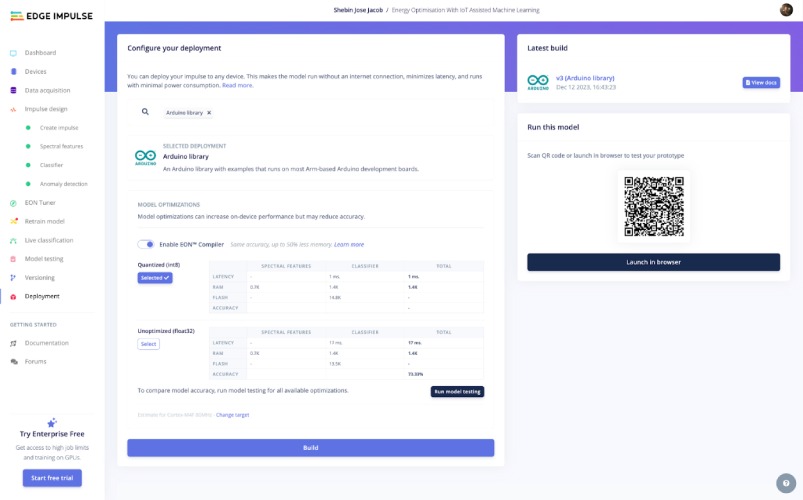
The build will output a .zip file containing the model and some examples. Add the library to the Arduino IDE using Sketch > Include Library > Add .ZIP library.
Now upload the code Deployment.ino to ESP32 and you're all done.
Custom Dashboard for Visualization and Control
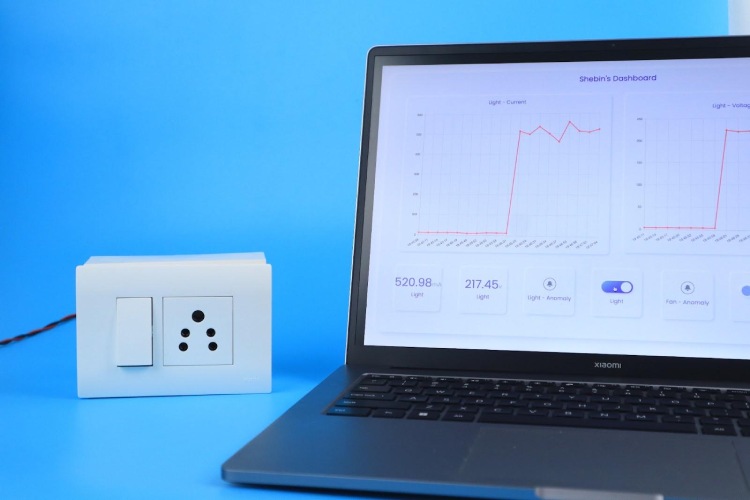
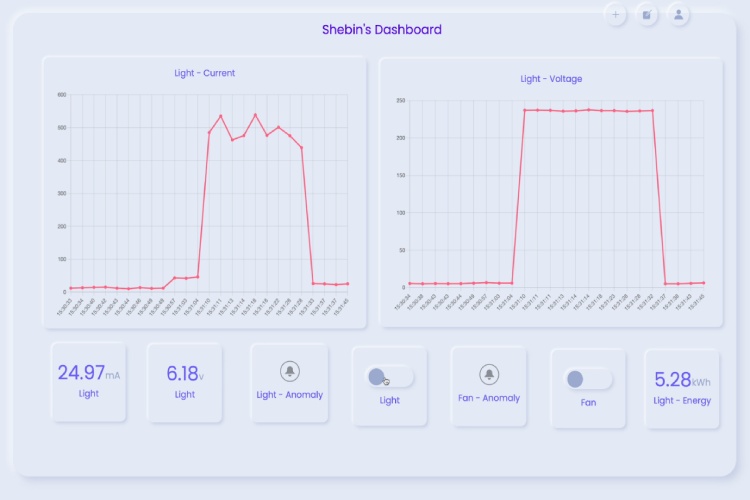
A custom dashboard is developed as a companion to GridIQ which serves as a visualization and control platform. The dashboard gives you the option to add different widgets that can be used for visualizing and controlling the connected nodes. The dashboard is developed using HTML, CSS and JS and uses MQTT to communicate with the node.
User can connect a GridIQ node to the dashboard by entering the unique KIT ID and unique NODE ID in the dashboard and can set those values within the ESP32 code.
Twilio for Instant Anomaly Alert
Twilio is a cloud communications platform that empowers developers to integrate voice, messaging, and text message capabilities into their applications using simple APIs. Known for its user-friendly tools and extensive documentation, Twilio enables businesses to enhance customer engagement through various communication channels, including SMS, voice calls, and more.
The Twilio Messaging API is a powerful tool that enables developers to incorporate text messaging capabilities into their applications and systems. It provides a straightforward interface to send and receive SMS and MMS messages globally, interacting with users on various devices and networks.
Setting up a Twilio account is pretty simple. If you have any doubts just refer to this video.
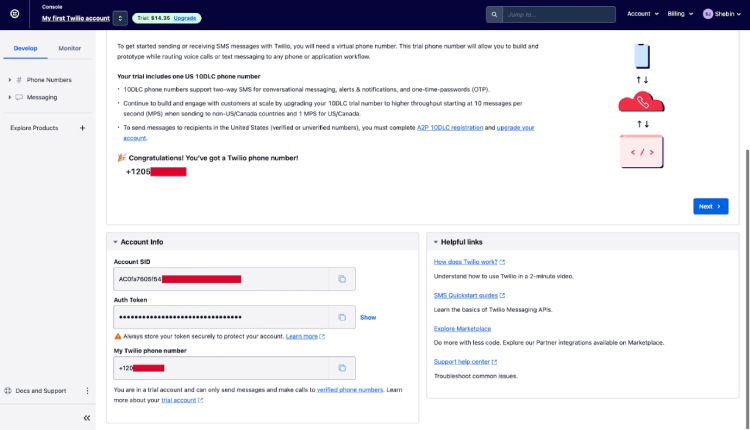
To send an SMS alert, gather the Account SID, Auth Token, From Phone Number, and To Phone Number. You can locate the first three in the Twilio dashboard, while the latter is the recipient's phone number for the alert. Once collected, insert these details into the ESP32 code. By doing so, you'll receive alerts whenever the machine learning model detects an anomaly.
Future Developments
- Replace invasive current and voltage sensors with accurate non-contact current and voltage sensors.
- Reduce the form factor of the node.
- Develop a dedicated PCB for the nodes.
- Add regression algorithms to predict future energy demands based on historical data.
- Develop a mobile application for the dashboard.
Conclusion
GridIQ stands as a testament to the potential of innovation in tackling the critical challenge of energy conservation. Its intelligent nodes and advanced machine learning offer a powerful tool for individuals and communities alike to take control of their energy usage, optimise their resource consumption, and ultimately, build a more sustainable future. GridIQ's success paves the way for further advancements in smart energy management, reminding us that the power to create change often lies in the smallest, most intelligent solutions. As we move forward, let GridIQ's success inspire us to continue pioneering innovative solutions that bridge the gap between technological advancement and environmental responsibility. Let us embrace the potential of GridIQ and similar technologies to ensure a future where energy efficiency is not just a goal, but a way of life, for ourselves and for generations to come.
Assets for Replication
Within this GitHub repository, you'll discover all the resources necessary to replicate this project. If you've any doubt's feel free to ask doubts.
#include <ACS712.h>
#include <ZMPT101B.h>

#define SENSITIVITY 500.0f

ZMPT101B voltageSensor(4, 50.0);
ACS712  ACS(1,3.3, 4095, 185);

void setup()
{
  Serial.begin(115200);
  while (!Serial);

  voltageSensor.setSensitivity(SENSITIVITY);
  ACS.autoMidPoint();
  //Serial.print("MidPoint: ");
  //Serial.println(ACS.getMidPoint());
  //Serial.print("Noise mV: ");
  //Serial.println(ACS.getNoisemV());
}

void loop() {
    unsigned long currentTime = millis();
    ACS.suppressNoise(true);
    float average = 0;
    for (int i = 0; i < 10; i++)
    {
      average += ACS.mA_AC();
    }
    float mA = average /10.0;
    float volt = voltageSensor.getRmsVoltage();

    //Serial.print("Current = ");
    Serial.print(mA);
    Serial.print(",");
    //Serial.print("Voltage =");
    Serial.println(volt);
}