In one of our recent articles, we shared solutions to some of the errors most beginners will encounter while working with the Arduino. Most of those errors, as simple as they look, could cost a beginner, several debug hours trying to fix them. So as a follow-up, today, I will be sharing solutions to the top 10 issues a beginner could encounter while working with the Raspberry Pi.
From experience, each of the raspberry PI's model (and operating system) has their own peculiar issues and fixes, so to keep things fairly regular for this article, I will assume you are using a Raspberry Pi 3 and running the latest version of the Raspbian stretch OS.
All set? Let’s dive in!
1. Boot Issues
This could be as a result of quite a number of factors. It is usually indicated by the Red LED (power LED) being “ON” while the green (activity LED) is either “OFF” or permanently “on”.
Solution:
The green light on the Raspberry Pi represents software activity, so when it is blinking at intervals, it means the Pi is working. Thus, when it’s off or not blinking, the first place you should check is where the PI’s software is housed; the SD card slot. Ensure that the SD card is correctly inserted. If things do not change, check the SD card to be sure it was properly flashed with the OS and that the files on it are not corrupted.
In situations like this, I usually just format the SD card and flash it again with the OS. If you have data you will like to keep on the SD card, insert it into a PC and copy it out before formatting.
2. NOOBS OS Stuck on splash screen
This is one of the main reasons why I am not a big fan of the Raspberry pi NOOBS software. When this error occurs, the Raspberry Pi's boot process gets stuck on the splash screen.
Solution:
This can be solved by formatting the SD card and ensuring the correct noob files are copied to it. If this doesn’t work, try another SD card or the same SD card on another raspberry pi. If the problem persists after doing all this, it might save you more time to install Raspbian stretch or any other distro.
3. Unable to Access the Pi over SSH
This is more of a security feature built into the Raspberry Pi stretch OS rather than an error. Communication over SSH is disabled for a raspberry pi running a fresh install of the raspbian stretch.
Solution:
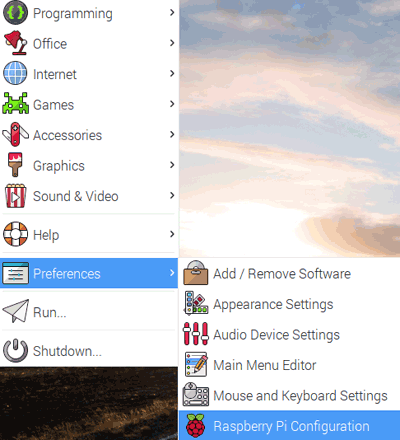
To solve this problem, you need to activate communication over SSH under the raspberry pi’s settings, with the PI connected to a monitor, go to preferences, and then select Raspberry pi configuration.
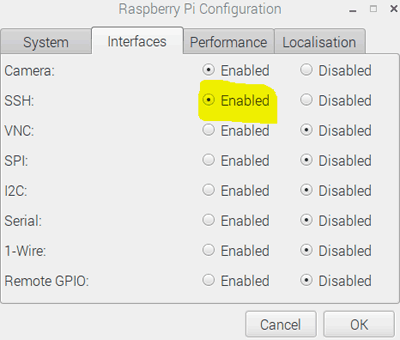
When the configuration window opens, select the radio button labeled, Enabled in front of SSH.
If you are running the Pi in headless mode, you will need to remove the SD card, insert it into a PC then create an empty file named SSH, copy the file to the SD card, and Insert the SD card back into the Raspberry Pi. You should now be able to access the PI over SSH.
4. Board goes off intermittently
This involves the Raspberry Pi rebooting itself at random intervals and sometimes when the board is on, the power LED will be off.
Solution:
This is essentially a power issue. The Raspberry Pi 3 for instance, requires a 5V, 2.5A power supply to function properly so anything short of that is likely to affect its performance. Although I have worked with 5V 1.5A on the PI but performance depends on the task to which the Pi is set. Essentially when this happens, check to ensure you are giving the Pi enough juice to stay awesome.
5. USB not Working
As the tag implies, this error describes scenarios where USB devices connected to the raspberry pi, are either not recognized by the Pi or do not work properly.
Solution:
A bunch of things could be wrong here.
1. The Raspberry Pi is probably not getting enough power and it’s thus unable to power the USB device. So ensure your Pi is properly powered.
2. The USB device could actually be faulty. Test it with your PC or any other computer to be sure it is working correctly.
3. Connect your device to the Pi before turning it on. While this shouldn’t probably be a problem, for USB devices like your Keyboard and Mouse, the Pi might need to do some initialization especially if you are connecting it to the Pi for the first time. Weird solution but works at times.
4. There are times when the device connects to your Pi quite well but its just not available for the particular operation you are trying to use it for. To confirm if this is the case, from the terminal, run the command;
lsusb –t
This should give you a list of USB devices connected to your pi as shown in the image below.

5. Driver Issues. Ensure the USB device is compatible with the Linux based operating system running on the Raspberry Pi. Elinux.org has a list of USB devices that are compatible with the Raspberry Pi here. The list is quite well ordered and it should help you determine if your device is compatible or not.
6. Update your pi. It is important before starting any new project on the raspberry pi to run an update or upgrade. The reason for this is to ensure you have compatible and latest software running on your pi. This at times could be a reason for hardware not responding to specific commands as it should.
5. Keyboard Character Display Errors
When the key displayed on the screen is different from the one pressed on the keyboard especially the # key. This error, most times occurs as a result of the default UK keyboard configuration of the raspbian and NOOBS software.
Solution:
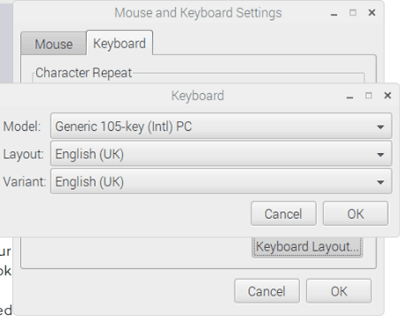
To fix this, you will need to change the configuration to that of your own keyboard or language. This can be done by going to the raspberry pi’s config menu, under the Internationalization menu, select the keyboard setup menu and scroll down to select the keyboard layout that matches the country of origin/language of your keyboard.
If you are working with a display, go to preferences and select the mouse and keyboard settings.
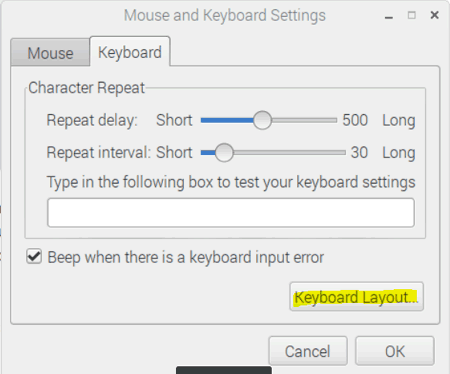
Select a keyboard layout and on the new window select your keyboard layout.
6. Raspberry Pi Not Working with HDMI Based Display
So you could connect with your Pi via ssh but you can’t just seem to get it to work with a display over HDMI? There are two things to do;
- Do a check on your HDMI cable
- Connect the display to the Pi and select the correct mode (HDMI or VGA) on the monitor before powering your Raspberry Pi. It is important that your screen is turned on before powering the Pi.
7. Raspberry Pi Camera not working
I have discovered most people expect the Raspberry Pi camera to work straight out of the box and I’ve so often had to recommend this simple solution that it probably deserves a place on this list.
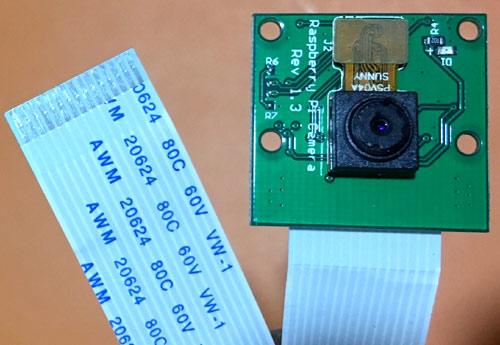
To be able to use the pi camera, it has to be enabled on the pi. This should, however, be done after the PI has been updated and upgraded.
To do this, start by running the update and upgrade commands;
Sudo apt-get update
Sudo apt-get upgrade
Followed by;
Sudo raspi-config
This will be open the raspberry pi configuration window shown below.
Scroll down, select the camera and select Enable.
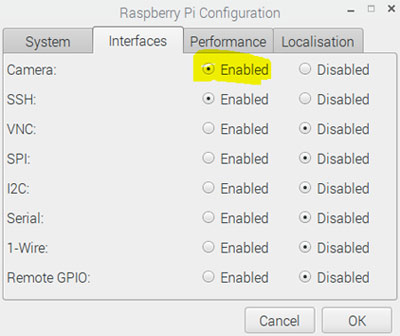
If you are working with a display, go to Preferences then select Raspberry Pi Configuration.

When the configuration window opens, check the Enabled radio button in front of the camera.
With this done, reboot the Pi. You should now be able to get your feeds and pictures. If you are still unable to access the camera, try with a different connector strip and camera if that does not work.
Learn more about how to use Pi camera with Raspberry Pi and USB camera with Raspberry pi.
8. Raspberry Pi Camera Blank or Black Capture
This describes a scenario where the Raspberry Pi would seem to have taken a picture but the image will appear blacked out.
Solution:
As mentioned above, quite a number of errors you will encounter on the raspberry pi will be due to the software update and this error is not different. When it occurs, the first fix you should try is to update and upgrade your Raspberry Pi to grab the latest software and fixes. Reboot after upgrading to effect changes.
9. Ethernet On WiFi Off
By default, when an Ethernet cable is connected to the Raspberry Pi, the Wi-Fi connectivity is disabled. This was implemented probably as a security feature for the Pi to disable routing between the Wi-Fi and the Ethernet port. This action is being managed by a config file named ifplugd which has to be disabled if you want to use the Wi-Fi and Ethernet connections at the same time.
To do this, run;
sudo update-rc networking disable
Or
sudo apt-get purge ifplugd
You should now be able to use both network options at the same time but do not forget the security loophole this could create as the Pi will behave like a router in this mode.
10. Trying to Change Password Hangs the Pi
This refers to a scenario where an attempt to change the password of the raspberry pi either hangs the pi or is rejected (i.e. new password not registered).
Solution
This is one of the signs that indicate the Raspberry Pi is not getting enough juice from the connected power supply or there is some fluctuation in the output of the power supply. Fixing this is as easy as changing the power supply to your Raspberry Pi or plugging it to a different port on your PC.
This is certainly not an exhaustive list of errors one could encounter while working with the Raspberry Pi, not sure we could fit that into a single article but this might give you a head start on the particular error shared and even similar errors. Also, check our Raspberry Pi Projects section to get started with cool applications using Raspberry Pi.
Once faced an error that took days to resolve? Feel free to share them via the comment section.
Till next time.


