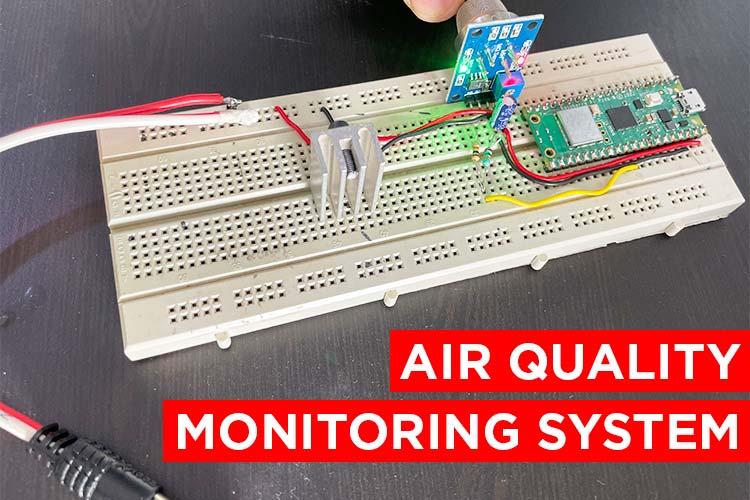
The efficient air quality monitoring system using the Internet of Things (IoT) to address the various issues related to environmental pollution and health problems created due to low-quality Air. The purpose is to provide real-time and localized air quality data or AQI levels to individuals so that anyone can secure themselves. The project enables web-based server technology where we can easily track and monitor data on any device using a local server network. Wireless web-based tracking using Air quality sensor MQ135 creates easy access to track the quality of Air nearby without any internet.
This attractive working and efficiency make this project idea to be implemented in various sectors to save lives at many harmful places like mining areas. It can also be used in industries of glass, cement, and more. The whole idea can be easily implemented at low prices but gets expensive returns from it.
Components Required
- Raspberry Pi Pico W
- MQ135 Sensor
- LM317T voltage Regulator
- 2K small pot
- 10k and 20k resistance
- 1µF Capacitor
- 12v DC female jack
- Heat Sink
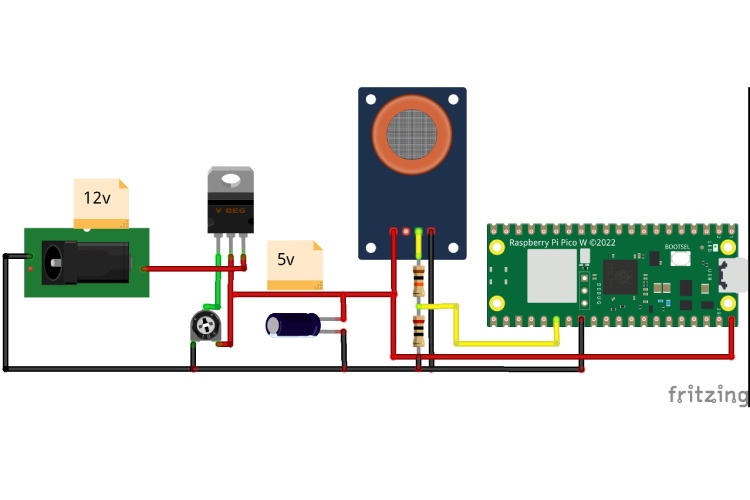
Circuit Diagram of Air Quality Monitoring System
LM317 Connections: LM317 has a total of 3 terminals named – Adjust, Input, and Output.
- The Adjust pin is connected to the trim pot variable terminal while the 12v is directly fed to the input terminal of LM317. The Output terminal is connected to one of the fixed ends of the trimpot.
The other fixed end of the trimpot is grounded. Hence by adjusting the trimpot resistance, you will observe the variable output voltage. We are fixed pot to get an output of 5v.
MQ-135 & Pico W connection: The MQ-135 sensor has 4 pins named – AOUT, DOUT, VCC(5v), and GND.
- The 5v is directly fed to the Sensor and microcontroller board through VCC and VBUS terminals respectively to power them. The ground is connected to both GND terminals.
- The Pico GPIO pins are 3.3v capable, therefore a voltage divider is used to lower down the Sensor’s Analog out pin whose peak is 5v. Two resistors of 10k and 20k sets in such a way that the output is approx. 3.3v.
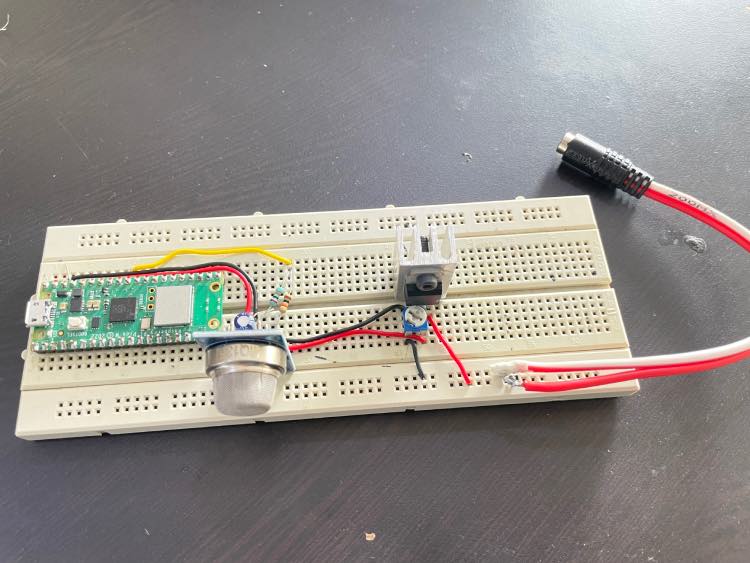
Note: Attached a heatsink with thermal paste to LM317 IC because lowering the voltage can cause heat dissipation. You can power the whole circuit with any 12v adapter easily.
Programming the IOT Air Quality Monitoring
The code creates a web server to display the data on the web page which can be accessed using IP Address. The Pico board itself has inbuilt WIFI capabilities that connect to the nearby WIFI address.
Installing Pico Board in Arduino IDE:
- Add the below link to the Additional Board Manager URL by going to File > Preferences
https://github.com/earlephilhower/arduino-pico/releases/download/global/package_rp2040_index.json
- Search “Pico” inside Board Manager and install the package display with the board name.
Inside the code, we included all necessary libraries like WiFi.h which is capable of connecting the board to an existing WIFI network whose security credentials are defined inside the code (ssid, password). The sensor analog pin is defined and connected to A0 of the Pico board.
#include <WiFi.h>
const char* ssid = "Semicon Media 2.4";      // Updated Wi-Fi network SSID
const char* password = "cdfiP29to665";       // Updated Wi-Fi network password
const int mqPin = A0;   // Analog pin for MQ-4 sensor
WiFiServer server(80);
Inside setup, we initialize the serial communication, define the pinmode, and then initiate the WIFI communication to connect the particular network. After a successful connection, the IP Address will display on the Serial monitor, through which you can access the webpage.
void setup() {
  Serial.begin(115200);
  pinMode(mqPin, INPUT);               // Configure D8 pin as a digital input pin
  WiFi.begin(ssid, password);
  while (WiFi.status() != WL_CONNECTED)
  { delay(1000);
    Serial.println("Connecting to WiFi...");
  }
  Serial.println("Connected to WiFi");
  Serial.println(WiFi.localIP());
  server.begin();
  delay(5000);
}
Inside the loop, the code starts by reading the data from the sensor which then also keeps displaying on the serial monitor. Further, the code creates a web server to handle the web client’s request. The HTML code sends the data to display on the web page. We have also used some CSS to style our code. Also, the heading text you can modify to display in another style.
void loop() {
    int sensorValue = analogRead(mqPin);
    Serial.print("Sensor Value: ");
    Serial.println(sensorValue);
    delay(200);
    WiFiClient client = server.available();
    if (client) {
      Serial.println("New client connected");
      String response = "HTTP/1.1 200 OK\r\nContent-Type: text/html\r\n\r\n";
      response += "<!DOCTYPE html><html><body>";
      response += "<head><meta name=\"viewport\" content=\"width=device-width, initial-scale=1.0, user-scalable=no\">\n";
      response += "<style>html { font-family: Helvetica; display: inline-block; margin: 0px auto; text-align: center;}\n";
      response += "body{margin-top: 50px;} h1 {color: #444444;margin: 50px auto 30px;}\n";
      response += "p {font-size: 24px;color: #444444;margin-bottom: 10px;}\n";
      response += "</style>\n";
      response += "</head>\n";
      response += "<body>\n";
      response += "<h1> IoT Air Quality Meter</h1>";
      response += "<p>AQI Level: <span id=\"sensorValue\"></span>" + String(sensorValue)+ "</p>";
      response += "</body></html>";
      client.print(response);
      delay(10);
      client.stop();
      Serial.println("Client disconnected");
  }
}
Working of the IOT Air quality monitoring System
When you successfully upload the code, you will see an IP Address on the Serial Monitor. Copy the IP and search on the browser on any other device but the device must be connected to the same network.
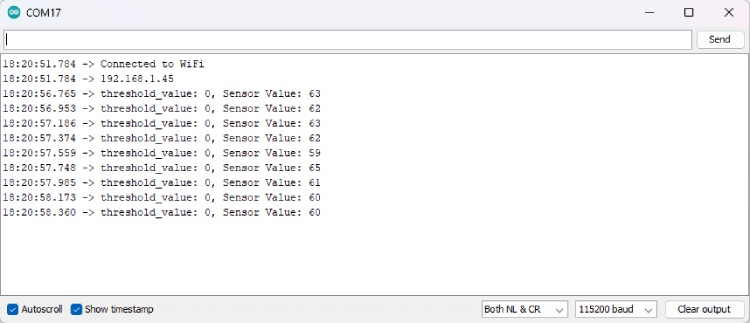
Note: You will need to refresh the web page every time to get the updated data.
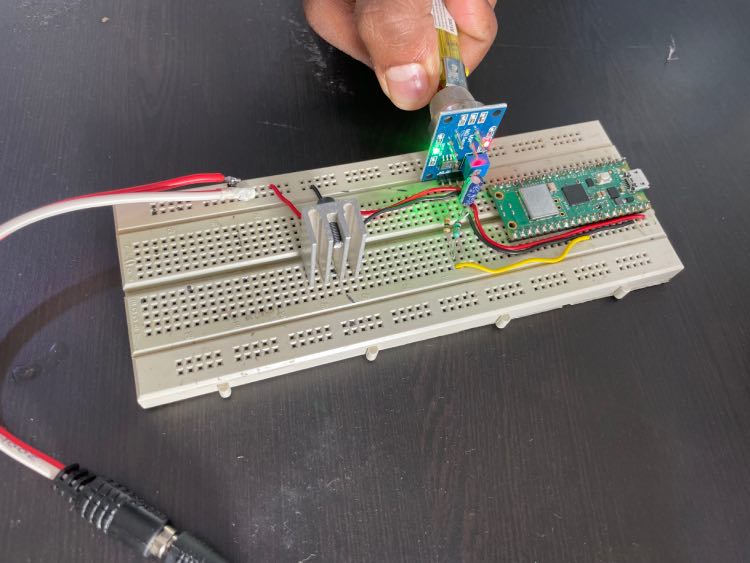
The below image will give you a glimpse of the working of the project. We can see that the project is working quite fine and the data displaying over there.
Complete Code
#include <WiFi.h>
const char* ssid = "Semicon Media 2.4";      // Updated Wi-Fi network SSID
const char* password = "cdfiP29to665";       // Updated Wi-Fi network password
const int mqPin = A0;   // Analog pin for MQ-4 sensor
WiFiServer server(80);
void setup() {
  Serial.begin(115200);
  pinMode(mqPin, INPUT);
  WiFi.begin(ssid, password);
  while (WiFi.status() != WL_CONNECTED)
  { delay(1000);
    Serial.println("Connecting to WiFi...");
  }
  Serial.println("Connected to WiFi");
  Serial.println(WiFi.localIP());
  server.begin();
  delay(5000);
}
void loop() {
    int sensorValue = analogRead(mqPin);
    Serial.print("Sensor Value: ");
    Serial.println(sensorValue);
    delay(200);
    WiFiClient client = server.available();
    if (client) {
      Serial.println("New client connected");
      String response = "HTTP/1.1 200 OK\r\nContent-Type: text/html\r\n\r\n";
      response += "<!DOCTYPE html><html><body>";
      response += "<head><meta name=\"viewport\" content=\"width=device-width, initial-scale=1.0, user-scalable=no\">\n";
      response += "<style>html { font-family: Helvetica; display: inline-block; margin: 0px auto; text-align: center;}\n";
      response += "body{margin-top: 50px;} h1 {color: #444444;margin: 50px auto 30px;}\n";
      response += "p {font-size: 24px;color: #444444;margin-bottom: 10px;}\n";
      response += "</style>\n";
      response += "</head>\n";
      response += "<body>\n";
      response += "<h1> IoT Air Quality Meter</h1>";
      response += "<p>AQI Level: <span id=\"sensorValue\"></span>" + String(sensorValue)+ "</p>";
      response += "</body></html>";
      client.print(response);
      delay(10);
      client.stop();
      Serial.println("Client disconnected");
      }
      }
We hope you enjoyed the project and found it useful. If you have any questions, please feel free to leave them in the comment section below.
#include <WiFi.h>
const char* ssid = "Semicon Media 2.4"; // Updated Wi-Fi network SSID
const char* password = "cdfiP29to665"; // Updated Wi-Fi network password
const int mqPin = A0; // Analog pin for MQ-4 sensor
WiFiServer server(80);
void setup() {
Serial.begin(115200);
pinMode(mqPin, INPUT); // Configure D8 pin as a digital input pin
WiFi.begin(ssid, password);
while (WiFi.status() != WL_CONNECTED)
{ delay(1000);
Serial.println("Connecting to WiFi...");
}
Serial.println("Connected to WiFi");
Serial.println(WiFi.localIP());
server.begin();
delay(5000);
}
void loop() {
int sensorValue = analogRead(mqPin);
Serial.print("Sensor Value: ");
Serial.println(sensorValue);
delay(200);
WiFiClient client = server.available();
if (client) {
Serial.println("New client connected");
String response = "HTTP/1.1 200 OK\r\nContent-Type: text/html\r\n\r\n";
response += "<!DOCTYPE html><html><body>";
response += "<head><meta name=\"viewport\" content=\"width=device-width, initial-scale=1.0, user-scalable=no\">\n";
response += "<style>html { font-family: Helvetica; display: inline-block; margin: 0px auto; text-align: center;}\n";
response += "body{margin-top: 50px;} h1 {color: #444444;margin: 50px auto 30px;}\n";
response += "p {font-size: 24px;color: #444444;margin-bottom: 10px;}\n";
response += "</style>\n";
response += "</head>\n";
response += "<body>\n";
response += "<h1> IoT Air Quality Meter</h1>";
response += "<p>AQI Level: <span id=\"sensorValue\"></span>" + String(sensorValue)+ "</p>";
response += "</body></html>

