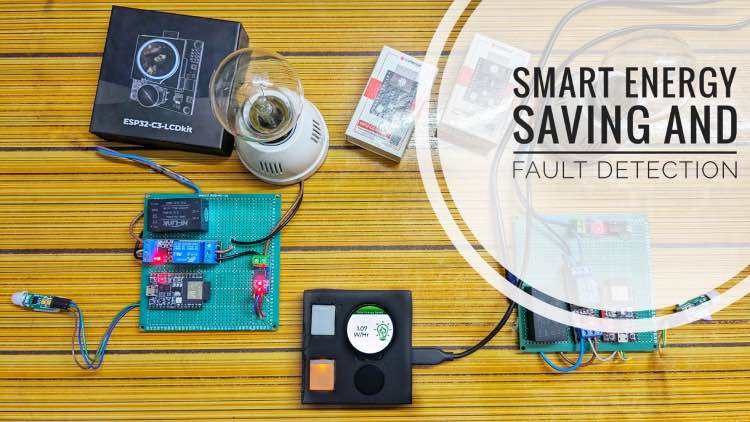
In an era defined by the technological advancements and a growing awareness of environmental sustainability, the need for innovative solutions to address our energy consumption becomes increasingly apparent. Introducing the "Smart Energy Saving" – a groundbreaking initiative designed to revolutionize the way we manage and utilize energy resources.
As we stand at the intersection of smart technologies and environmental responsibility, this project aims to redefine the traditional approach to energy consumption by harnessing the power of cutting-edge innovations. The Smart Energy Saving Project envisions a future where energy efficiency is seamlessly integrated into our daily lives, creating a sustainable and eco-friendly environment.
In this project, we’ll be build a intelligent wireless energy-saving system that has the capability to deactivate appliances in the absence of human. Additionally, users can track the health of their devices and monitor energy savings by assessing the current consumption of each respective appliance.
Components Used:
- ESP32-C3 Devkit - 2
- ESP32-C3 LCDKit - 1
- Capacitve touch buttons - 2
- 5V relay module - 2
- Hi Link AC-DC 5V converter - 2
- PIR Module - 2
- ACS712 5Amp - 2
- 100 W Bulb and bulb holder
ESP32-C3 Devkits are purchased from Digikey
Connection Diagram:
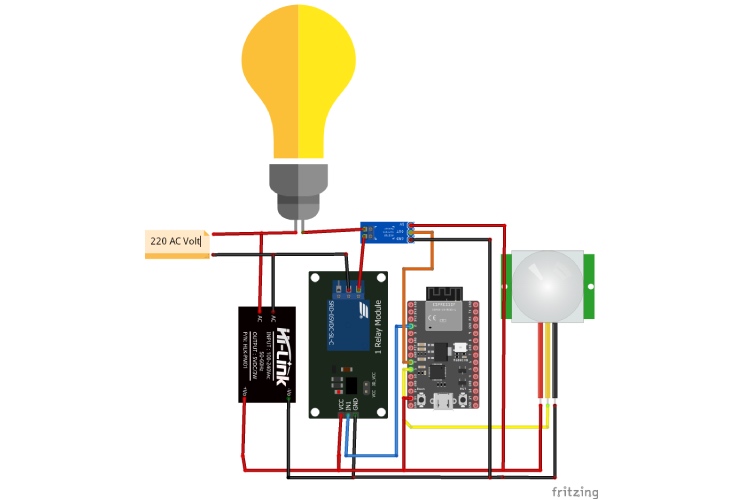
There are 3 circuits that are used in the project:
1. Slave device to connect a load x2
2. Master device to control and display energy savings.
2 slave devices which will be connected with any appliance through the relay, in our case a bulb will be acting as a load. Both slave devices will be identical. Connection diagram for slave devices is shown below:
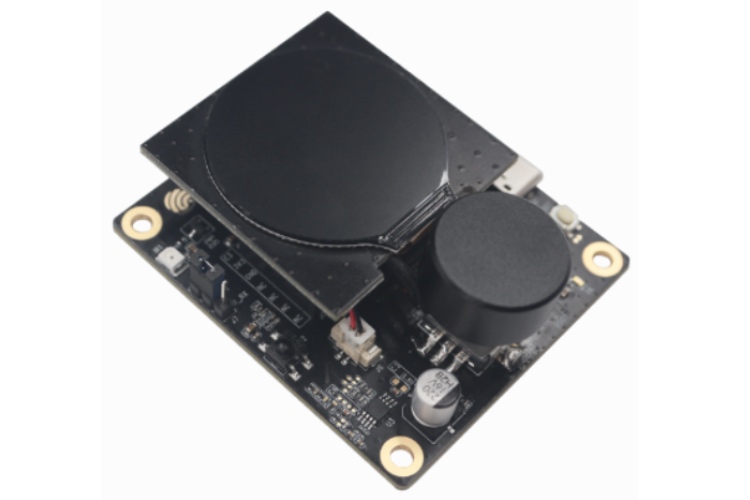
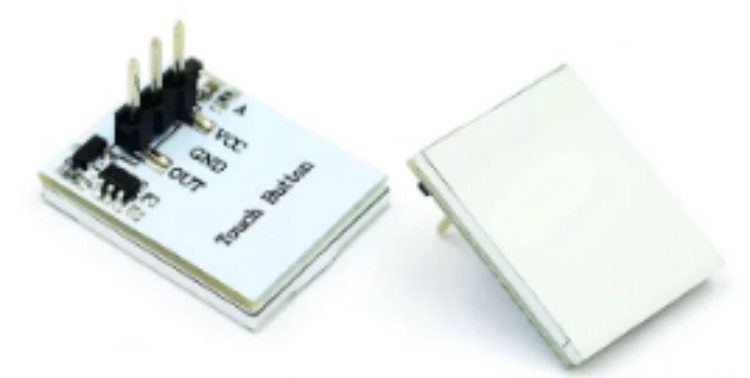
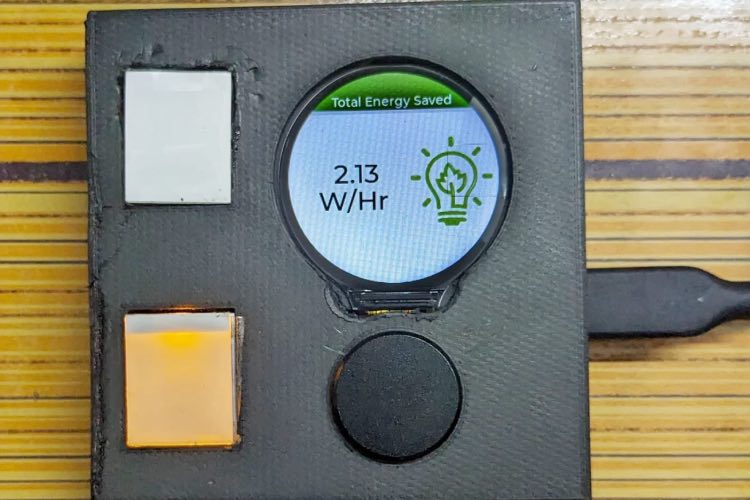
For the master device, we have used ESP32-C3 lcdkit and 2 capacitive touch buttons which are connected on GPIO 8 and GPIO 4. This lcdkit has RGB led, IR receiver and transceiver, speaker which can be explored further. You can power the master circuit directly via USB.
Working:
Before heading to the main working of the project, first let’s take a look on the wireless communication part.
As mentioned previously, we have 3 systems to integrate with each other wirelessly. This wireless communication will happen using ESP-NOW protocol.
ESP-NOW is a communication protocol developed by Espressif Systems, the company behind the ESP8266 and ESP32 series of Wi-Fi-enabled microcontrollers. ESP-NOW highlight its focus on providing a lightweight and fast wireless communication protocol between ESP8266 and ESP32 devices.
Key Features of ESP-NOW:
- Peer-to-Peer Communication: ESP-NOW allows for direct communication between ESP8266 and ESP32 devices without the need for a traditional Wi-Fi network or the complexities of setting up an access point.
- Low Latency: The protocol is designed for low-latency communication, making it suitable for applications that require quick and efficient data transfer.
- Efficient Data Transmission: ESP-NOW operates in a simple and efficient manner, making it well-suited for scenarios where a small amount of data needs to be transmitted quickly.
- Native Mode: ESP-NOW can operate in "native" mode, allowing ESP8266 and ESP32 devices to communicate with each other using their MAC addresses without the need for IP addresses.
- Group Communication: It supports both unicast and multicast communication, enabling communication between two devices or broadcasting messages to multiple devices.
- Minimal Power Consumption: ESP-NOW is designed to be energy-efficient, making it suitable for battery-powered devices.
Applications of ESP-NOW include scenarios where direct, peer-to-peer communication between ESP8266 and ESP32 devices is needed, such as in sensor networks, home automation systems, and other Internet of Things (IoT) projects. It provides a lightweight and fast alternative to traditional Wi-Fi communication in certain use cases.
Slave and Master Device Working:
As all the appliances will be connected, on the slave side, current calculations are processed inside slave devices and based on the PIR state and touch button state (integrated with master), it will turn on/off the relay. Slave device will send the current consumption, PIR state and relay state to master using ESP-NOW protocol.
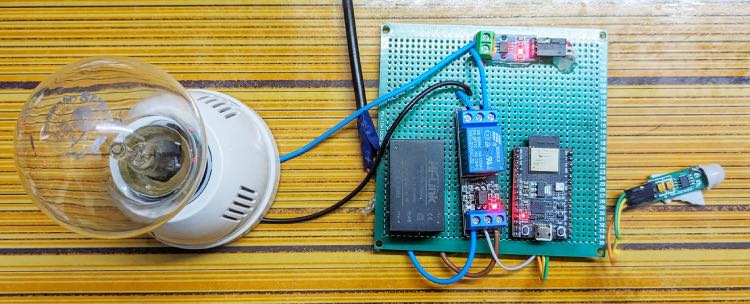
Touch button will act as a master button. If touch button is off, then whatever the state of the PIR sensor, the appliance will remain off and you can see the state of the device on the screen as well.
We have created 4 screens on the esp32 lcdkit using Squareline studio. First screen will be the Welcome screen, second screen dedicated to Bedroom light, third screen is for Dining room light and last screen is to show the total energy saved till now.
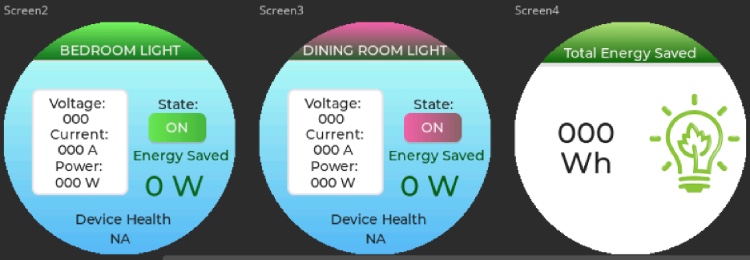
If touch button on the master board is ON then on the basis of human presence it will turn on/off the bulb. if the human exit the room then after the interval 10-15 seconds it will turn off the bulb automatically and energy saving mode will be activated and continuously updated on the screen.
Energy saved calculations are running inside the master device. It is calculated based on the wattage of the appliance.
Energy consumption (W/hr) = (voltage * Current)/time
Fault Detection:
When the current consumption reached the threshold of the appliance, the slave device will send an error message to master and it will display the message under device health. In this way, we can prevent the damage of the appliance and implement a preventive measure and save the energy.
3D Design and Printing:
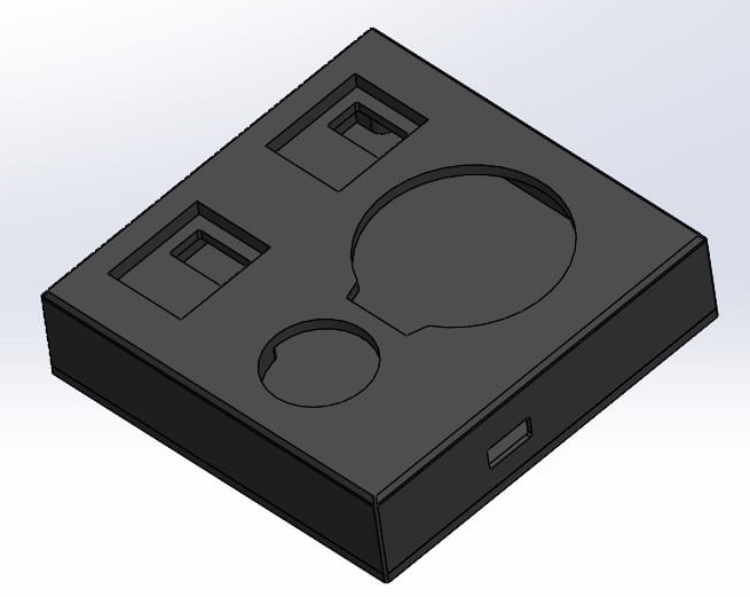
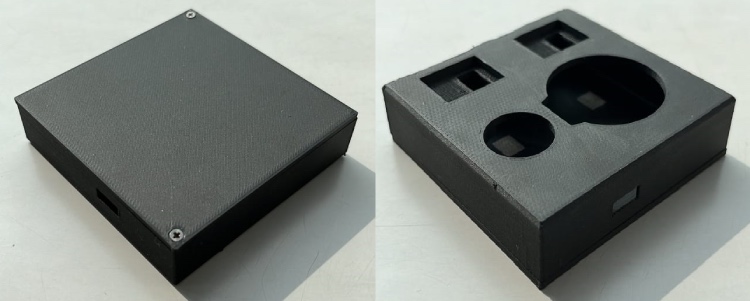
To give a more compact look to the master and slave pcb, you can design a 3D print enclosure in solidworks or any other CAD tool.
Future scope:
We can make full IoT enabled home automation system which can be controlled and monitored from anywhere in the world. You just need to change the protocol and network settings. Further, you can extend the slave devices to connect all the appliances like refrigerator, heaters, etc. For this you need to change the current sensor module according to the current consumption of that particular appliance.
EP32 Code for Smart Energy Saving and Fault Detection: Master Code
Now let us look at the code for master, we will include all the necessary libraries to the code using the include function, esp_now, lvgl, TFT_eSPI and other standard libraries. To use this library, open the library manager in the Arduino IDE and install it from there, SimpleESPNowConnection by Erich O. Pintar, lvgl by kisvegabor. After that, we have defined all the necessary macros, typedefs and global variables. Later we created instances for each individual. We will use these instances to access the corresponding function. One will have to change the total number of slaves based on the number of slaves used.
/*MASTER PARAMETERS*/
#define SLAVE_1_INDEX_0   0xC0
#define SLAVE_1_INDEX_1   0x4E
#define SLAVE_1_INDEX_2   0x30
#define SLAVE_1_INDEX_3   0xEF
#define SLAVE_1_INDEX_4   0x1D
#define SLAVE_1_INDEX_5   0x9C

#define SLAVE_2_INDEX_0   0xC0
#define SLAVE_2_INDEX_1   0x4E
#define SLAVE_2_INDEX_2   0x30
#define SLAVE_2_INDEX_3   0xF1
#define SLAVE_2_INDEX_4   0x1D
#define SLAVE_2_INDEX_5   0x94

#define TOTAL_SLAVES        2
#define DISPLAY_TIMEOUT     5
#define ONE_HUNDRED_MILLIS  100

/*Change to your screen resolution*/
static const uint16_t screenWidth  = 240;
static const uint16_t screenHeight = 240;

static lv_disp_draw_buf_t draw_buf;
static lv_color_t buf[ screenWidth * screenHeight / 10 ];

TFT_eSPI tft = TFT_eSPI(screenWidth, screenHeight); /* TFT instance */

bool button_state[3]    = {false};
bool slave_pir_state[2] = {false};
bool slave_health[2]    = {false};
bool data_rcv           = false;

char tx_msg[250]        = {'\0'};
char rx_msg[250]        = {'\0'};
uint8_t display_timer   = 0;
uint8_t loop_counter    = 0;
uint8_t slave_addr[2][6] = {{SLAVE_1_INDEX_0, SLAVE_1_INDEX_1, SLAVE_1_INDEX_2, SLAVE_1_INDEX_3, SLAVE_1_INDEX_4, SLAVE_1_INDEX_5},{SLAVE_2_INDEX_0, SLAVE_2_INDEX_1, SLAVE_2_INDEX_2, SLAVE_2_INDEX_3, SLAVE_2_INDEX_4, SLAVE_2_INDEX_5}};
uint8_t slave_id[2]     = {1,2};
float slave_current[2]  = {0.0};
float energy_saved[3]   = {0.0};

String success;
esp_now_peer_info_t slave_info[TOTAL_SLAVES] = {0};
hw_timer_t * timer = NULL;

void init_app(void);
void main_app(void);
float get_current_mA(void);
void ARDUINO_ISR_ATTR onTimer();
void OnDataSent(const uint8_t *mac_addr, esp_now_send_status_t status);
void OnDataRecv(const uint8_t * mac, const uint8_t *incomingData, int len);
The function right_btn_pressed is used to switch between different screens on LCD.
void right_btn_pressed() {
  if ((millis() - last_pressed) >= 200) {
    switch(current_screen) {
      case 1:
        lv_scr_load_anim(ui_Screen2, LV_SCR_LOAD_ANIM_MOVE_LEFT, 300, 0, false);
        current_screen = 2;
        break;
      case 2:
        lv_scr_load_anim(ui_Screen3, LV_SCR_LOAD_ANIM_MOVE_LEFT, 300, 0, false);
        current_screen = 3;
        break;
      case 3:
        lv_scr_load_anim(ui_Screen4, LV_SCR_LOAD_ANIM_MOVE_LEFT, 300, 0, false);
        current_screen = 4;
        break;
      default:
        lv_scr_load_anim(ui_Screen1, LV_SCR_LOAD_ANIM_MOVE_LEFT, 300, 0, false);
        current_screen = 1;
        break;
    }
    last_pressed = millis();
  }
}
The functions OnDataSent and OnDataRecv are callbacks used when data is sent or received via esp-now communication protocol.
// Callback when data is sent
void OnDataSent(const uint8_t *mac_addr, esp_now_send_status_t status)
{
  Serial.print("\r\nLast Packet Send Status:\t");
  Serial.println(status == ESP_NOW_SEND_SUCCESS ? "Delivery Success" : "Delivery Fail");
  if (status ==0)
  {
    success = "Delivery Success :)";
  }
  else
  {
    success = "Delivery Fail :(";
  }
}

// Callback when data is received
void OnDataRecv(const uint8_t * mac, const uint8_t *incomingData, int len)
{
  memcpy(&rx_msg, incomingData, len);
  data_rcv = true;
}
The function onTimer is a callback attached with a timer interrupt. Where we increase the counters which helps to detect timeout in main application logic.
void ARDUINO_ISR_ATTR onTimer()
{
  loop_counter++;
  display_timer++;
}
The function init_app is used as the code initializer function where we configure pins, initialize peripherals like USART and Timer . After that we configure wifi in station mode, going further we initialize esp-now, attach callbacks for data send and receive and add peer node (Slaves).
void init_app(void)
{
  Serial.begin(115200);
  pinMode(4,INPUT_PULLDOWN);
  pinMode(8,INPUT_PULLDOWN);
  timer = timerBegin(0, 80, true);
  timerAttachInterrupt(timer, &onTimer, true);
  timerAlarmWrite(timer, 1000, true);
  timerAlarmEnable(timer);

  // Set device as a Wi-Fi Station
  WiFi.mode(WIFI_STA);

  Serial.print("ESP Board MAC Address:  ");
  Serial.println(WiFi.macAddress());
  // Init ESP-NOW
  if (esp_now_init() != ESP_OK) {
    Serial.println("Error initializing ESP-NOW");
    return;
  }

  // Once ESPNow is successfully Init, we will register for Send CB to
  // get the status of Trasnmitted packet
  esp_now_register_send_cb(OnDataSent);

  // Register peer
  for (uint8_t i = 0; i < TOTAL_SLAVES; i++)
  {
    memcpy(slave_info[i].peer_addr, &slave_addr[i][0], 6);
    slave_info[i].channel = 0;
    slave_info[i].encrypt = false;
  }

  // Add peer
  for(int i=0; i<TOTAL_SLAVES; i++){
  if (esp_now_add_peer(&slave_info[i]) != ESP_OK){
    Serial.println("Failed to add peer");
    return;
  }

  // Register for a callback function that will be called when data is received
  esp_now_register_recv_cb(OnDataRecv);
  }
}
The function main_app is responsible for all the application logic being executed, such as reading states of buttons, updating LCD display and taking actions according to the data received from slave.
void main_app(void)
{

  if(digitalRead(4) == 1 && (button_state[0] == false))
  {
    button_state[0] = true;
    sprintf(tx_msg,"{\"B\":\"%d\"}", button_state[0]);
    esp_err_t result = esp_now_send(&slave_addr[0][0], (uint8_t * )&tx_msg, strlen(tx_msg));
    if (result == ESP_OK)
    {
      Serial.println("Sent with success");
    }
    else
    {
      Serial.println("Error sending the data");
    }
    memset(tx_msg,'\0',250);
  }

  if(digitalRead(4) == 0 && (button_state[0] == true))
  {
    button_state[0] = false;
    sprintf(tx_msg,"{\"B\":\"%d\"}", button_state[0]);
    esp_err_t result = esp_now_send(&slave_addr[0][0], (uint8_t * )&tx_msg, strlen(tx_msg));
    if (result == ESP_OK)
    {
      Serial.println("Sent with success");
    }
    else
    {
      Serial.println("Error sending the data");
    }
    memset(tx_msg,'\0',250);
  }

  if(digitalRead(8) == 1 && (button_state[1] == false))
  {
    button_state[1] = true;
    sprintf(tx_msg,"{\"B\":\"%d\"}", button_state[1]);
    esp_err_t result = esp_now_send(&slave_addr[1][0], (uint8_t * )&tx_msg, strlen(tx_msg));
    if (result == ESP_OK)
    {
      Serial.println("Sent with success");
    }
    else
    {
      Serial.println("Error sending the data");
    }
    memset(tx_msg,'\0',250);
  }
  if(digitalRead(8) == 0 && (button_state[1] == true))
  {
    button_state[1] = false;
    sprintf(tx_msg,"{\"B\":\"%d\"}", button_state[1]);
    esp_err_t result = esp_now_send(&slave_addr[1][0], (uint8_t * )&tx_msg, strlen(tx_msg));
    if (result == ESP_OK)
    {
      Serial.println("Sent with success");
    }
    else
    {
      Serial.println("Error sending the data");
    }
    memset(tx_msg,'\0',250);
  }
  if (data_rcv = true)
  {
    data_rcv = false;
    char* srcptr = NULL;

    srcptr = strstr(rx_msg,"\"ID\":\"");
    if (srcptr != NULL)
    {
      uint8_t temp_slave_id = 0;
      char temp_char[10] = {'\0'};

      srcptr += 6;
      temp_char[0] = *srcptr;
      temp_slave_id = atoi(temp_char);
      temp_slave_id = temp_slave_id - 1;
      srcptr = strstr(rx_msg,"\"POR\":\"");

      if (srcptr != NULL)
      {
        sprintf(tx_msg,"{\"B\":\"%d\"}", button_state[temp_slave_id]);
        esp_err_t result = esp_now_send(&slave_addr[temp_slave_id][0], (uint8_t * )&tx_msg, strlen(tx_msg));
        if (result == ESP_OK)
        {
          Serial.println("Sent with success");
        }
        else
        {
          Serial.println("Error sending the data");
        }
      }
      else
      {
        srcptr = strstr(rx_msg,"\"PIR\":\"");
        if (srcptr != NULL)
        {
          Serial.println("P");
          srcptr += 7;
          temp_char[0] = *srcptr;
          Serial.println(*srcptr);
          slave_pir_state[temp_slave_id] = atoi(temp_char);
          memset(temp_char,'\0', 15);
        }

        srcptr = strstr(rx_msg,"\"A\":\"");
        if (srcptr != NULL)
        {
          Serial.println("A");
          srcptr += 5;
          memcpy(temp_char,srcptr, 8);
          Serial.println(*srcptr);
          slave_current[temp_slave_id] = atof(temp_char);
          Serial.println(slave_current[temp_slave_id]);
          memset(temp_char,'\0', 15);
        }

        srcptr = strstr(rx_msg,"\"OC\":\"");
        if (srcptr != NULL)
        {
          srcptr += 6;
          temp_char[0] = *srcptr;
          slave_health[temp_slave_id] = atoi(temp_char);
          Serial.print("Slave Health:");
          Serial.println(slave_health[temp_slave_id]);
          memset(temp_char,'\0', 15);
        }
      }

    }
    memset(rx_msg,'\0',250);
  }
  if (loop_counter >= ONE_HUNDRED_MILLIS)
  {
    loop_counter = 0;
    char temp_buff[15] = {'\0'};

    for (uint8_t i = 0; i < 2; i++)
    {
      if (slave_pir_state[i] == false && button_state[i] == true)
      {
        energy_saved[i] = energy_saved[i] + ((240 * 0.42)/36000);
      }
    }
    energy_saved[2]  = energy_saved[0] + energy_saved[1];

      if (slave_health[0] == 0)
      {
        sprintf(temp_buff,"OK");
        lv_label_set_text(ui_hlthsc1, temp_buff);
        memset(temp_buff,'\0',15);
      }
      else
      {
        sprintf(temp_buff,"ERR");
        lv_label_set_text(ui_hlthsc1, temp_buff);
        memset(temp_buff,'\0',15);
      }

      if (slave_health[1] == 0)
      {
        sprintf(temp_buff,"OK");
        lv_label_set_text(ui_hlthsc2, temp_buff);
        memset(temp_buff,'\0',15);
      }
      else
      {
        sprintf(temp_buff,"ERR");
        lv_label_set_text(ui_hlthsc2, temp_buff);
        memset(temp_buff,'\0',15);
      }

      if (slave_pir_state[0] == 1)
      {
        sprintf(temp_buff,"ON");
        lv_label_set_text(ui_statesc1, temp_buff);
        memset(temp_buff,'\0',15);
      }
      else
      {
        sprintf(temp_buff,"OFF");
        lv_label_set_text(ui_statesc1, temp_buff);
        memset(temp_buff,'\0',15);
      }

      if (slave_pir_state[1] == 1)
      {
        sprintf(temp_buff,"ON");
        lv_label_set_text(ui_statesc2, temp_buff);
        memset(temp_buff,'\0',15);
      }
      else
      {
        sprintf(temp_buff,"OFF");
        lv_label_set_text(ui_statesc2, temp_buff);
        memset(temp_buff,'\0',15);
      }

      sprintf(temp_buff, "240 V");
      lv_label_set_text(ui_voltsc1, temp_buff);
      lv_label_set_text(ui_voltsc2, temp_buff);
      memset(temp_buff,'\0',15);

      sprintf(temp_buff, "%.2f mA", slave_current[0]);
      lv_label_set_text(ui_currentsc1, temp_buff);
      memset(temp_buff,'\0',15);

      sprintf(temp_buff, "%.2f mA", slave_current[1]);
      lv_label_set_text(ui_currentsc2, temp_buff);
      memset(temp_buff,'\0',15);

      sprintf(temp_buff, "%.2f W/Hr", energy_saved[0]);
      lv_label_set_text(ui_enrgysc1, temp_buff);
      memset(temp_buff,'\0',15);

      sprintf(temp_buff, "%.2f W/Hr", energy_saved[1]);
      lv_label_set_text(ui_enrgysc2, temp_buff);
      memset(temp_buff,'\0',15);

      sprintf(temp_buff, "%.2f", energy_saved[2]);
      lv_label_set_text(ui_enrgysavedsc4, temp_buff);
      memset(temp_buff,'\0',15);

  }
  if (display_timer >= DISPLAY_TIMEOUT)
  {
    display_timer = 0;
    lv_timer_handler(); /* let the GUI do its work */
  }
}
Lastly, the setup and loop function. The setup function is used to initialize and setup all the peripherals and configurations at the startup. The loop function will call the main_app continuously.
void setup()
{
  init_app();
  lv_init();

#if LV_USE_LOG != 0
    lv_log_register_print_cb( my_print ); /* register print function for debugging */
#endif

  tft.begin();          /* TFT init */
  tft.setRotation( 0 ); /* Landscape orientation, flipped */

  /*Set the touchscreen calibration data,
    the actual data for your display can be acquired using
    the Generic -> Touch_calibrate example from the TFT_eSPI library*/
  uint16_t calData[5] = { 275, 3620, 264, 3532, 1 };

  lv_disp_draw_buf_init( &draw_buf, buf, NULL, screenWidth * screenHeight / 10 );

  /*Initialize the display*/
  static lv_disp_drv_t disp_drv;
  lv_disp_drv_init( &disp_drv );
  /*Change the following line to your display resolution*/
  disp_drv.hor_res = screenWidth;
  disp_drv.ver_res = screenHeight;
  disp_drv.flush_cb = my_disp_flush;
  disp_drv.draw_buf = &draw_buf;
  lv_disp_drv_register( &disp_drv );

  /*Initialize the (dummy) input device driver*/
  static lv_indev_drv_t indev_drv;
  lv_indev_drv_init( &indev_drv );
  indev_drv.type = LV_INDEV_TYPE_POINTER;
  lv_indev_drv_register( &indev_drv );

  ui_init();

  Serial.println( "Setup done" );
  attachInterrupt(9, right_btn_pressed, FALLING);
}

void loop()
{
main_app();
}
EP32 Code for Smart Energy Saving and Fault Detection: Slave Code
Now let us take a look at code of slave, we will include all the necessary libraries to the code using the include function, esp_now, WiFi, ACS712 and other standard libraries. To use this library, open the library manager in the Arduino IDE and install it from there, SimpleESPNowConnection by Erich O. Pintar, ACS712 by Rob Tilaart. After that, we have defined all the necessary macros, typedefs and global variables. Later we created instances for each individual. We will use these instances to access the corresponding function. One will have to change the unique slave id based on the number of slaves used.
#include "stdbool.h"
#include <esp_now.h>
#include <WiFi.h>
#include "ACS712.h"

#define ACS_PIN       A0
#define PIR_PIN       1
#define RELAY_PIN     2

#define OC_TH         3000
#define OV_TH         240
#define UV_TH         200

#define MASTER_INDX_0  0xEC
#define MASTER_INDX_1  0XDA
#define MASTER_INDX_2  0x3B
#define MASTER_INDX_3  0x29
#define MASTER_INDX_4  0xB8
#define MASTER_INDX_5  0x20

#define ONE_HUNDRED_MILLIS  100
#define TRANSMIT_TIMER  1000

typedef struct slave_tx_msg
{
  bool flag_oc;
  bool flag_ov;
  bool flag_uv;
  bool pir_state;
  bool load_state;
  bool load_health;
  unsigned int voltage;
  float current;
}slave_tx_msg;

typedef struct slave_rx_msg
{
  bool button_state;
}slave_rx_msg;

slave_tx_msg s_tx_msg;
slave_rx_msg s_rx_msg;

bool relay_state = false;
bool data_rcv = false;
bool button_state = false;
char tx_msg[250] = {'\0'};
char rx_msg[250] = {'\0'};
char* srcptr = NULL;
uint8_t helath_state = 0;     //0: HEALTHY; 1: WARNING; 2: ERROR
uint8_t master_Address[6] = {MASTER_INDX_0, MASTER_INDX_1, MASTER_INDX_2, MASTER_INDX_3, MASTER_INDX_4, MASTER_INDX_5};
uint8_t loop_counter = 0;
uint8_t slave_id = 1;

uint16_t transmit_timer = 0;
float curr_reading = 0.0;

String success;
esp_now_peer_info_t peerInfo;
hw_timer_t * timer = NULL;

ACS712  ACS(0, 3.3, 4095, 185);

void relay_on(void);
void relay_off(void);
void init_app(void);
void main_app(void);
float get_current_mA(void);
void ARDUINO_ISR_ATTR onTimer();
void OnDataSent(const uint8_t *mac_addr, esp_now_send_status_t status);
void OnDataRecv(const uint8_t * mac, const uint8_t *incomingData, int len);
The functions relay_on and relay_off are used to switch on/off the relay(load).

void relay_on(void)
{
  digitalWrite(RELAY_PIN,LOW);
  relay_state = true;
}

void relay_off(void)
{
  digitalWrite(RELAY_PIN,HIGH);
  relay_state = false;
}
The function get_current_mA is used to read the load current.
float get_current_mA(void)
{
return ACS.mA_AC_sampling()/2;
}
The functions OnDataSent and OnDataRecv are callbacks used when data is sent or received via esp-now communication protocol.
void OnDataSent(const uint8_t *mac_addr, esp_now_send_status_t status)
{
  Serial.print("\r\nLast Packet Send Status:\t");
  Serial.println(status == ESP_NOW_SEND_SUCCESS ? "Delivery Success" : "Delivery Fail");
  if (status ==0)
  {
    success = "Delivery Success :)";
  }
  else
  {
    success = "Delivery Fail :(";
  }
}

void OnDataRecv(const uint8_t * mac_addr, const uint8_t *incomingData, int len)
{
  memcpy(&rx_msg, incomingData, len);
  data_rcv = true;
}
The function onTimer is a callback attached with a timer interrupt. Where we increase the counters which helps to detect timeout in main application logic.
void ARDUINO_ISR_ATTR onTimer()
{
  loop_counter++;
  if (transmit_timer != 0)
  {
    transmit_timer++;
    if (transmit_timer >= TRANSMIT_TIMER)
    {
      transmit_timer = TRANSMIT_TIMER;
    }
  }
}
The function init_app is used as the code initializer function where we configure pins, initialize peripherals like USART and TIMER. After that we configure wifi in station mode, going further we initialize esp-now, attach callbacks for data send and receive and add peer node (Master). After that we will send the master a message that the slave has been powered on using slave id.
void init_app(void)
{
  /*PIN CONFIGURATION*/
  pinMode(ACS_PIN, ANALOG);
  pinMode(PIR_PIN, INPUT_PULLDOWN);
  pinMode(RELAY_PIN, OUTPUT);

  /*SERIAL CONFIGURATION*/
  Serial.begin(115200);

  /*TIMER CONFIGURATION*/
  timer = timerBegin(0, 80, true);
  timerAttachInterrupt(timer, &onTimer, true);
  timerAlarmWrite(timer, 1000, true);
  timerAlarmEnable(timer);

  relay_off();
  ACS.autoMidPoint();

  /*Set device as a Wi-Fi Station*/
  WiFi.mode(WIFI_STA);

  Serial.print("ESP Board MAC Address:  ");
  Serial.println(WiFi.macAddress());

  /*Init ESP-NOW*/
  if (esp_now_init() != ESP_OK)
  {
    Serial.println("Error initializing ESP-NOW");
    return;
  }

  /*Once ESPNow is successfully Init, we will register for Send CB to get the status of Trasnmitted packet*/
  esp_now_register_send_cb(OnDataSent);

  /*Register peer*/
  memcpy(peerInfo.peer_addr, master_Address, 6);
  peerInfo.channel = 0;
  peerInfo.encrypt = false;

  /*Add peer*/
  if (esp_now_add_peer(&peerInfo) != ESP_OK)
  {
    Serial.println("Failed to add peer");
    return;
  }

  /*Register for a callback function that will be called when data is received*/
  esp_now_register_recv_cb(OnDataRecv);
  delay(250);
  sprintf(tx_msg,"{\"ID\":\"%d\",\"POR\":\"1\"}", slave_id);
  esp_err_t result = esp_now_send(master_Address, (uint8_t * )&tx_msg, sizeof(tx_msg));
  if (result == ESP_OK)
  {
    Serial.println("Sent with success");
  }
  else
  {
    Serial.println("Error sending the data");
  }
  memset(tx_msg,'\0',250);
}
The function main_app is responsible for all the application logic being executed, such as measuring current and overcurrent in every 100 milliseconds. Reading state of pir sensor and button state is being read continuously, whereas if human presence is detected and button state is also on that slave will send the various information to master in every 1 second. Information such as slave id, PIR sensor state, voltage (hardcoded), current consumption and overcurrent detection.
void main_app(void)
{
  if(loop_counter >= ONE_HUNDRED_MILLIS)
  {
    loop_counter = 0;

    s_tx_msg.current = get_current_mA();
    // Serial.println(s_tx_msg.current);
    if (s_tx_msg.current >= OC_TH)
    {
    relay_off();
      s_tx_msg.flag_oc = true;
    }
  }

  if (digitalRead(PIR_PIN) == 1 && button_state == true)
  {
    if (relay_state == false)
    {
      relay_on();
      transmit_timer = 1;
    }
    if (transmit_timer >= TRANSMIT_TIMER)
    {
      transmit_timer = 1;
      sprintf(tx_msg,"{\"ID\":\"%d\",\"PIR\":\"1\",\"V\":\"240\",\"A\":\"%f\",\"OC\":\"%d\"}",slave_id,s_tx_msg.current,s_tx_msg.flag_oc);
      Serial.println(tx_msg);
      esp_err_t result = esp_now_send(master_Address, (uint8_t * )&tx_msg, sizeof(tx_msg));
      if (result == ESP_OK)
      {
        Serial.println("Sent with success");
      }
      else
      {
        Serial.println("Error sending the data");
      }
      memset(tx_msg,'\0',250);
    }
  }
  else
  {
    if (relay_state == true)
    {
      relay_off();

      s_tx_msg.current = get_current_mA();
      sprintf(tx_msg,"{\"ID\":\"%d\",\"PIR\":\"0\",\"V\":\"240\",\"A\":\"0.0\",\"OC\":\"%d\"}",slave_id,s_tx_msg.flag_oc);
      Serial.println(tx_msg);
      esp_err_t result = esp_now_send(master_Address, (uint8_t * )&tx_msg, sizeof(tx_msg));
      if (result == ESP_OK)
      {
        Serial.println("Sent with success");
      }
      else
      {
        Serial.println("Error sending the data");
      }
      memset(tx_msg,'\0',250);
    }
  }

  if (data_rcv == true)
  {
    data_rcv = false;
    Serial.println(rx_msg);
    srcptr = strstr(rx_msg,"\"B\":\"");
    if (srcptr != NULL)
    {
      srcptr += 5;
      if (*srcptr == '1')
      {
        button_state = true;
      }
      else
      {
        button_state = false;
      }
    }
    memset(rx_msg,'\0',250);
  }
}
Lastly, the setup and loop function. The setup function is used to initialize and setup all the peripherals and configurations at the startup. The loop function will call the main_app continuously.
void setup()
{
 init_app();
}

void loop()
{
  main_app();
}
Project Team Members
- Rishabh Jain
- Tirthraj Solanki

