Many Analog Electronic circuits require dual power supply rails for proper balanced operation one being the Operational amplifier circuit. Negative supply voltage is also required in digital systems like A/D converters, op-amps, and comparators. In our previous tutorial, we built a +12V and -12V Dual Power Supply Circuit and a +5V and -5V Dual Power Supply Circuit but the outputs from these circuits are fixed, so, in this tutorial, we are going to design a variable dual DC power supply circuit which can provide variable output voltage ranging from 14V to -14V. The voltage conversion task is performed in four steps, which are Transformer operation, Rectification, Smoothing, and Regulation.
Components Required for building a Variable Dual Power Supply Circuit
The following components are required for performing this project:
|
S.N. |
Component |
Type |
Quantity |
|
1 |
Center Tapped Transformer |
220V/12V |
1 |
|
2 |
1000 μF capacitor |
Electrolytic capacitor |
2 |
|
3 |
1 μF capacitor |
Electrolytic capacitor |
2 |
|
4 |
Schottky diode |
1N5822 CY |
4 |
|
5 |
LM337T |
Negative voltage regulator |
1 |
|
6 |
LM317T |
Positive voltage regulator |
1 |
|
7 |
330R resistor |
Metal film |
2 |
|
8 |
Voltage display module |
0-30V |
1 |
Circuit Diagram of Variable Dual Power Supply
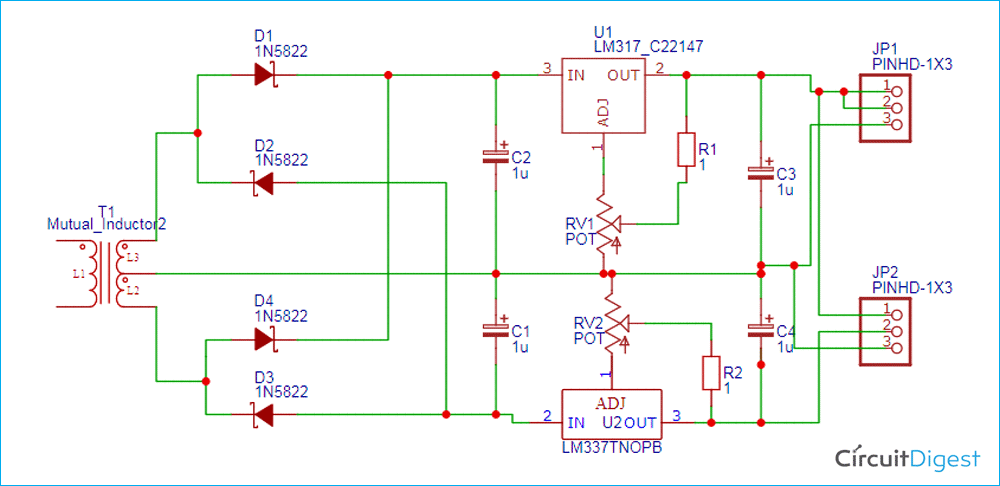
Complete schematic for building a Variable Negative Voltage Regulator is shown below. This circuit consists of a transformer followed by a rectifier circuit, a smoothing capacitor, and finally a voltage regulator.
This circuit can be divided into four parts. First one is the Transformer operation- Here we will first convert 220v AC into 12v AC using step down (220v/12v) center-tapped transformer. Second part is the Rectification – The output of the transformer is then sent to the rectifier circuit. This circuit converts 12v AC into 12v DC. Third part is Smoothing- Output of rectifier circuit is of pulsating nature, for converting it into pure DC; we have attached a capacitor across the load. It is also called filtering. Last part is Regulation- Lastly, the output of the capacitor is sent to voltage regulator ICs LM317T and LM337T which will provide the desired output voltage. All these four parts are explained below:
1. Transformer Operation:
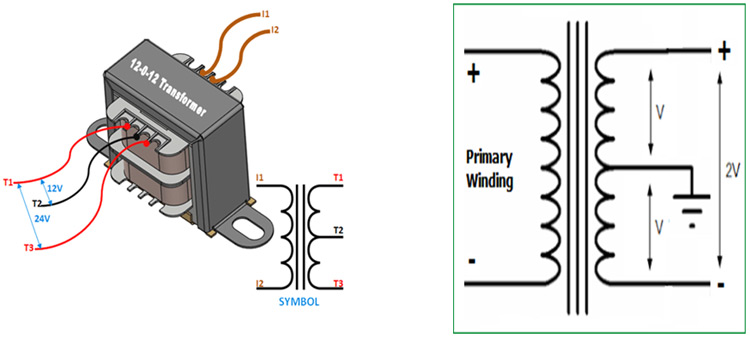
The first step is converting 220v AC into 12v AC by using a step-down transformer. Primary winding of center tapped transformer is connected to the household power supply (230v AC, 50Hz) and output is taken from secondary winding of center tapped transformer. Center tapped transformer is also known as a two -phase three -wire transformer. It is used to step down voltage from 220v AC to 12v AC. In the figure below, we can see the voltage difference between the two outer windings (T1 and T3) is twice the voltage difference between the middle (T2) and outer winding (T1 or T3). The voltage between T1 and T2 is 180 degrees out of phase with each other.
2. Rectification:
In this step, we are going to convert AC into DC using the full bridge rectifier. Rectifier circuit converts AC supply into DC supply. This circuit is made with the help of diodes. We have used power diode (1N5822 CY) to make a rectifier circuit. This particular diode is used because of safety and flexibility purpose. If we use a diode of low ampere rating, then it can be damaged due to surges in current.
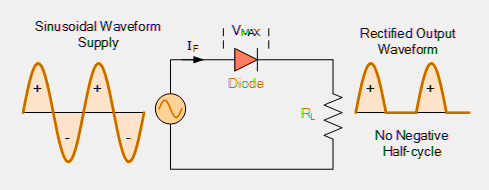
Power diode can be used singly or connected together to produce a variety of rectifier circuits such as full-wave and half-wave rectifier circuits. In the image below, the power diode is behaving like a half -wave rectifier.
We can convert AC into DC using two types of rectifier circuits. One is a half-wave rectifier circuit and another is a full-wave rectifier circuit. In a half-wave rectifier circuit, the output voltage becomes half of the input voltage, and we can design it by using two diodes and in a full-wave rectifier circuit, the output voltage is equal to the input voltage, we design a full-wave rectifier circuit by using four diodes. Here we have used full- wave rectifier circuit. In the below image, we can see the circuit of the full wave rectifier.
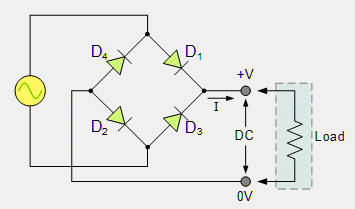
The output voltage of full- wave rectifier circuit is:
VDC = 2Vmax / π = 0.637 VMAX = 0.9 VRMS
The input and output voltage waveforms of a full-wave rectifier circuit are shown below.

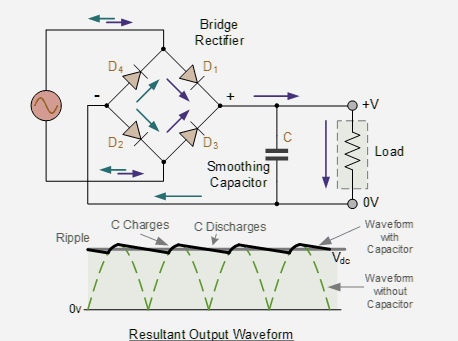
The output of the rectifier is not pure DC, but it contains ripples in it.
3. Smoothing:
The output of the rectifier circuit is pulsating in nature, so we use smoothing capacitors to get pure, DC. Smoothing capacitor connected in parallel with the load across the output of full-wave bridge rectifier circuit. We use an electrolytic capacitor for smoothing. Here, we have used two electrolytic capacitors of 1000uF
The smoothing capacitor connected to a full-wave rectifier circuit is shown in the figure below.
4. Regulation:
The output of the capacitor is sent to voltage regulator ICs which will provide the desired output voltage. Here we have used two variable voltage regulator ICs, one for variable positive voltage (LM 317T) and another for variable negative voltage (LM 337T).
LM317 T (variable positive voltage regulator)
LM317 T is the three-terminal variable positive voltage regulator. It can supply 1.5 amps current with an output voltage ranging from 1.25V to 37V. LM317T is short circuit proof due to its inbuilt current limiting and shut capabilities.
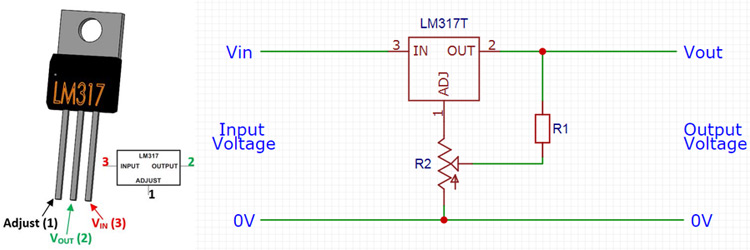
The output of LM317 is calculated by using the ratio of two resistors R1 and R2, which form a voltage divider circuit across the output terminal as shown in a given figure.
The output voltage of LM317T can be calculated using the below formula.
Vout = 1.25 (1 + R2/R1)
LM337 T (variable Negative voltage regulator)
LM337 T is the three-terminal variable negative voltage regulator. It can supply 1.5 amps current with an output voltage ranging from -1.25V to -37V. LM337T is short circuit proof due to its inbuilt current limiting and shut capabilities.

The output of LM337 is calculated by using the ratio of two resistors R1 and R2, which form a voltage divider circuit across the output terminal as shown in the given figure.
The output voltage of LM317T can be calculated using the below formula:
Vout = -1.25 (1 + R2/R1)
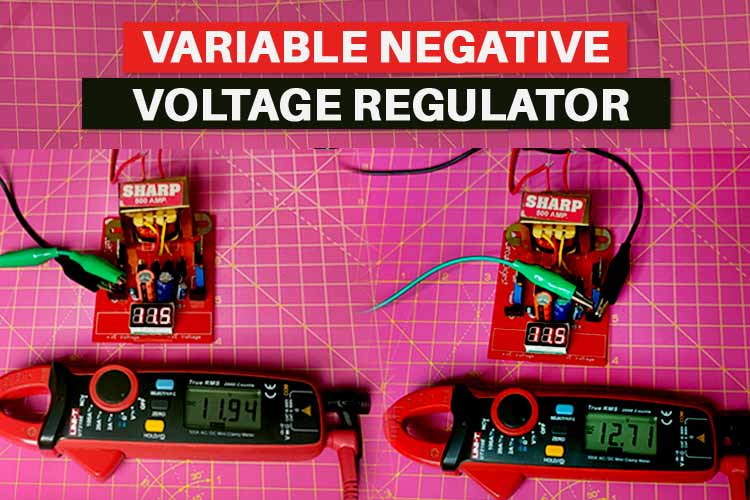
Lastly, we have used a voltage display module. In this display module, we have shown the value of positive voltage. It is not possible to display the negative voltage in the voltage display module because this module can only display the value from 0 to 30 volts.
Fabricating PCB for Variable Dual Power Supply
Now that we have the schematic, we can proceed with laying out the PCB for variable dual power supply Circuit. You can design the PCB using any PCB software of your choice. If you are a beginner who is just getting started in the world of PCB, we would recommend you to check out the getting started guide for PCB Designing. If you want to skip the design processes, you can also download the Gerber file of this Handheld Game Console project using the link below:
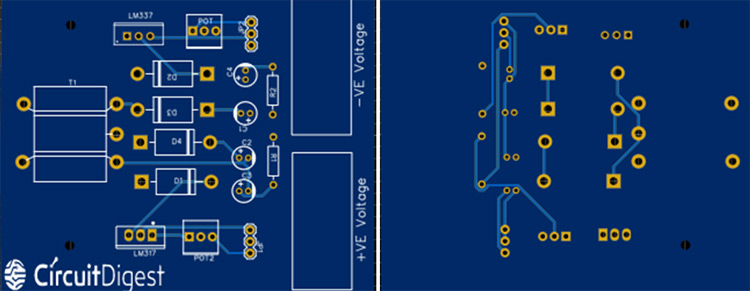
Below are the 2D model views of the top layer and bottom layer of the Ultrasonic Ruler PCB:
You can also check out the other PCB projects that we have previously built on Circuit Digest if you are interested.
Assembling the Variable Dual Power Supply PCB
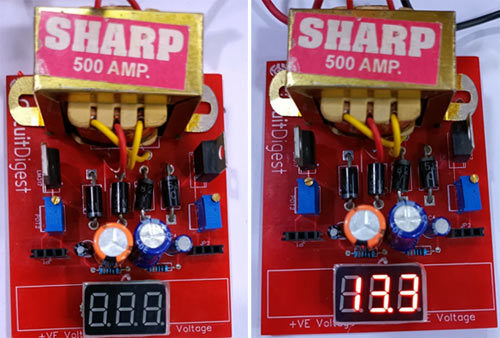
Once we received the PCB from the PCB fabricator, we proceeded with assembling the PCB. The completely soldered board looks like the below:
Testing the Variable Negative Voltage Regulator
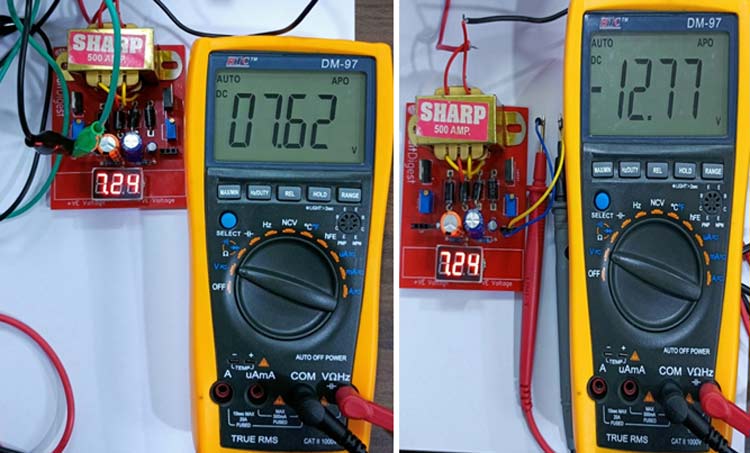
After soldering the components on PCB, the next task is testing the circuit. For that purpose, I connected the 220V power supply to a step-down transformer. The output reading of the circuit is displayed on the voltage display module. The positive and negative voltage can be changed using the trim pots connected on both sides of the PCB. It is not possible to display the negative voltage in the voltage display module because this module can only display the value from 0 to 30 volts so we used a multi-meter to display negative voltage.
So, this is how you can design a dual power supply circuit. Hope you enjoyed the project and learned something useful, if you have any questions, please leave them in the comment section below or use our forum to start a discussion on this.

