Flashlight or Torch is very useful in emergency situations like power failure. These flashlights are battery-operated, and we have to charge regularly in particular intervals. But what if you don’t have electricity and your flashlight is dead? In that situation, Mechanical chargeable Flashlights is very good option, which can be charge by rotating the lever attached to it. It has some mechanism and gears to convert the mechanical energy into electrical energy to charge the battery inside it. Here we are using the same principal to make a Emergency flash light which has a Supercapacitor and this Supercapacitor can be charged by rotating a DC Motor attached to it.
So in this tutorial, we are going to make an emergency flashlight that can be charged by rotating a small DC motor attached to it. To build this, we are using a Supercapacitor, LED, and Schottky diode. The supercapacitor is used to power the LED, and the DC motor is used to recharge the supercapacitor. Schottky diode is used to stop the current flow from supercapacitor to motor because when the motor is connected to Supercapacitor, the motor starts rotating by taking the power from Supercapacitor and we can’t recharge the supercapacitor using the motor. So the only way to block the current flow from Supercapacitor to the motor is to use a Diode. Other PN junction diodes can be used, but Schottky diode has a lower voltage drop compared to other PN junction diodes.
Components Required
- DC Motor
- Supercapacitor
- Schottky Diode
- Resistor (200 ohms)
- Switch
- LED
DC Motor:
DC motor is a very common type of motor and easily available at a low price. These motors are equipped with magnets. An armature is placed in this magnetic field, so whenever current passes through the armature, it experiences a force that causes it to rotate the rotor with respect to its original position.
DC motors can be divided into many types according to their shape, size, and working. Mainly DC motors are divided into four types:
- Permanent Magnet DC Motors
- Series DC Motors
- Shunt DC Motors
- Compound DC Motors
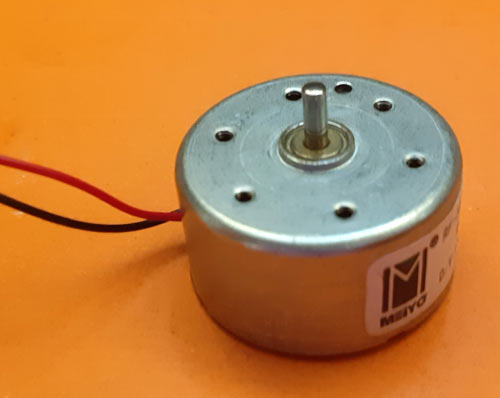
In this project, we are using a Toy\Hobby DC Motor. It’s a normal DC motor that has only two terminal without any polarity. Its operating voltage is 4.5V to 9V. Also learn more about DC motors and various ways to control it in below tutorials:
Super Capacitor:
A supercapacitor is a high-capacity capacitor with capacitance values much higher than normal capacitors but lower voltage limits. Supercapacitors combine the properties of capacitors and batteries into one device. A supercapacitor can store 10 to 100 times more energy than electrolytic capacitors and can receive and deliver charge much faster than batteries, and have more charging-discharging cycles than rechargeable batteries. Learn more about Supercapacitors here.
In this project, we are using a 5.5V 1F Coin Super-capacitor. Before proceeding, we will check how much energy this supercapacitor can store. We can calculate the energy store using the following formula:
E = 1/2CV2
Where E = Energy
C = Capacitance
V= Voltage
In our case C= 1F and V= 5.5 V.
E= ½*1*5.5*5.5
E= 15 Joules
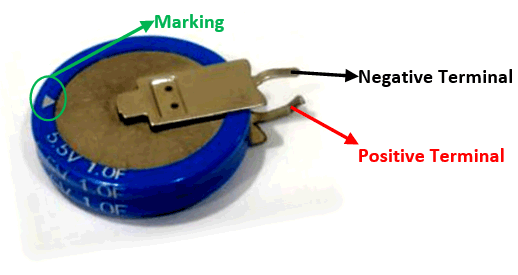
The polarity of a supercapacitor is shown in below image. Arrow direction represents the current flow from positive to the negative terminal.
Schottky Diode:
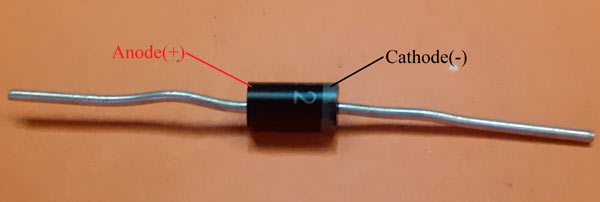
Schottky diode is also known as a hot carrier diode/ Barrier diode. As the name suggests, it is used as a barrier to stop current flow in reverse directions. Current enters through the Anode and exits through the Cathode. Compared to a PN junction diode, Schottky diode has a less forward voltage drop and fast switching rate.
Schottky diode voltage drop is generally between 0.15 and 0.45 volts, but a normal PN junction diode has a voltage drop between 0.6 to 1.7 .
DC motor as Electricity Generator
Before making the whole circuit, lets see how a DC motor can be used to generate AC voltage. Connect the motor and led as shown in below circuit:
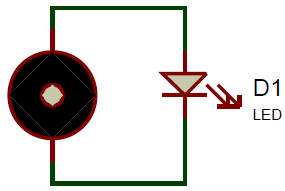
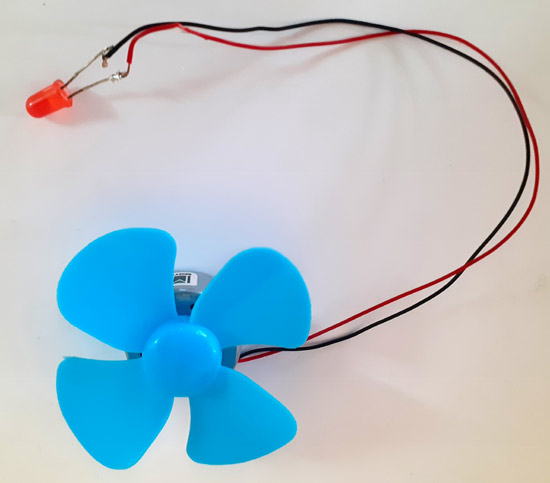
As the motor doesn’t have any polarity, connect the first wire to the positive pin of LED and then second wire to the negative pin of led. Now rotate the motor to its maximum speed by blowing the air, the LED should glow. If LED doesn’t glow reverse the connection and then rotate again.
Actual hardware image is shown below:
Circuit Diagram and Working Explanation
Now, we have seen how a motor can produce electricity, we will use the motor to charge the supercapacitor which in turn power the LED.
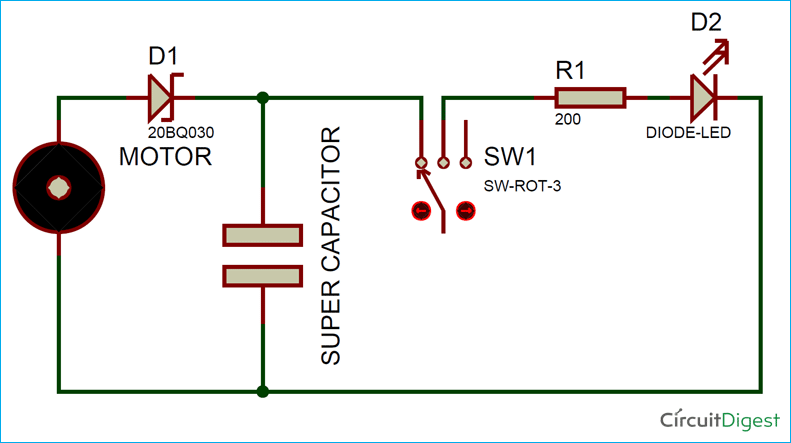
Super Capacitor is used here to store the charge so that it can power the LED for a longer time. Connect the negative terminal of supercapacitor with the first wire of motor and positive terminal to the second wire of motor through the Schottky diode.
As told earlier Schottky diode is used to block the current flow in the opposite direction. So connect the positive terminal of Schottky diode to motor and negative terminal to the supercapacitor. Now current will flow from anode to cathode, and it will block the current flow from the cathode to anode means current will only flow from motor to supercapacitor. Schottky diode is used here because it has low power drop than the normal diode.
Now connect the LED with a Supercapacitor and use a resistor to limit power consumption. A slider switch is also used to turn LED on and off. Connect the positive pins of supercapacitor and LED with 2nd and 3rd pin of the switch and connect the negative pin of led to the first pin of the switch.
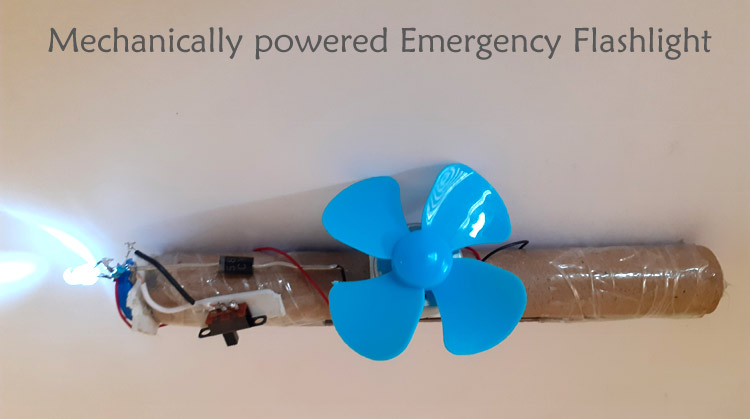
After the connection, my flashlight prototype looks like the image given below. I used a cardboard to make a pipe-like structure.
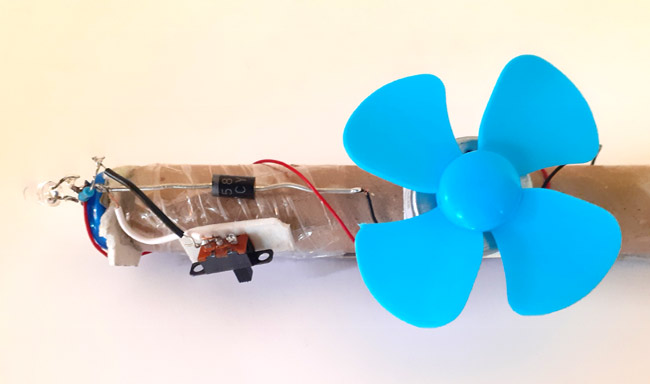
Finally, the Mechanically powered Emergency Flashlight is ready, just blow the air into the fan to rotate it. The motor will charge the supercapacitor, and Supercapacitor will power the LED. You can use a brighter LED for more light. Once the supercapacitor is fully charged, it can power the led for approx. 10 minutes. To rotate the motor, instead of blowing the air some more efficient gear and lever mechanism can be built.
If you have any questions regarding this project leave them in the comment section.
The complete demonstration video is given below:

