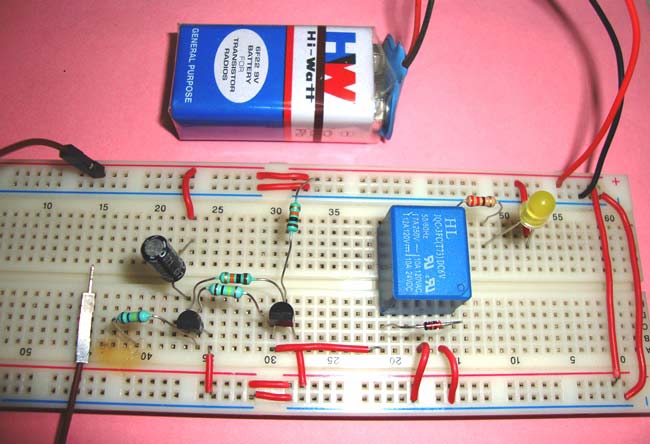
Latch basically means “to become fixed in a particular state”. In Electronics, Latch Circuit is a circuit which locks its output, when a momentarily input trigger signal is applied, and retains that state, even after the input signal is removed. This State will remain indefinitely until the power is reset or some external signal is applied. Latch circuit is similar like SCR (Silicon Controlled Rectifier) and can be very useful in alarm circuits, where a small trigger signal will Turn On the alarm for indefinite period, until reset manually. We have previously built some alarm circuits:
- Laser Security Alarm Circuit
- Fire Alarm using Thermistor
- Burglar Alarm Circuit
- IR Based Security Alarm
- Fire Alarm System using AVR Microcontroller
Today we are going build a very simple and cheap Latch circuit using Transistors, this circuit can be used trigger the AC mains loads and alarms.
Components:
- Resistors- 10k (2), 100k (2), 220 ohm (1)
- Transistors- BC547, BC557
- Capacitor- 1uF
- Relay- 6v
- Diode- 1N4148
- LED
- Power Source- 5v-12v
Circuit Diagram:
Circuit Diagram of Latching circuit is simple and can be easily built. Resistor R1 and R4 work as a current limiting resistor for Transistor Q1 and resistors R2 and R3 work as current limiting resistor for Transistor Q2. Current Limiting resistors must be used at the bases of BJT transistors, otherwise they might burn. Purposes of other components have been explained in ‘Working section’ below.
Working Explanation:
Before going into the explanation, we should note that Transistor Q1 BC547 is a NPN transistor, which conducts or Turns On, when a small positive voltage is applied to its base. And Transistor BC557 is PNP transistor which Conducts or Turns On, when a negative voltage (or ground) is applied to its base.
Initially, both the transistors are in OFF state, and Relay is deactivated. PNP Transistor BC557 base is connected to Positive voltage with current limiting resistor R3, so that it won’t conducts accidently. Capacitor C1 has been used precautionary, to prevent the accidental and false triggering of circuit.
Now when a small positive voltage is applied to the Base of Transistor BC547, it turns ON the transistor and Base of the transistor Q2 BC557 gets connected to the Ground. Resistor R2 and R3 prevents the short circuit in this condition. Now when Base of Transistor BC557 gets grounded, it starts conducting and energises the Coil of relay, which activates the Relay and turns ON the device connected to Relay. In our case LED will glow.
This is normal behaviour until now, but what makes it a ‘Latch’ circuit. If you notice, collector of Transistor BC557 is connected to base of Transistor BC547, through a current limiting resistor R4. And when the Transistor BC557 turns ON, current flow in two directions, first to the relay and second to the base of transistor Q1. So this Feedback voltage to the base of Transistor BC547, keeps the transistor BC547 ON for indefinite period, even after the input trigger voltage is removed. This in turns keeps the second transistor ON indefinitely and a Latch or Lock is formed instantly.
Now the alarm or device, connected to the Relay, will remain ON until the Power is reset. Or a Reset Push button can be added to this circuit, to break the Latch state. This button would connect the base of transistor BC547 to the Ground, which turn OFF the Q1 and Q2, and breaks the Latch.
If you do not want to Latch any AC appliances, and just want Turn ON LED or a Buzzer, you can simply remove the Relay and connect LED directly in place of Relay, with a resistor.
Diode 1N4148 is used to prevent reverse current flow, when the transistor is switched OFF. Every Inductor coil (in Relay)produces equal and opposite EMF when switched OFF suddenly, this may cause permanent damage to components, so Diode must be used to prevent reverse current. Understand the Working of Relay here.
Comments
You can use this circuit or
You can use this circuit or use IC 4017 based this Toggle Switch
Simple Latch Circuit with Transistors
Hi, unfortunately all these pnp-npn transistor latch variations have very sensitive input (I guess it is because of positive feedback). Mine catches EM noise from 20W AC motor turning on nearby. Dangerous if it turns on some heavy equipment.
hello from morocco i need to
hello from morocco i need to use this one to auto water level control my 2hp pump wich is 50m below what do i change to become very stable and is relay 10amp enough for 2hp any help thank you very much
Could you please explain how
Could you please explain how the false triggering might occur, and thus how capacitor prevents it?
The picture shows a 9V
The picture shows a 9V battery and the circuit shows a 9V input, but the relay says 6V. When the relay is activated, 9V would be applied across the LED and R5, and 220 ohms seems a little light for and LED and 9V.
Am I missing something?


I have a wireless door bell I am using for a mailbox alarm with a mercury switch for activation. The receiver sounds a chime and flashes an LED but I want the LED to stay on until I reset it. Should I use a latching relay or transistor circuit?
Thanks