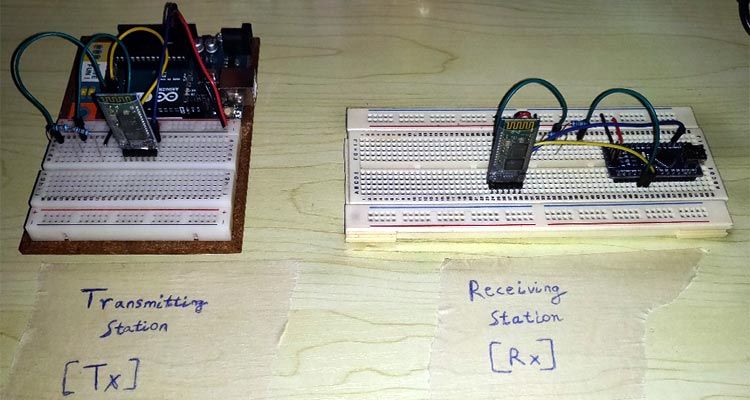
HC-05 Bluetooth Modules are the go-to Bluetooth modules for any Arduino project! It’s easy to hook up and code in the Arduino IDE. In most projects, we usually connect to HC05 to an Arduino and use it to wirelessly communicate with another smart device like a mobile phone. This is fairly simple and we have built many interesting projects with it like Bluetooth Controlled Robot, Bluetooth Voice Control, Bluetooth Home Automation, etc. However, have you ever needed to connect two HC-05s together? It’s not as straightforward connecting an HC05 to a smartphone, there are some additional steps involved. This tutorial will guide you through this process. Let’s jump right in!
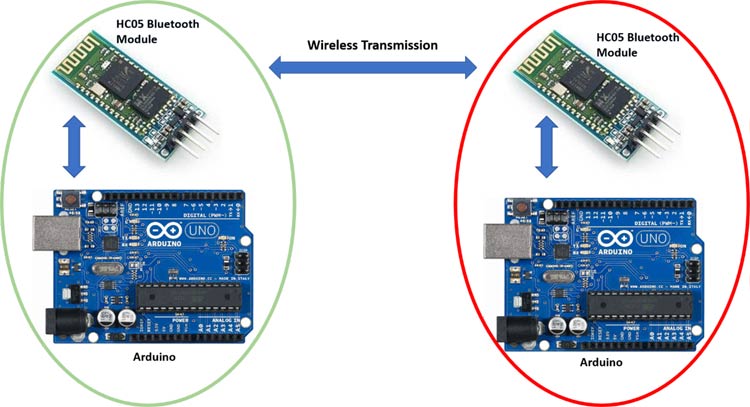
Materials Required
- 2x Arduino (Any model will do; I’m using an Arduino Uno R3 and an Arduino Nano)
- 2x HC05 Bluetooth Modules
- Breadboard
- Jumper Wires
- 2x 1kΩ resistor
- 2x 2.2kΩ resistor
Circuit Diagram
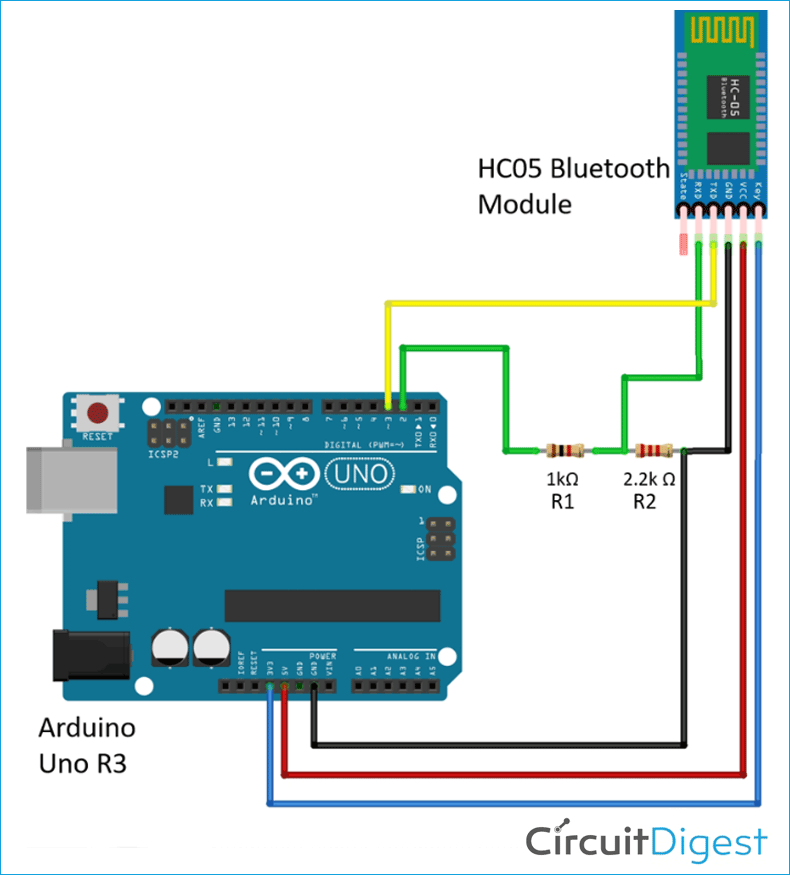
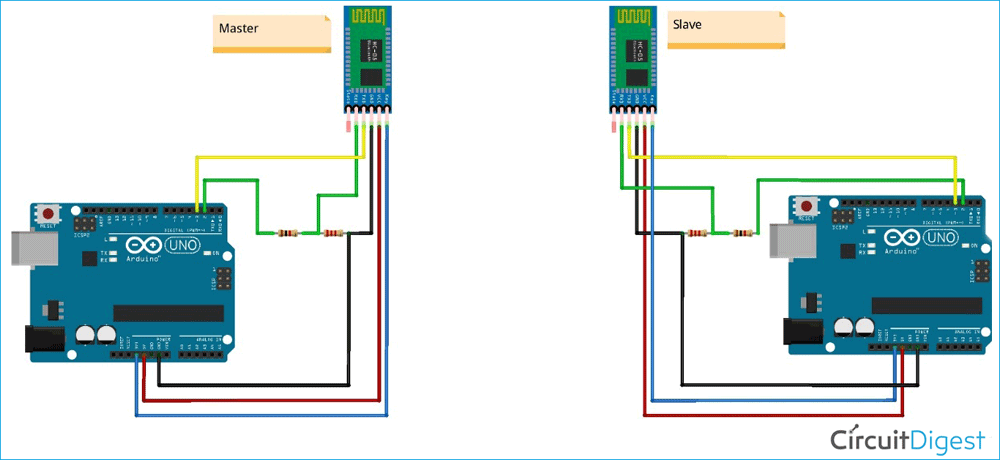
This is the basic circuit diagram. Wire up 2 of these circuits, one for master and one for the slave. For the connections, all we are doing here is connecting the HC05 to the Arduino. The Receiver (Rx) pin of the HC05 operates at the 0V to 3.3V range and the Arduino operates at the 0V to 5V range. So, we will use resistors (R1 and R2) to create a voltage divider to reduce the 5V output of the Arduino to 3.3V, so as to not damage the HC05 module.
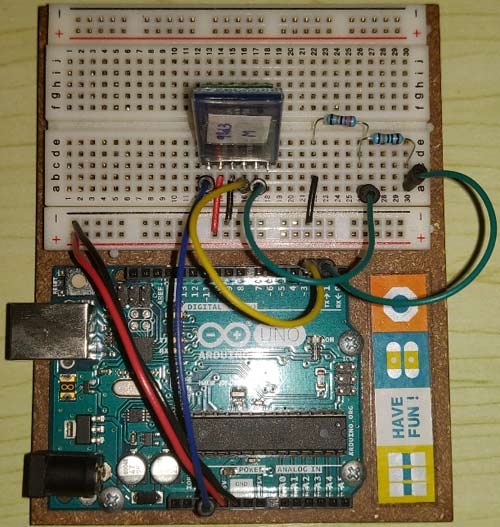
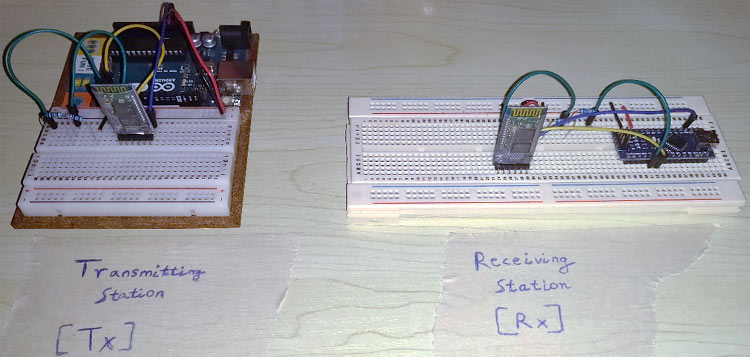
I’m using 1kΩ for R1 and 2.2KΩ for R2 but you can use any resistor value as long as the R2 is approximately double the value of R1 (R2 ≈ 2R1). Similarly, repeat the circuit for both master and slave, the Arduino Master Bluetooth Circuit and Arduino Slave Bluetooth Circuit are shown below.
Initial Configuration of the HC05 modules
This is the additional step required to connect two HC05 modules together. We need to change some settings inside the HC05 Bluetooth Module, to do this, we have to go into the HC05 module’s AT Command Mode and send commands to it through the Arduino IDE’s serial monitor. To do this, we need to write an Arduino code to send commands through the serial monitor to the HC05.
The code to configure the HC05 module can be found at the bottom of this page, the explanation of the code is as follows
Add the SoftwareSerial library to this code.
#include <SoftwareSerial.h>
Define the transmit (Tx) and Receive (Rx) pin numbers. I’m using pin 2 for Tx and pin 3 for Rx.
#define tx 2
#define rx 3
Give the Bluetooth connection some name (here I am using configBt), then tell the SoftwareSerial library which pin is Tx and which pin is Rx. The syntax is bluetoothName(Rx, Tx);
SoftwareSerial configBt(rx, tx); // RX, TX
In order to configure the Bluetooth module, the Arduino needs to send commands to it at a baud rate of 38400 baud. Similarly, we set the baud rate of the Bluetooth connection as well to 38400 baud. Set the Transmit (Tx) to the output pin and Receive (Rx) to the input pin
void setup()
{
  Serial.begin(38400);
  configBt.begin(38400);
  pinMode(tx, OUTPUT);
  pinMode(rx, INPUT);
}
Inside the forever loop, we have the main chunk of the code. The idea here is to send whatever is typed in the textbox in the serial monitor to the HC05 through the Arduino’s Tx pin. Then display whatever is output by the HC05 in the serial monitor.
void loop()
{
  if(configBt.available()) // if the HC05 is sending something…
  {
    Serial.print(configBt.readString()); // print in serial monitor
  }
  if(Serial.available()) // if serial monitor is outputting something…
  {
    configBt.write(Serial.read()); // write to Arduino’s Tx pin
  }
}
Upload this code into the Arduino connected to the master HC05 module first. After uploading the code, plug out the Arduino power cable. Press and hold the button on the HC05. Now plug in the Arduino power cable while still holding the button on the HC05. Alright, now you can release the button on the HC05. This is how you go into the AT mode of the HC05. To check if you have done this right, make sure the red light on the HC05 is blinking approximately every one second (slow blinking!). Normally before the HC05 is connected to any Bluetooth device, it’s red light blinks at a very high frequency (fast blinking!).
Next, open the serial monitor (the serial monitor button is at the top right of the Arduino IDE). At the bottom right corner of the Serial monitor window, if you haven’t already done so, make sure that you set the line ending setting to “Both NL and CL” and baud rate to 38400. Now, type in AT in the serial monitor, if all goes well, you’ll get an “OK” from the HC05 displayed in the serial monitor window. Congratulations! You are have successfully logged into the HC05 module’s AT command mode.
Now, enter the following commands in the table below to configure the master HC05 module:
|
COMMAND (enter this in the serial monitor and press enter) |
RESPONSE (reply from HC05, displayed in the serial monitor) |
Function (What does this command do?) |
|
AT |
OK |
Test |
|
AT+CMODE? |
OK |
Check the CMODE or Connection Mode ----------------------------- CMODE: 0 is the slave 1 is master |
|
AT+CMODE=1 |
OK |
Set the CMODE to 1 as we are configuring the master HC05 |
|
AT+ADDR? |
+ADDR:FCA8:9A:58D5 OK
*This is the address of my master HC05. Your address will be different! |
Returns the address of the HC05, note this down as we will need it later on! |
Next connect your computer to your other HC05, the slave:
|
COMMAND (enter this in the serial monitor and press enter) |
RESPONSE (reply from HC05, displayed in the serial monitor) |
Function (What does this command do?) |
|
AT |
OK |
Test |
|
AT+CMODE? |
OK |
Check the CMODE or Connection Mode ----------------------------- CMODE: 0 is a slave 1 is master |
|
AT+CMODE=0 |
OK |
Set the CMODE to 0 as we are configuring the slave HC05 |
|
AT+BIND= FCA8,9A,58D5
*Replace the “:” in the master HC05 address with “,”
*Here I’m using the address of the master HC05 I noted down from the previous table. You should use the address of your master HC05! |
OK |
Setting the address of the master HC05 that this slave HC05 will automatically connect to on boot up |
|
AT+BIND? |
+BIND: FCA8:9A:58D5 OK
*This is the address of my master HC05. Your address will be different! |
Check the binding address of your slave. If it matches the address of your master HC05, you are good to go! |
Arduino to Arduino Bluetooth Communication Testing
Firstly, power both the master and slave HC05 modules. After the power on and a few seconds have passed look at the red light on the HC05 modules.
|
Blinking Speed of the red light |
What it means |
|
Blinking at a very high frequency (fast blinking!) |
Not good! It means your HC05 modules are not connecting with each other! Time to troubleshoot! |
|
Blinking at a low frequency (slow blinking!) |
Nice! You have done it! But we still got to do one more check just to be super sure that this setup works! Move on! |
Once your red lights are blinking at a low frequency (slow blinking!), you can be sure that both your HC05s are connected with each other, but we haven’t tested if data can be sent back and forth between the master and slave. After all, that’s the main purpose here.
Upload the below code to one of the Arduinos, this is the code to test transmitter (Tx), again the complete code for both transmitter and receiver can be found at the bottom of this page.
Following the previous code, we add the SoftwareSerial library to this code and define the transmit (Tx) and Receive (Rx) pin numbers. Then we name the Bluetooth connection and pass the Tx and Rx pin numbers to the library.
#include <SoftwareSerial.h>
#define tx 2
#define rx 3
SoftwareSerial bt(rx,tx); //RX, TX
In the setup function, we are setting the baud rate for the Arduino serial monitor and the Bluetooth again. Do you see the difference here compared to the previous code? We are using a baud rate of 9600 baud. This is the default pre-set communication baud rate of the HC05 Bluetooth module when communicating with other Bluetooth devices. So, note that 38400 baud is for configuring the HC05 with AT commands and 9600 baud is the default baud rate of the HC05 module. Lastly, just like before we configure the Tx pin as output and Rx pin as an input.
void setup()
{
  Serial.begin(9600);
  bt.begin(9600);
  pinMode(tx, OUTPUT);
  pinMode(rx, INPUT);
}
Inside the forever loop, all we are doing is transmitting a random value of “123” through the HC05.
void loop()
{
  bt.write(123);
}
Upload this code to the other Arduino, this is the code to test receive (Rx):
Exactly the same as the previous codes, we configure the SoftwareSerial library.
#include <SoftwareSerial.h>
#define tx 2
#define rx 3
SoftwareSerial bt(rx, tx); //RX, TX
The code in the setup function is exactly the same as the code to test transmit (Tx).
void setup()
{
  Serial.begin(9600);
  bt.begin(9600);
  pinMode(tx, OUTPUT);
  pinMode(rx, INPUT);
}
In the forever loop, we just need to receive what we are sending from the transmitting Arduino. If the receive buffer has received some data from the HC05, then display whatever is received in the serial monitor.
void loop()
{
  if(bt.available()>0)
  {
    Serial.println(bt.read());
  }
}
After you have uploaded the respective codes to each Arduino, open the Serial monitor to the receiving Arduino. Make sure you choose the baud rate as 9600 and the line ending as Newline in the serial monitor. If everything is working fine, you should be seeing 123.
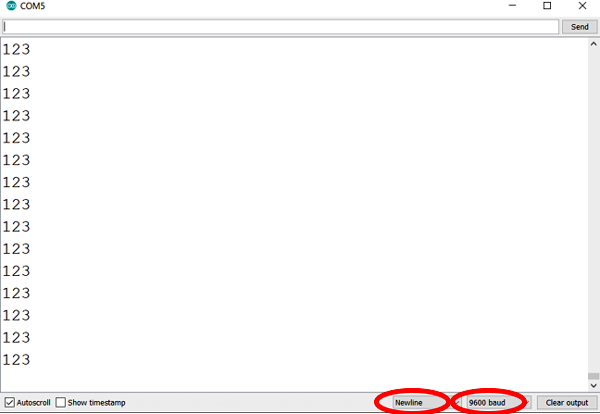
Note: If you have connected both the transmitting and receiving Arduinos to the same laptop, make sure you choose the right COM port under TOOLS > PORT. You should be connected to the receiving Arduino’s COM port.
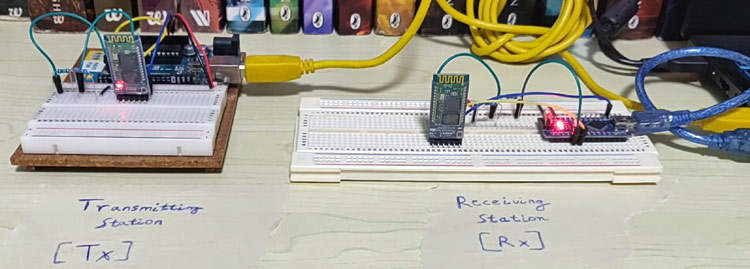
If all goes well, swap the HC05 modules to make sure communication can happen in both directions and WE ARE DONE!
HC05 Configuration:

#include <SoftwareSerial.h>
#define tx 2
#define rx 3
SoftwareSerial configBt(rx, tx); // RX, TX
void setup()
{
  Serial.begin(38400);
  configBt.begin(38400);
  pinMode(tx, OUTPUT);
  pinMode(rx, INPUT);
}
void loop()
{
  if(configBt.available()) //if the bluetooth module is sending something...
  {
    Serial.print(configBt.readString()); //print whatever the bluetooth module is sending
  }

  if(Serial.available()) //if we have typed anything into the serial monitor input text box...
  {
    configBt.write(Serial.read()); //write whatever we typed into the serial monitor input text box to the bluetooth module
  }
}


Receiver:

#include <SoftwareSerial.h>
#define tx 2
#define rx 3
SoftwareSerial bt(rx, tx); //RX, TX
void setup()
{
  Serial.begin(9600);
  bt.begin(9600);
  pinMode(tx, OUTPUT);
  pinMode(rx, INPUT);
}
void loop()
{
  if(bt.available()>0)
  {
    Serial.println(bt.read());
  }
}


Sender:

#include <SoftwareSerial.h>
#define tx 2
#define rx 3
SoftwareSerial bt(rx,tx); //RX, TX
void setup()
{
  Serial.begin(9600);
  bt.begin(9600);
  pinMode(tx, OUTPUT);
  pinMode(rx, INPUT);
}
void loop()
{
  bt.write(123);
}
Comments
Yes, we can transceive at
Yes, we can transceive at baud rates higher than 9k! The HC05 can go up to a baud rate of 460800 (I got this value from the HC05 datasheet), but the Arduino's baud rate has to match the HC05's baud rate, that's a rule of thumb. Since we are using the softwareserial library in the Arduino code, we need to look at the maximum baud rate that this library can support. From the software serial library's reference page (https://www.arduino.cc/en/Reference/softwareSerial), it states that this library can support baud rates up to 115200. So the practical upper limit should be 115200.



Thanks for the explanation Karthik.
I do have a question though: can we transceive at baud rates higher than 9k? What's the (practical) upper limit? The reason I ask is when using sensors, we may need real time monitoring that may need faster communication, and this may be too slow.