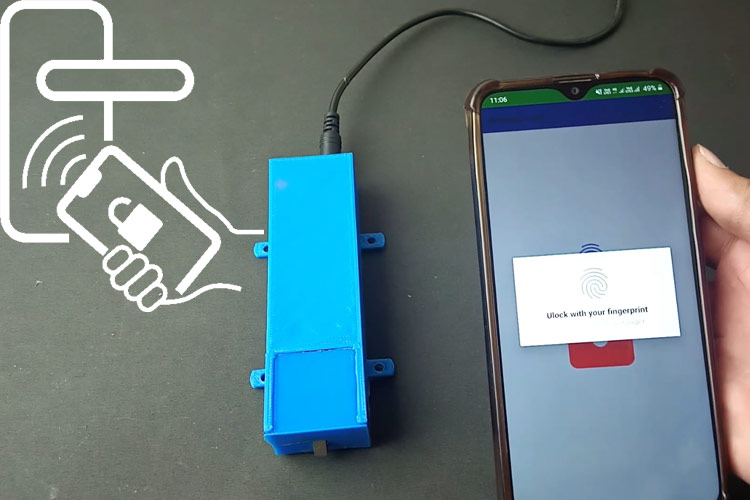
Now the whole world is in the grasp of COVID 19 and everyone is taking precautions wherever they can to prevent themselves from contracting this serious disease by following social distancing, wearing masks, using cashless transactions, and avoids touching anything to prevent the spread of germs. With the advent of technology, the normal locks are becoming things of the past and new biometric-based locks and RFID based locks are becoming more and more mainstream. Fingerprint-based locks and attendance record-keeping devices are used in most of the offices and colleges too but nowadays it is not advisable to do so due to this pandemic and so we are going to build a door lock by using a solenoid lock and control it using an android app over Bluetooth so that we don’t have to touch the fingerprint sensor at all and just use your own phones to control the lock. So, let’s get started.
Components Required
- 1×Arduino Nano
- 1×HC-05 Bluetooth Module
- 1×Solenoid Lock
- 1×Piezoelectric Buzzer
- 1×Red LED 5mm
- 1×Green LED 5mm
- 1×IRF540N N-Channel MOSFET
- 1×BC547 NPN Transistor
- Resistors: 1×550Ω, 1×2k0Ω, 1×220Ω
- 1×7805 Voltage Regulator
- 1×DC Jack connector pair
- Perfboard
Solenoid Lock
In a conventional door lock, there is a key to pull or push the latch, and we have to operate it manually, but in a solenoid lock, the latch can be operated automatically by applying a voltage across the solenoid coil which will control the latch present in the lock.
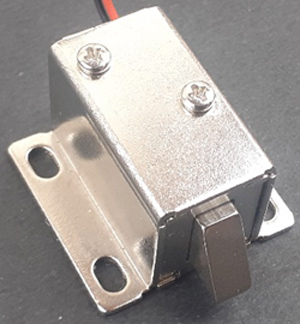
Solenoid lock has a low-voltage solenoid coil that pulls the latch back into the door when a suitable voltage is applied to it and will remain open until the voltage is removed. So, you can control the operation by controlling the voltage given to it by using a pushbutton, relay, microcontrollers, etc. Solenoid door locks are mainly used in remote areas to automate operations without involving any human effort.
HC-05 Bluetooth Module
HC-05 is used to provide wireless connectivity to your projects so that you can communicate with other microcontrollers or your mobile phones and laptops. You can easily control the data being sent and received by using simple android applications that you can easily make yourself. It has two modes, first data mode which is used to transfer data to and from the Bluetooth device and the second is AT Commands mode which is used to configure your Bluetooth module. It communicates using USART communication at a 9600 baud rate so that you can connect it to any microcontroller which supports USART communication and can be easily connected to the Serial ports available on the board. Mind that you need to power the device with a 5V power supply and connect the TX pin to RX pin of your microcontroller and RX pin to the TX pin of the microcontroller. You can use it in automation applications and wireless applications in data logging and robotics.
Circuit Diagram for Bluetooth Controlled Solenoid Lock
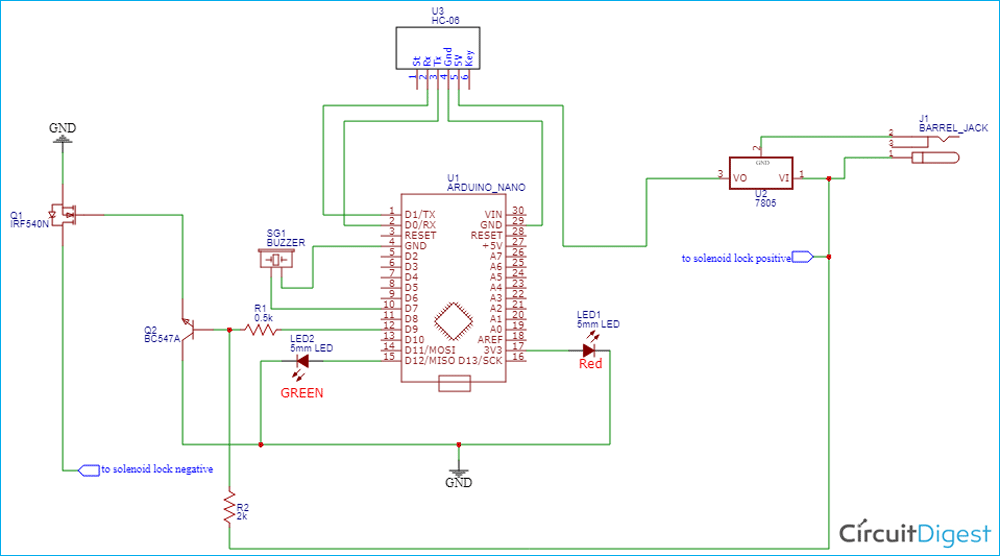
The complete circuit diagram that shows how to interface and control a solenoid lock with an Arduino through a MOSFET is shown below.
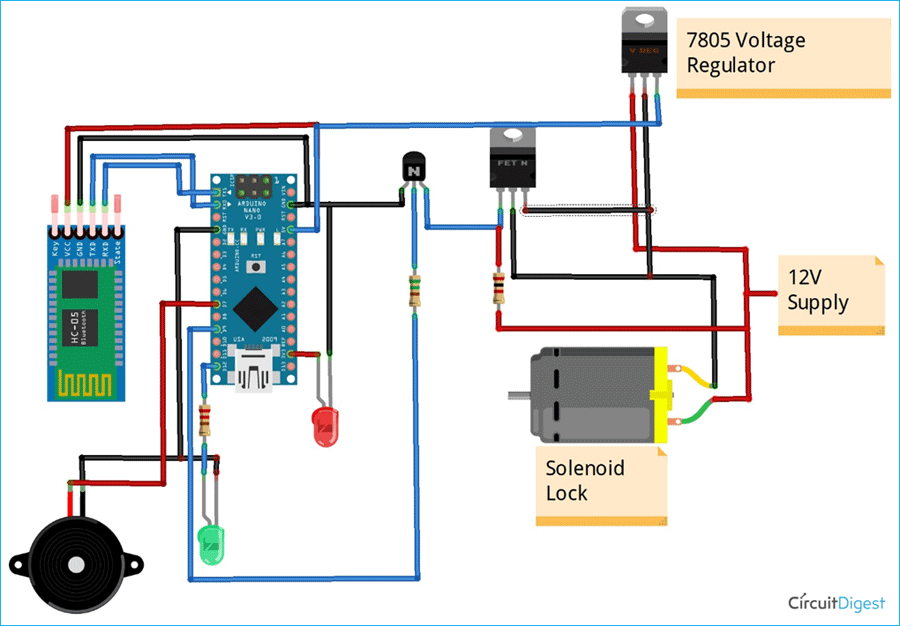
As shown in the circuit diagram, the connections are rather, simple you need to connect the HC-05 Bluetooth module to the nano by powering the device with a 5V power supply and connect the TX pin to RX pin of your microcontroller and RX pin to the TX pin of the microcontroller. You need to add a red LED to display the power status of the Arduino nano and a green LED to show if the door is unlocked. You also need to connect a buzzer. The connection diagram is also shown below for easy understanding.
To control the solenoid lock, you need to use a control circuit that comprises an NPN Transistor and N channel MOSFET. We will control the NPN transistor by connecting the D9 pin of the Nano to the base pin of the transistor via a 550 Ohm resistor to control the current flowing into the Transistor. When the D9 pin is pulled high, the transistor is turned on and the gate pin of the MOSFET is pulled to the ground, turning the MOSFET OFF that turn off the solenoid lock and when the D9 pin is LOW, the NPN transistor is off which means that the GATE of the MOSFET is pulled to 12V via a 2kOhm pull up resistor to turn on the MOSFET and power the solenoid lock. In this way, you can control the Solenoid lock using your 5V Arduino Nano. You can not directly control the IRF540N MOSFET with 5V pins from the Nano as it is not a logic-level MOSFET so it won't fully turn on or off with 5V from the nano, hence we will use the BC547 NPN transistor to control the MOSFET.
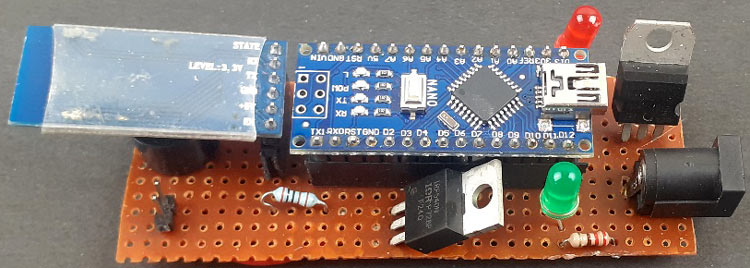
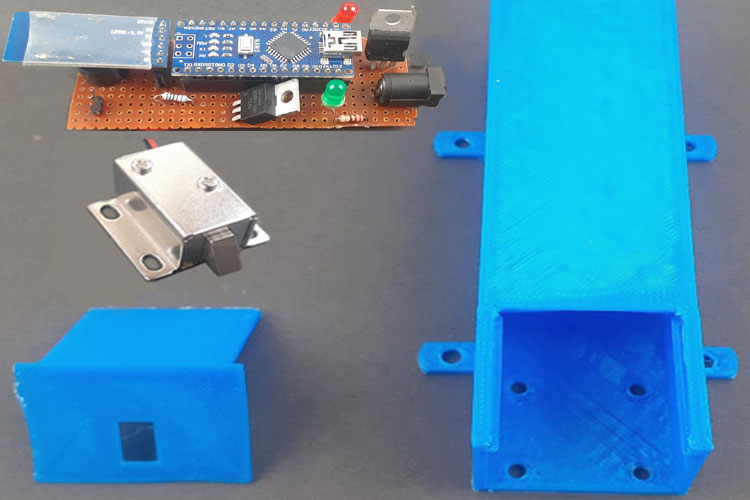
I have soldered the complete circuit on a perf board to make it compact. The idea is to design a 3D printed casing for our lock so that it can be easily installed and used.
Arduino Program to Control Solenoid Lock based on Fingerprint Data
We will write the code on the official Arduino IDE, if you do not have the IDE, you must download it from the official Arduino website. We start the code by declaring the variables we will use in the code to control the peripherals like buzzer and led, also to control the solenoid lock by controlling the transistor.
int value1;
#define led 12
#define bjt 9
#define buzzer 7
Now coming to the setup part of the Arduino, we will first initialize the serial communication of the Arduino at a 9600 baud rate. As we are using the hardware pins of the Arduino for serial communication, so we don’t have to use software serial in the project. Now we must declare the pins we are using as outputs or inputs and give them initial conditions.
    Serial.begin(9600);
    pinMode(bjt, OUTPUT);
    pinMode(led,OUTPUT);
    pinMode(buzzer, OUTPUT);
    digitalWrite(bjt, HIGH);
    digitalWrite(led, LOW);
Now in the loop function of the code, we will read the data coming serially from the HC-05 Bluetooth module and check if they are corresponding to the lock or unlock command. In our program logic if the fingerprint is correctly recognized, then the Bluetooth module will send value “1” and if the fingerprint is not recognized, then the Bluetooth module will send value “0”. If the value read by Nano is “1”, then the door will be unlocked and the buzzer will sound for a second and the door will remain unlocked for 7 seconds. After that, the door will be locked again. If the value read is “0”, which means the fingerprint is not recognized, hence the buzzer will sound an alarm three times for a second each to alert the security.
Serial.println("Reading");
  while(Serial.available()==0);
  value1 = Serial.read();
  Serial.println(value1);
  if (value1==1)
  {
    Serial.println("Unlocking");
    digitalWrite(bjt, LOW);
    digitalWrite(buzzer, HIGH);
    digitalWrite(led, HIGH);
    delay(1000);
    digitalWrite(buzzer, LOW);
    delay(6000);
    digitalWrite(bjt, HIGH);
    digitalWrite(led, LOW);
  }
  if (value1==0)
  {
      digitalWrite(bjt, HIGH);
      digitalWrite(buzzer, HIGH);
      Serial.println("Locking");
      delay(1000);
      digitalWrite(buzzer, LOW);
      delay(1000);
      digitalWrite(buzzer, HIGH);
      delay(1000);
      digitalWrite(buzzer, LOW);
      delay(1000);
      digitalWrite(buzzer, HIGH);
      delay(1000);
      digitalWrite(buzzer, LOW);
  }
Android App for Reading Fingerprint Data and Sending to Arduino via Bluetooth
The app for this project was designed using the Kodular app inventor. Creating an app using Kodular is very simple; you can make an app by combining the blocks according to the flow chart of your project.
To create an app with Kodular, navigate to Kodular.io and create an account if you don’t have one, log in to your account, and then click on the ‘Create Apps’ option.

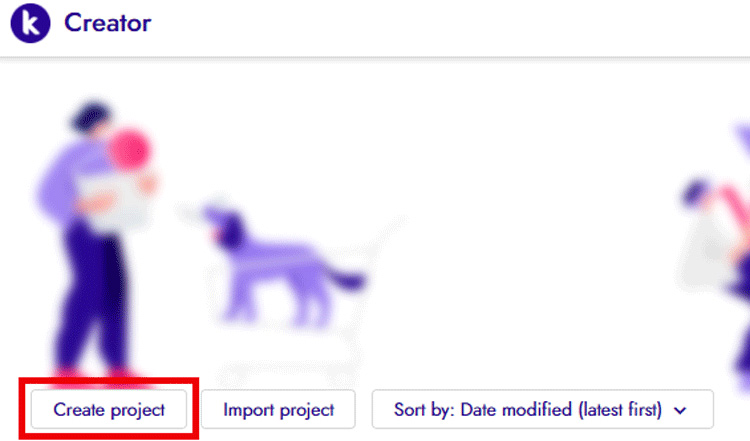
After that, you will be taken to the Projects screen. Click on the ‘Create Project’ button to create a Project.
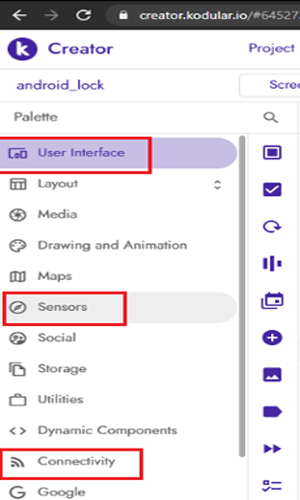
Name the app and click ‘Finish’. The project will be created and you will be taken to the Designer page of the project. Now on the Designer page, add these four components from Components Palette to create a layout for the app: Bluetooth Client, Fingerprint, List Picker, and Image Button. List picker and Button can be found in ‘User Interface’ while Fingerprint and Bluetooth can be picked from ‘Sensors’ & ‘Connectivity’.
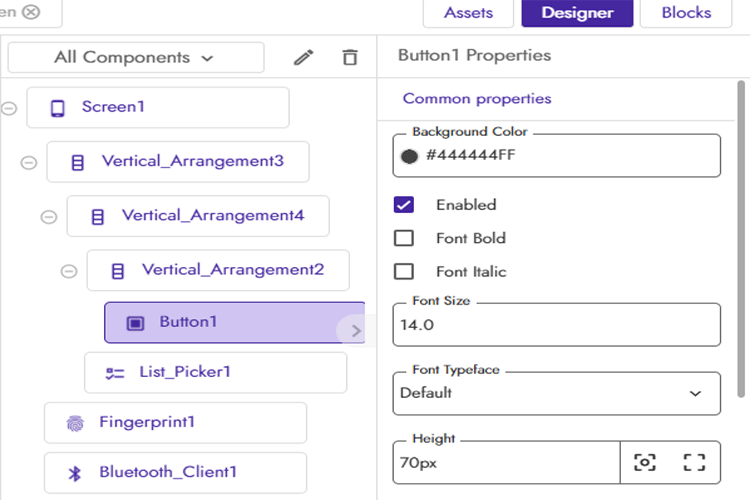
Screen properties can be changed by changing the properties for each block.
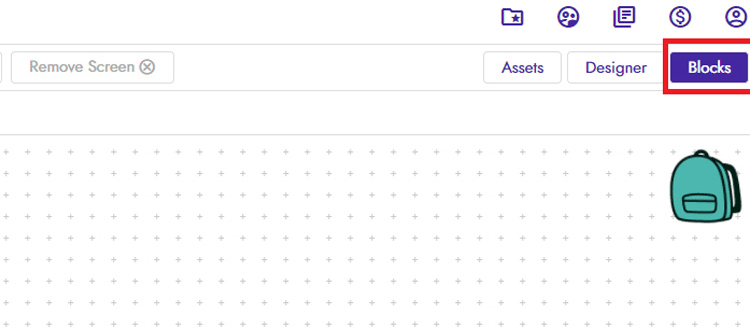
After that, move to the ‘Blocks’ screen to build the app using the blocks.
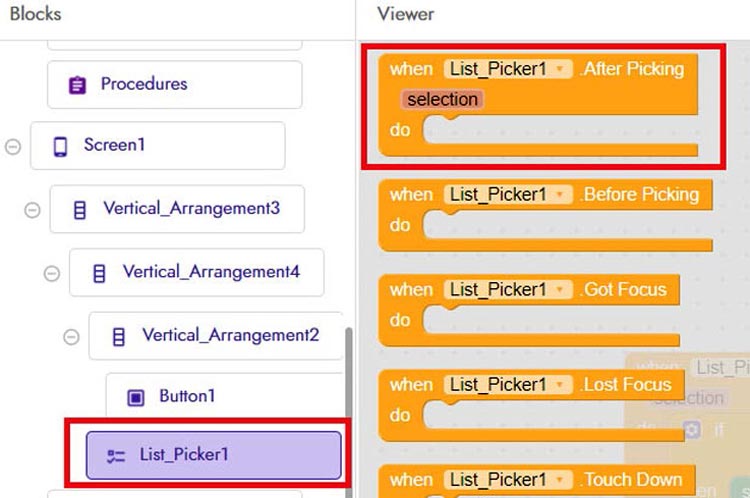
Now scroll down, click on the ‘List_Picker1’ and drag & drop the first code block as shown in the image:
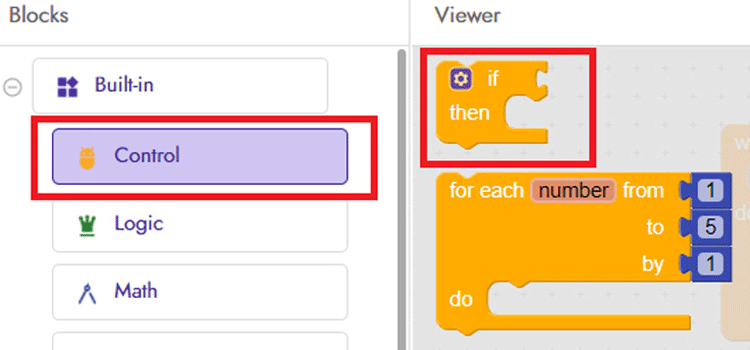
In the next step, click on the ‘Control’ block and then drag & drop the first code block on the Viewer screen.
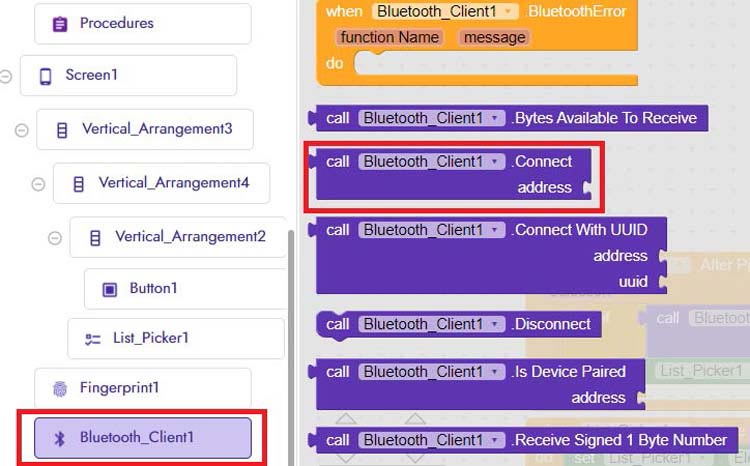
After that, go to the ‘Bluetooth_client1’ block and select the ‘Bluetooth_client.connect’ code block.
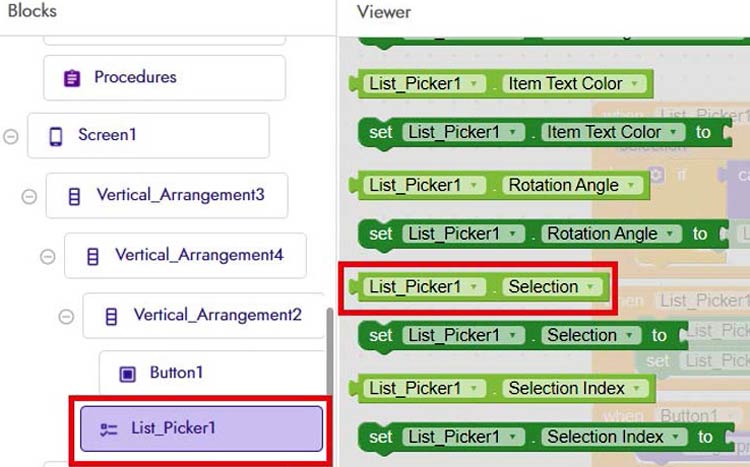
Then go to the ‘List_Picker’ block and select the ‘Selection code block’ as shown in the below image.
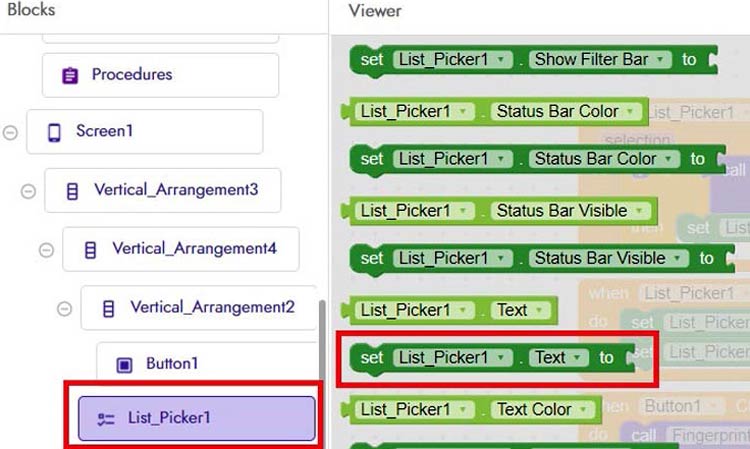
Now in the next step, again go to ‘List_Picker’ block and select the ‘List_Picker. Text to’ code block as shown in the below image.
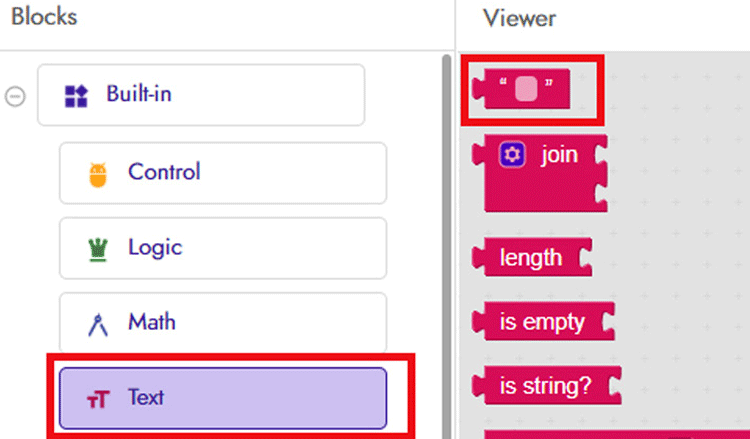
After that, go to the ‘Text’ block and select the first code block.
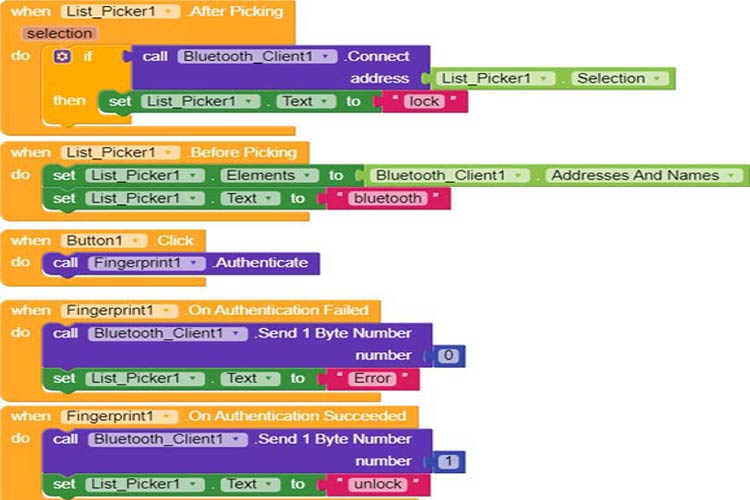
With this, the first code block is finished. We need to create three more code blocks to call the fingerprint sensor of the Android phone and authenticate the fingerprint. The complete code block is shown in the below picture. Use this picture to join the rest of the code blocks.
When all the blocks are connected, export the .apk file on your laptop or you can directly export the apk to your phone using the QR Code. The .aia and .apk file of this app can be downloaded from the below link.
3D Printed Casing for Biometric-based Lock
As mentioned earlier, we have created a 3D model to assemble the perf board and solenoid lock into a neat little casing. The model placed on slicing software is shown below.
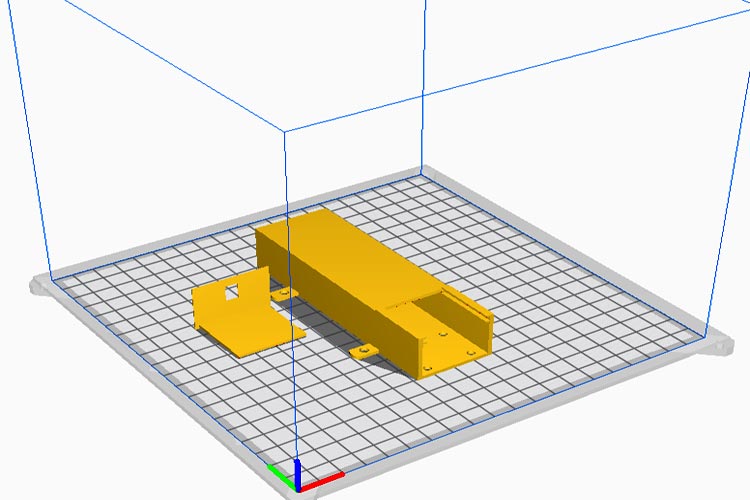
If you are using the same size perf board and solenoid lock, then you can also print the same casing using the STL files given below. You can also check out other 3D printing projects that we have build earlier.
STL files for Solenoid Lock Casing
Testing our Arduino based Fingerprint controlled lock
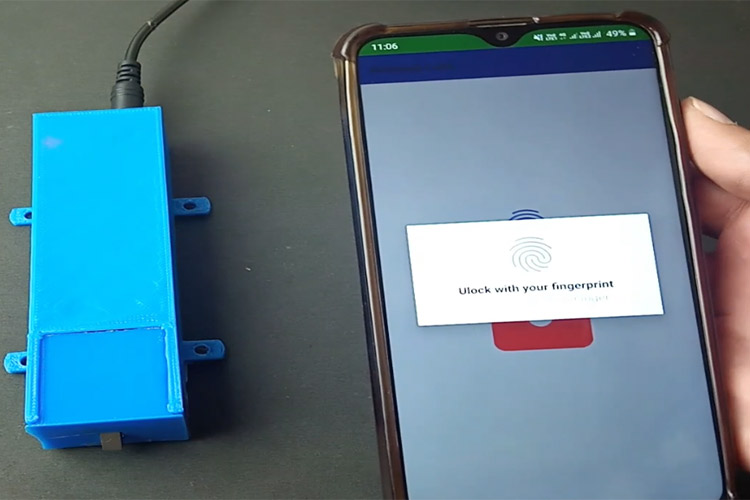
First, you need to download and install the .apk file on your phone to control the lock. You also need to upload the complete code on your Arduino Nano but make sure you remove the TX and RX pins from the nano before you upload the code. After the upload is complete, install the lock and then turn on the Bluetooth on your mobile phone and pair with the Bluetooth device you are using and open the app. Now tap on the Bluetooth icon on the app and connect to the Bluetooth device and the Bluetooth icon on the app will turn to the lock icon. Now you have to tap on the fingerprint icon to check the fingerprint using your phone’s fingerprint scanner and the value will be sent to the Arduino Nano.
This project is just a basic demonstration of the things you could do with the Bluetooth module connected to your phone. You can build a whole working robot, attendance register, app-controlled home automation devices, etc. and the list goes on up to your imagination. You can also interface displays to show the name of the person entering the premises or add a camera to click a picture of the person for security purposes. Try this on your own, make some changes, and if you ever get stuck somewhere, just let us know in the comments section and we will help you out. Thanks again and have a great day.
int value1;
#define led 12
#define bjt 9
#define buzzer 7
void setup()
{
    Serial.begin(9600);
    pinMode(bjt, OUTPUT);
    pinMode(led,OUTPUT);
    pinMode(buzzer, OUTPUT);
    digitalWrite(bjt, HIGH);
    digitalWrite(led, LOW);
}
void loop()
{
    Serial.println("Reading");
    while(Serial.available()==0);
    value1 = Serial.read();
    Serial.println(value1);
    if (value1==1)
    {
      Serial.println("Unlocking");
      digitalWrite(bjt, LOW);
      digitalWrite(buzzer, HIGH);
      digitalWrite(led, HIGH);
      delay(1000);
      digitalWrite(buzzer, LOW);
      delay(6000);
      digitalWrite(bjt, HIGH);
      digitalWrite(led, LOW);
    }
    if (value1==0)
    {
        digitalWrite(bjt, HIGH);
        digitalWrite(buzzer, HIGH);
        Serial.println("Locking");
        delay(1000);
        digitalWrite(buzzer, LOW);
        delay(1000);
        digitalWrite(buzzer, HIGH);
        delay(1000);
        digitalWrite(buzzer, LOW);
        delay(1000);
        digitalWrite(buzzer, HIGH);
        delay(1000);
        digitalWrite(buzzer, LOW);
    }
}
