We all saw how everyone started to panic during the onset of the pandemic, and it was because of the lack of solid information and the spread of fake news. And this is how people fall under the misconception and get confused about the symptoms of a disease. That is why we wanted to build a project that will allow people to check whether they are COVID positive or not. Also, we didn't want our project to only be limited to a COVID test, but instead, we wanted to make an inexpensive monitoring device that will come in handy even when (or if) the pandemic ends.
What it does?
Paean is a device built by AVR Microcontroller that monitors the three essential body parameters of a human being, namely, the heart rate, SPO2 level, and temperature. Along with that, it also stores the data collected from the user into the software for future access. The three mentioned parameters that Paean can measure are crucial and potent to reveal several secrets of one's health condition.
Previously we have built many health monitoring systems, you can check them out
- IoT Based Patient Health Monitoring System using ESP8266 and Arduino
- Heart Beat Monitoring using PIC Microcontroller and Pulse Sensor
- ESP8266 based Air Pollution Detector
- IoT Based Heart Rate Monitor using MAX30100 Pulse Oximeter and ESP32
Component Required for Monitoring of Essential Body Parameters
Project Used Hardware
- AVR microcontroller(atmega328p),
- IR LED,
- Photodiode,
- LM35,
- Breadboard,
- wires(a lot of wires),
- USB to TTL converter(CH340chip)
Project Used Software
- Arduino IDE,
- SerialPlot
Project Hardware Software Selection
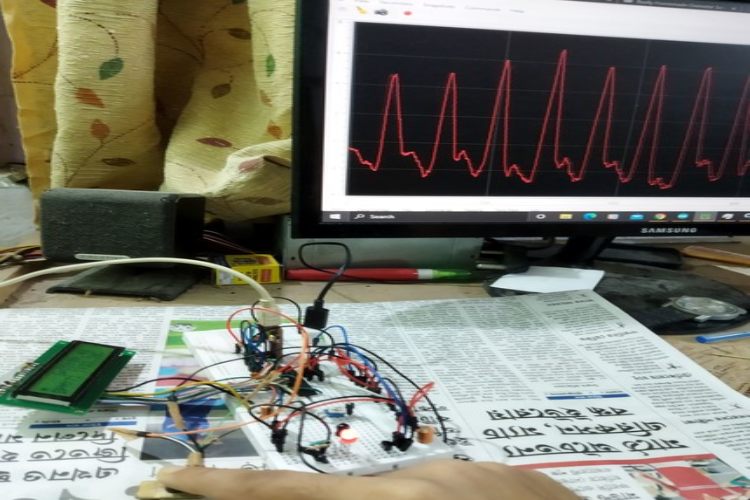
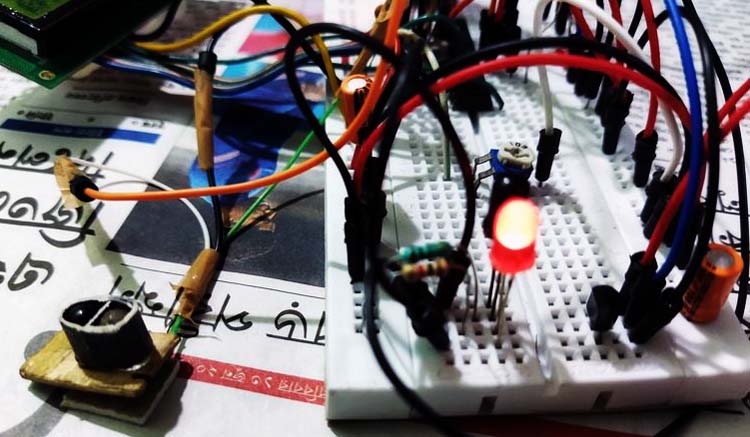
The Project has three main parts, BPM reading, Oxygen saturation level, and temperature measurement. Along with that, the data needed to be plotted and stored on the computer. For that, we designed a simple GUI software in JAVA using Swing. The signals read by the ADC were very noisy, and the data were very jittery. We needed to filter out the high-frequency noise. For that, we used a recursive filter and moving average algorithm to smooth out the readings. And finally able to get the cream signal, which can be viewed on the monitor(pics attached). It even had the diastolic peaks and the dicrotic notch, making our optical measurement very accurate and up to the mark, with just scratch components. The main controller of the system is the atmega328p microcontroller. All the sensors are interfaced with it. It basically reads the signals from the sensors via the 10bit ADC and applies the digital filters and simple algorithms to get accurate data. Along with that, an FTDI chip is used to send the data to the computer, which can be read by the JAVA program by the serial port. To measure the Heart Rate, i.e., the beats per minute, that we placed an Infrared Led(980nm) beside a Photodiode, and made it a compact capsule so that they don't move while taking readings, and placed a black cover around them to protect it from ambient light. As soon as we encounter a peak, a timer gets started and measures the transit time until the next peak. This transit time is the time period of the heartbeat; by inverting it, we get the frequency, and by multiplying it with 60, we get the BPM. We took similar ten readings and averaged them to get better readings. To measure the SpO2, i.e., the oxygen saturation level in the blood, we took a RED led(650nm) and again put a photodiode beside it; the difference from the IR is that is, blood is capable of absorbing light of this wavelength proportional to the oxygen content inside the blood. Now to calculate the SpO2, we obtained the AC rms swing of the signal from the RED led and the AC rms of the signal from the Infrared Led. After that, we averaged all the samples one at a time from both the signal to get the DC value from the signal. The SpO2 calculation is then done by the ratio of (((AC rms of Red)/(DC of RED))/((AC rms of IR)/(DC of IR))). To get the AC values, we used the local min-max algorithm to find the crest and the trough values of the signals. With the difference, we get the AC value. To measure the Temperature, we used an LM35 sensor, and with a simple conversion formula, we get the temperature from the voltage read by the ADC. It's simply temperature=(mV/10); Coming to the software part, we built a simple GUI software in JAVA using the SWING framework. We used a simple canvas and a few buttons to make the GUI. The readings are transmitted by the microcontroller over the UART communication via the Serial port. The data packets are then parsed by java and plotted to the canvas. The whole software is built with the Eclipse IDE.
Paean Circuit Diagram
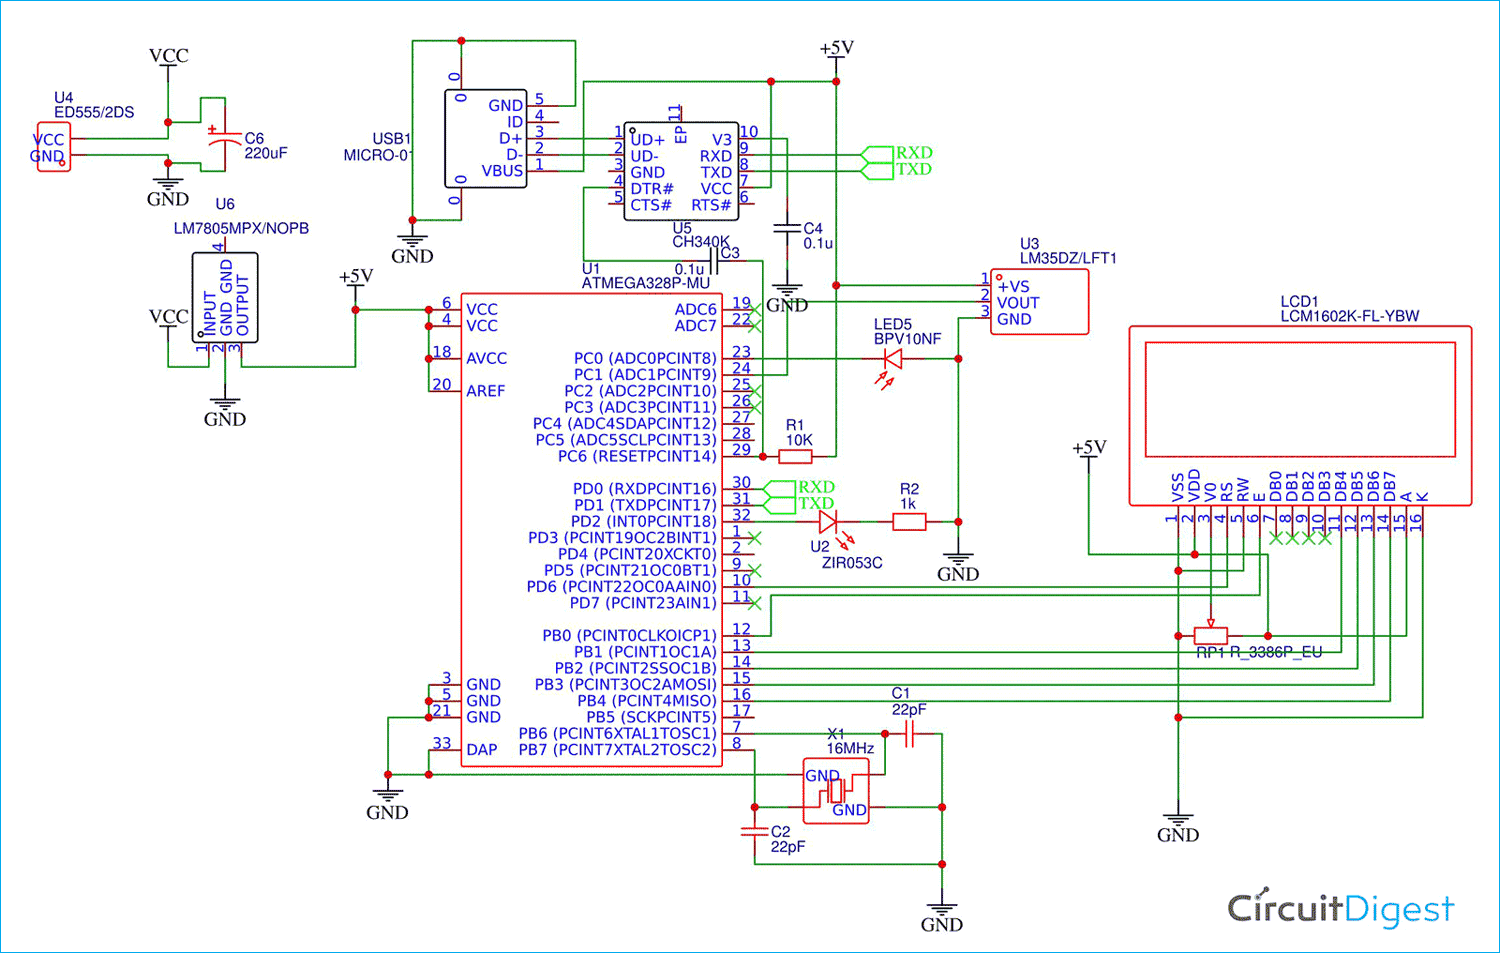
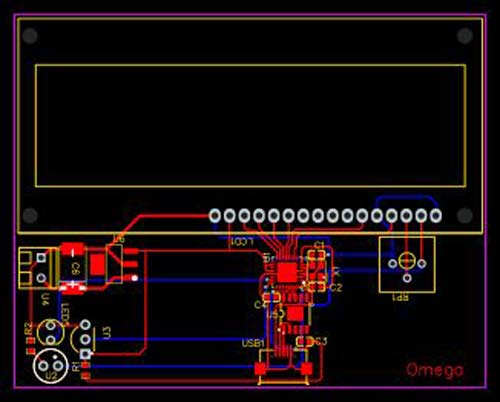
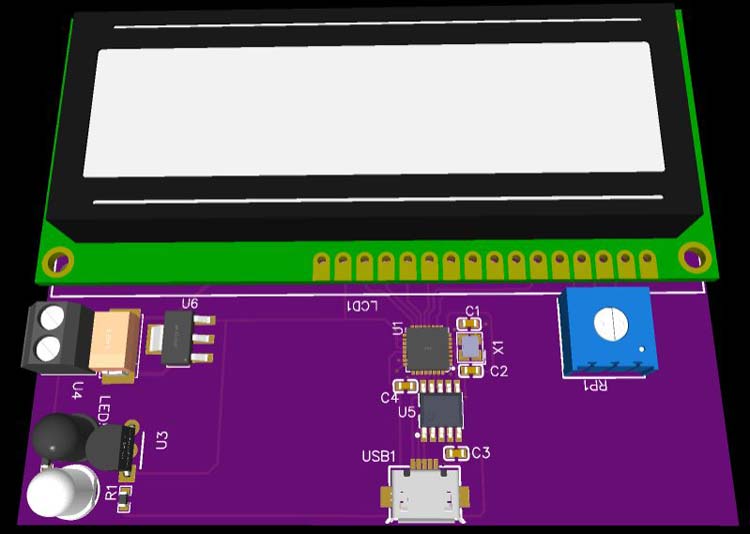
The Screw Terminal is given for a battery input source, then it is fed into a 5v voltage regulator that regulates the input voltage to fixed 5v, then there is a 16x2 LCD for showing the measurements, and for the sensor, we have the IR LED and Photodiode, along with that an LM35 temperature sensor. These sensors were interfaced by the microcontroller sitting at the middle and the USB to TTL chip Ch340 sitting below the microcontroller is used to interface it with the computer, and for connecting Paean to the computer a micro USB port is given which can be connected by a USB cable.
Challenges
We ran into the biggest challenge was, being able to calculate the SPO2 level. Other than that, some more challenges that we faced were making the IR sensor, for it was a bit troublesome. At first, it was not providing as smooth readings as we desired to achieve, and instead, the sensor was causing some random noises that affected the readings. Finding the filter coefficients for accurate readings took a lot of trial and error. The algorithm for auto-calibration was a tough one.
Accomplishments
Accomplishments that we're proud of We are very proud to have completed our project, and our biggest achievement was getting accurate data from the temperature sensor and achieving the correct SPO2 level and the accurate BPM. And lastly, transmitting the data to the computer and plotting it with the Java GUI was the greatest achievement of the project.
What we will learn?
We learned about the SPO2 level and how we can achieve that using red light, in addition to achieving the photoplethysmogram with optical sensors like photodiodes and IR LEDs. We also learned about the digital filters, which we can implement into our future projects, and being the most helpful. We were pretty amazed by knowing that we are surrounded by so many signals, and it contains data. Even when we saw the signal from the sensor read by the ADC, it was such a mess and very noisy reading. After filtering, we were able to get the desired reading.
What's next for Paean?
Next, we will try to build an app that will display all the data recorded from the person using Paean. If in the future we are successful in building the app, then it will also be able to analyze and express if the user has any health condition using algorithms. Along with focusing on the COVID test, this hack will also help people, in general, to monitor their well-being and learn about the factors that affect their health. We will try to turn this device into a commercial product that can also be used for educational purposes in institutes and hospitals.
#include <LiquidCrystal.h>
#define alpha 0.2
#define alpha2 0.05
#define alphar 0.4
#define alphar2 0.002
#define nIR 200
#define nRed 50
int data[nIR];
int dataR[nRed];
byte bheart[8] = {
  0b00000,
  0b01010,
  0b11111,
  0b11111,
  0b11111,
  0b01110,
  0b00100,
  0b00000
};
byte sheart[8] = {
  0b00000,
  0b00000,
  0b01010,
  0b11111,
  0b01110,
  0b00100,
  0b00000,
  0b00000
};
const int rs = 9, en = 7, d4 = 6, d5 = 4, d6 = 3, d7 = 2;
LiquidCrystal lcd(rs, en, d4, d5, d6, d7);
float x, y, raw, sum = 0, avg = 0, braw = 0.0, max = 0, bpm = 0.0, lavg = 0.0, conf, lbpm, spraw=0.0, bpmavg;
int idx = 0, idxr=0;
int ct = 0;
long ls = 0, ps = 0, cs = 0;
boolean f=false;
float rmin=0,rmax=0, imin=0, imax=0, lspraw=0.0;
void setup()
{
  lcd.begin(16, 2);

  lcd.createChar(0, bheart);
  lcd.createChar(1, sheart);
  lcd.clear();
  delay(1000);
  lcd.print("     Paean");
  lcd.setCursor(1,1);
  lcd.print("Place Finger");
float diff=0.0;
int f=1;
String s="";
ps=millis();
int n=0,c=0;
float rawtemp=0, ltemp=0;
  pinMode(A0, INPUT_PULLUP);
  pinMode(A1, INPUT);
    pinMode(A5, INPUT);
  Serial.begin(38400);
  for(int i=0;i<nIR;i++)
  data[i]=0;
  for(int i=0;i<nRed;i++)
  dataR[i]=0;
  delay(3000);
  lcd.clear();
      lcd.setCursor(0, 1);
      lcd.print("BPM:");
      lcd.print((int)lavg);
      lcd.setCursor(5, 0);
      lcd.print("SpO2:");
      lcd.print(spraw/10);
  for(;;)
  {
   braw = calRawIR();
   rawtemp+=calRawTemp();
    if (braw > 2 && f)
    {
      spraw+=(((diff/rmin)/4.58)*92.26+8.05);
      rmax=calRawRed();
      ps = millis() - ls;
      ls = millis();
      f = 0;
      n++;
      bpmavg += bpm;
      bpm = (1000.0 / ps) * 60;
      lcd.setCursor(0, 0);
      lcd.write(byte(1));

    }

    else if (braw < -0.5)
    {
      f = 1;
      lcd.setCursor(0, 0);
      lcd.write(byte(0));
      rmin=calRawRed();
      diff=abs(rmin-rmax)*-1;
    }

   if(n==9)
   {
    lavg = bpmavg / 10;
    lcd.clear();
      lcd.setCursor(7, 1);
      lcd.print("T:");
      lcd.print(ltemp);
      lcd.print("C");
      lcd.setCursor(0, 1);
      lcd.print("BPM:");
      lcd.print((int)lavg);
      lcd.setCursor(5, 0);
      lcd.print("SpO2:");
      lcd.print(spraw/10);

      rawtemp=0;
      spraw=0;
      bpmavg=0;
    n=0;
   }

    if(c==1000)
    {
      c=0;
      lcd.setCursor(7, 1);
      lcd.print("T:");
      if(rawtemp/1000.00>32)
      ltemp=rawtemp/1000.00;
      lcd.print(ltemp);
      lcd.print("C");
      rawtemp=0;
    }
   c++;
   Serial.println(braw);
  }
}
void loop()
{

}

float calRawIR()
{
  raw = analogRead(A0);
  x  = alpha * raw + (1 - alpha) * x;
  y  = alpha2 * x + (1 - alpha2) * y;

  sum -= data[idx];
  data[idx] = raw;
  sum += raw;

  idx = (idx + 1) % nIR;

  avg = sum / nIR;

  return (y-avg);
}
float xr, yr, sumr = 0, avgr = 0, rawr;

float calRawRed()
{
  rawr = analogRead(A1);
  xr  = alphar * rawr + (1 - alphar) * xr;
  yr  = alphar2 * xr + (1 - alphar2) * yr;
  sumr -= dataR[idxr];
  dataR[idxr] = (xr-yr)*7;
  sumr += (xr-yr)*7;

  idxr = (idxr + 1) % nRed;

  avgr = sumr / nRed;
  return (y-avg)/3.0;
}

float temp=0.0;

float calRawTemp()
{
  float rawt = analogRead(A5);
  temp=0.1*rawt + 0.9*temp
  float mv = (temp/870.0)*5002.0;
  float cel = mv/10;
  return cel;
}

