In this tutorial, we are going to look at the ESP RainMaker. ESP RainMaker is the end-to-end platform for the ESP chips from Experessif. It is designed as a successor to Experessif’s ESP Jumpstart platform. ESP RainMaker enables customers to quickly design, build and deploy AIoT solutions based on enterprise-level cloud computing without the hassle of managing any infrastructure. It is a collection of device-agent SDK, a transparent cloud application, and iOS/Android phone apps. This lets developers write the firmware and instantaneously interact with it through the phone apps or voice assistants without writing a single line of code in the cloud or the phone applications. Makers can just focus on developing their firmware without worrying about the app or cloud integration and the rest of the infrastructure.
The ESP Rainmaker is similar to other IoT services like the Blynk application, Ubidots, Thingspeak, IFTTT, Arduino IoT cloud, etc. But this platform offers more features such as self-adapting mobile apps, free integration of Alexa and Google Assistant, Node sharing, Wi-Fi provisioning through QR code, and much more. The great attribute of using this IoT platform is that it is free for its users and offers great features. The primary components of this solution are:
- Claiming Service (to get the Cloud connectivity credentials)
- RainMaker Agent (i.e. Rainmaker repo, to develop the firmware)
- RainMaker Cloud (backend, offering remote connectivity)
- RainMaker Phone App/CLI (Client utilities for remote access)
ESP Rainmaker Features and Benefits
A few main features and benefits of the ESP RainMaker platform are as follows:
- Minimal R&D investment due to the turnkey solution.
- Safe and stable upscale options.
- Reduced development time.
- Maintenance-free, riskless cloud solution.
- Pay-as-you-use solution based on AWS serverless architecture.
- Private cloud solution for better security and privacy.
- Supports most mainstream services such as Alexa, Google Assistant, Apple Homekit, and Matter.
- Node sharing – This allows users to share their device’s control over the internet.
- Timezone setting – the timezone of each device or node can be changed through the phone app instead of hard coding.
- Arduino Support – ESP rainmaker now supports Arduino IDE, which is great news for the DIY community.
- Node grouping – Users can now manage nodes as a group, which enables the users to manage multiple devices with ease.
- FaaS — Function As A Service - In addition to managed services, the Serverless architecture offers a “FaaS (Function-as-a-Service)” runtime that allows developers to write code snippets that can work on the data and interact with available services. Developers can use their familiar programming languages (such as Python, node.js and Go) with SDKs to interact with services. FaaS is also charged based on the number of executions and time and memory consumption of the runtime.
ESP RainMaker Workflow
Now let’s look at the simple workflow of the Rainmaker and how it works.
- Once the ESP32 is programmed with ESP RainMaker firmware, the ESP32 will generate and display a QR code in the serial monitor which can be scanned using the ESP rainmaker app.
- Once the QR code is scanned the app will initiate BLE communication with the ESP32 SoC.
- After connecting with the ESP32 we can start provisioning the SoC by providing the WiFi credentials.
- The ESP32 will establish the connection to the ESP RainMaker Cloud through the WiFi and will exchange the relevant data we have programmed to do.
- Once the ESP32 is connected to the cloud we can communicate it through either the cloud service or the mobile app.
Circuit Diagram for the ESP RainMaker Example
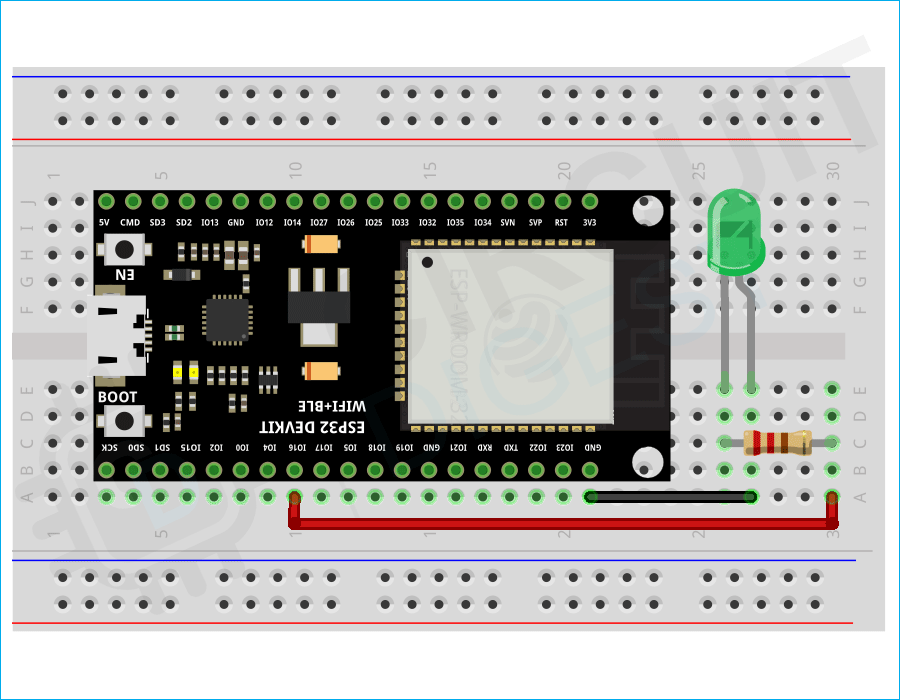
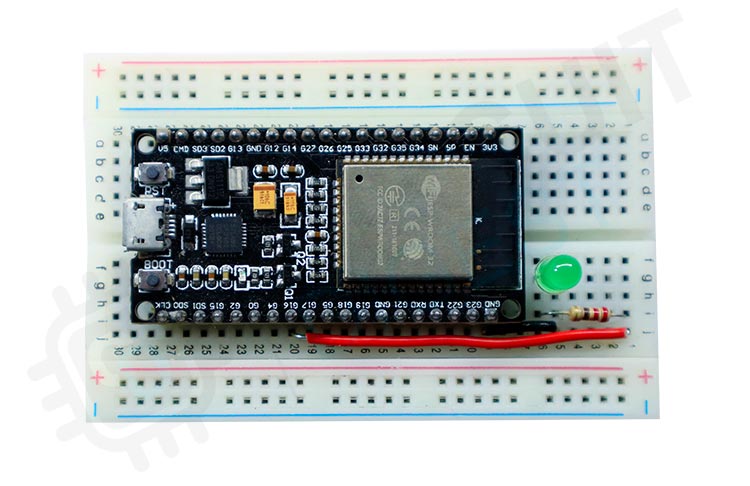
We have already build a lot of interesting projects using ESP32. Now in this article lets start with the basics again by interfacing an LED with ESP32, but this time using ESP32 with Rainmaker. For that, connect an LED to the GPIO16 through a current limit resistor as shown below. And for the switch, we will use the onboard boot switch.
Here is how the real-life connection looks.
Commonly Asked Questions
What is ESP RainMaker?
ESP RainMaker is a platform that allows developers to build connected devices with Espressif's ESP32 SoC without the hassle of managing the infrastructure. It provides a device SDK, self-adapting phone apps, transparent cloud middleware, and host utilities to reduce complexity in the development of connected devices.
Where is the ESP RainMaker Cloud infrastructure hosted?
ESP RainMaker uses Amazon Web Services (AWS) Servers.
Is ESP RainMaker Free?
ESP RainMaker will always be available to makers, hobbyists, and teachers, for free. They also offer paid services without the limitations of public service.
Using ESP RainMaker with Arduino IDE
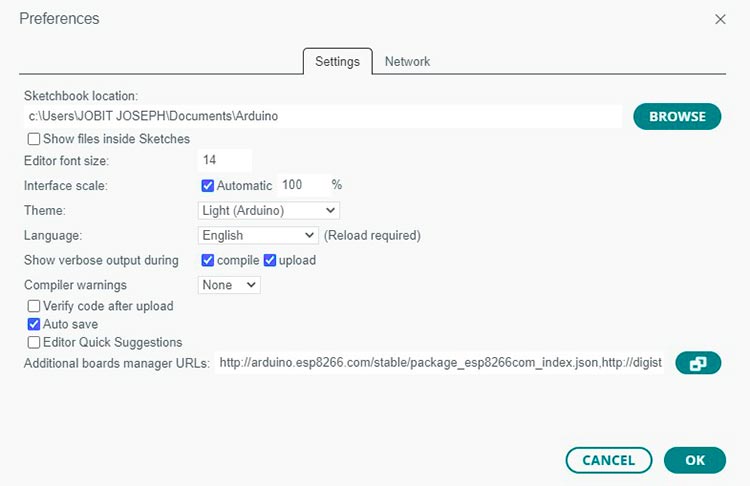
Now let’s look at how we can use the ESP RainMaker with the Arduino IDE. For that, we must install the ESP32 board V2.0. If you have already installed the V2.0 you can skip this step. If you have an old version, update the board definition to the latest one. If you don’t have the ESP32 board installed or if the board manager is not showing version 2.0, install it using the following Jason link.
https://raw.githubusercontent.com/espressif/arduino-esp32/gh-pages/package_esp32_index.json
To install the board, add the above link to the additional board manager URLs section in the Arduino IDE preferences menu as shown below.
After that Search for ESP32 in the board manager and install the latest version. Then in the IDE, select board as ESP32 Dev Module, flash size as per your board, and the partition scheme as RainMaker. Once it’s done, open the example code attached below this article, compile it, and upload it to the ESP32 development board. Download the ESP RainMaker app. Scan the QR code displayed in the serial Monitor using the Rainmaker APP.
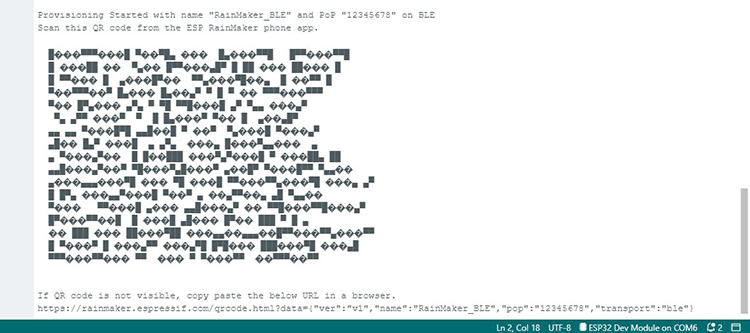
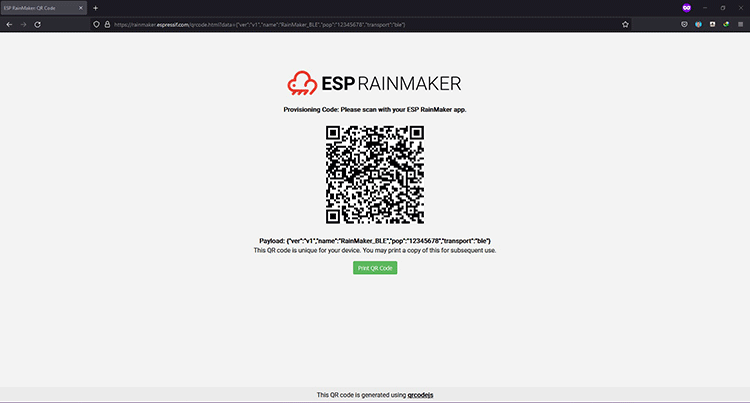
If the QR code is not proper as shown above, copy the URL at the bottom of the serial monitor and paste it to any browser. The browser will now show the correct QR code and you can scan it using the app.
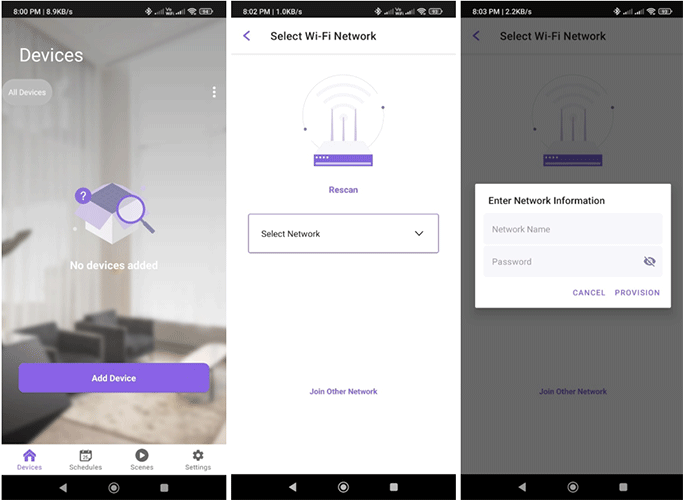
Open the app and log in to it. If you haven’t added any device previously the app will show the home screen with add device button. Click on it and scan the QR code. Once the app is connected to the ESP32 through BLE (Bluetooth Low energy), the app will show a screen to select the WiFi connection. If your phone doesn’t show any Wi-Fi networks in the app, you can enter the WiFi credentials manually by clicking on the Join Other Network Option.
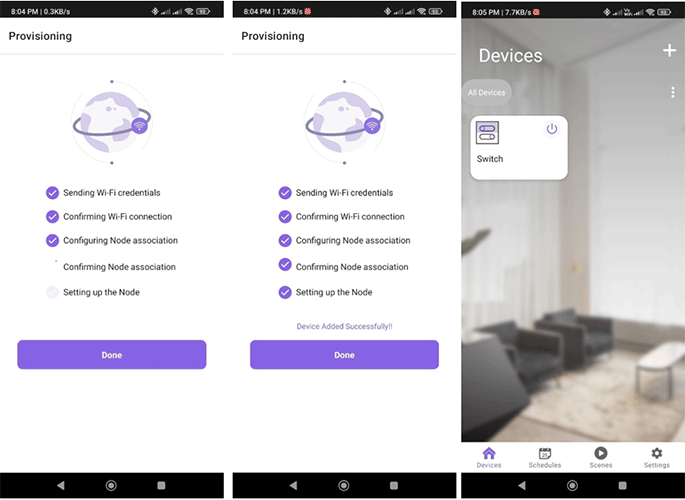
Once it’s done, the ESP will automatically connect to the WiFi network and a new device called Switch will be added to the app’s home screen. From there you can control the LED using the switch button on the device.
Arduino Code for Using ESP RainMaker
Now let’s look at the code.
#include "RMaker.h"
#include "WiFi.h"
#include "WiFiProv.h"
#define DEFAULT_POWER_MODE true
const char *service_name = "RainMaker_BLE";
const char *pop = "12345678";
//GPIO for virtual device
static int gpio_0 = 0;
static int gpio_switch = 16;
/* Variable for reading pin status*/
bool switch_state = true;
//The framework provides some standard device types like a switch, lightbulb, fan, temperature sensor.
static Switch my_switch;
At the start, we have included all the necessary libraries, which include the WiFi and RainMaker libraries. Later we specified the BLE credentials using the pointers service_name and pop, which will be used while the provisioning. Then we have defined the GPIO pins used for the LED and switch. We have also created a Boolean variable called switch_state to store the switch status.
void sysProvEvent(arduino_event_t *sys_event) {
    switch (sys_event->event_id) {
        case ARDUINO_EVENT_PROV_START:
#if CONFIG_IDF_TARGET_ESP32S2
        Serial.printf("\nProvisioning Started with name \"%s\" and PoP \"%s\" on SoftAP\n", service_name, pop);
        printQR(service_name, pop, "softap");
#else
        Serial.printf("\nProvisioning Started with name \"%s\" and PoP \"%s\" on BLE\n", service_name, pop);
        printQR(service_name, pop, "ble");
#endif
        break;
        default:;
    }
}
The sysProvEvent function is used for system provisioning events. This function will obtain the Wi-Fi credentials and connect ESP32 to the router.
void write_callback(Device *device, Param *param, const param_val_t val, void *priv_data, write_ctx_t *ctx) {

    const char *device_name = device->getDeviceName();

    const char *param_name = param->getParamName();

    if(strcmp(param_name, "Power") == 0) {

        Serial.printf("Received value = %s for %s - %s\n", val.val.b? "true" : "false", device_name, param_name);

        switch_state = val.val.b;

        (switch_state == false) ? digitalWrite(gpio_switch, LOW) : digitalWrite(gpio_switch, HIGH);

        param->updateAndReport(val);

    }

}
The following callback function will be responsible for checking the particular device which sent the data and then changing the parameter of the device accordingly. This callback function will be used for the device LED. If the device is ‘LED’ and its parameter is ‘Power’ then this function will check whether the state of the LED pin is HIGH or LOW. If the power is HIGH, the LED will turn ON. Similarly, if the power is LOW, the LED will turn OFF.
{
    Serial.begin(115200);
    pinMode(gpio_0, INPUT);
    pinMode(gpio_switch, OUTPUT);
    digitalWrite(gpio_switch, DEFAULT_POWER_MODE);
    Node my_node;
    my_node = RMaker.initNode("ESP RainMaker Node");
    //Initialize switch device
    my_switch = Switch("Switch", &gpio_switch);
    //Standard switch device
    my_switch.addCb(write_callback);
    //Add switch device to the node
    my_node.addDevice(my_switch);
    //This is optional
    RMaker.enableOTA(OTA_USING_PARAMS);
    //If you want to enable scheduling, set the time zone for your region using setTimeZone().
    //The list of available values are provided here https://rainmaker.espressif.com/docs/time-service.html
    // RMaker.setTimeZone("Asia/Shanghai");
    // Alternatively, enable the Timezone service and let the phone apps set the appropriate timezone
    RMaker.enableTZService();
    RMaker.enableSchedule();
    RMaker.start();
    WiFi.onEvent(sysProvEvent);
#if CONFIG_IDF_TARGET_ESP32S2
    WiFiProv.beginProvision(WIFI_PROV_SCHEME_SOFTAP, WIFI_PROV_SCHEME_HANDLER_NONE, WIFI_PROV_SECURITY_1, pop, service_name);
#else
    WiFiProv.beginProvision(WIFI_PROV_SCHEME_BLE, WIFI_PROV_SCHEME_HANDLER_FREE_BTDM, WIFI_PROV_SECURITY_1, pop, service_name);
#endif
}
Inside the setup() function, we open the serial communication at a baud rate of 115200. Then we configure the reset pin as an input pin and the LED pin as an output pin. This is done by using pinMode() function and specifying the GPIO pin as the first parameter and the mode as the second parameter. Moreover, we will initially set the LED pin in a LOW state. Then we will declare a node with the name “ESP RainMaker Node”. Later we declared the switch device. We also declared the call-back function for the switch device and enabled the time zone service. Later we started the RainMaker band using Rmaker.start function and called the sysProEvent function after that for provisioning.
void loop() {
    if(digitalRead(gpio_0) == LOW) { //Push button pressed
        // Key debounce handling
        delay(100);
        int startTime = millis();
        while(digitalRead(gpio_0) == LOW) delay(50);
        int endTime = millis();
        if ((endTime - startTime) > 100) {
          // Toggle device state
          switch_state = !switch_state;
          Serial.printf("Toggle State to %s.\n", switch_state ? "true" : "false");
          my_switch.updateAndReportParam(ESP_RMAKER_DEF_POWER_NAME, switch_state);
          (switch_state == false) ? digitalWrite(gpio_switch, LOW) : digitalWrite(gpio_switch, HIGH);
      }
    }
    delay(100);
}
In the loop, we will monitor the state of GPIO0 and will update the parameter switch_state accordingly. We will also print the status change to the serial monitor for debugging purposes. And here is the result.
Common Problems and Solutions while Uploading RainMaker Firmware
RainMaker Failed to create a claim endpoint after uploading the code.
Solution: Make sure to choose the partitioning scheme with the OTA option. Preferably the RainMaker option itself.
RainMaker Claiming failed error!
Solution: Enable Erase all flash content before sketch upload.
ESP32 failed to start reboots continuously.
Solution: Select the proper flash size as per your board and choose the partitioning scheme with the OTA option. Preferably the RainMaker option itself.
Supporting Files
#include "RMaker.h"
#include "WiFi.h"
#include "WiFiProv.h"

#define DEFAULT_POWER_MODE true
const char *service_name = "RainMaker_BLE";
const char *pop = "12345678";
//GPIO for virtual device
static int gpio_0 = 0;
static int gpio_switch = 16;

/* Variable for reading pin status*/
bool switch_state = true;

//The framework provides some standard device types like switch, lightbulb, fan, temperaturesensor.
static Switch my_switch;

void sysProvEvent(arduino_event_t *sys_event)
{
    switch (sys_event->event_id) {
        case ARDUINO_EVENT_PROV_START:
#if CONFIG_IDF_TARGET_ESP32S2
        Serial.printf("\nProvisioning Started with name \"%s\" and PoP \"%s\" on SoftAP\n", service_name, pop);
        printQR(service_name, pop, "softap");
#else
        Serial.printf("\nProvisioning Started with name \"%s\" and PoP \"%s\" on BLE\n", service_name, pop);
        printQR(service_name, pop, "ble");
#endif
        break;
        default:;
    }
}

void write_callback(Device *device, Param *param, const param_val_t val, void *priv_data, write_ctx_t *ctx)
{
    const char *device_name = device->getDeviceName();
    const char *param_name = param->getParamName();

    if(strcmp(param_name, "Power") == 0) {
        Serial.printf("Received value = %s for %s - %s\n", val.val.b? "true" : "false", device_name, param_name);
        switch_state = val.val.b;
        (switch_state == false) ? digitalWrite(gpio_switch, LOW) : digitalWrite(gpio_switch, HIGH);
        param->updateAndReport(val);
    }
}

void setup()
{
    Serial.begin(115200);
    pinMode(gpio_0, INPUT);
    pinMode(gpio_switch, OUTPUT);
    digitalWrite(gpio_switch, DEFAULT_POWER_MODE);

    Node my_node;
    my_node = RMaker.initNode("ESP RainMaker Node");

    //Initialize switch device
    my_switch = Switch("Switch", &gpio_switch);

    //Standard switch device
    my_switch.addCb(write_callback);

    //Add switch device to the node
    my_node.addDevice(my_switch);

    //This is optional
    RMaker.enableOTA(OTA_USING_PARAMS);
    //If you want to enable scheduling, set time zone for your region using setTimeZone().
    //The list of available values are provided here https://rainmaker.espressif.com/docs/time-service.html
    // RMaker.setTimeZone("Asia/Shanghai");
    // Alternatively, enable the Timezone service and let the phone apps set the appropriate timezone
    RMaker.enableTZService();

    RMaker.enableSchedule();

    RMaker.start();

    WiFi.onEvent(sysProvEvent);
#if CONFIG_IDF_TARGET_ESP32S2
    WiFiProv.beginProvision(WIFI_PROV_SCHEME_SOFTAP, WIFI_PROV_SCHEME_HANDLER_NONE, WIFI_PROV_SECURITY_1, pop, service_name);
#else
    WiFiProv.beginProvision(WIFI_PROV_SCHEME_BLE, WIFI_PROV_SCHEME_HANDLER_FREE_BTDM, WIFI_PROV_SECURITY_1, pop, service_name);
#endif
}

void loop()
{
    if(digitalRead(gpio_0) == LOW) { //Push button pressed

        // Key debounce handling
        delay(100);
        int startTime = millis();
        while(digitalRead(gpio_0) == LOW) delay(50);
        int endTime = millis();

        if ((endTime - startTime) > 100) {
          // Toggle device state
          switch_state = !switch_state;
          Serial.printf("Toggle State to %s.\n", switch_state ? "true" : "false");
          my_switch.updateAndReportParam(ESP_RMAKER_DEF_POWER_NAME, switch_state);
          (switch_state == false) ? digitalWrite(gpio_switch, LOW) : digitalWrite(gpio_switch, HIGH);
      }
    }
    delay(100);
}
