As the IoT revolution is booming with every single day, the number of connected devices are increasing very rapidly. In future, most of the devices will be connected with each other and will communicate in real time. One of the problem faced by these device is power consumption. This power consumption factor is one of the critical and decisive factor for any IoT device and IoT Projects.
As we know that ESP8266 is one of the most popular module to build any IoT project, so in this article we learn about saving power while using ESP8266 in any IoT application. Here we upload LM35 temperature sensor data to ThingSpeak cloud in 15 seconds interval and during those 15 seconds ESP8266 remains in DeepSleep mode to save the power
Different Methods to Minimize Power Consumption
We can write a firmware to make the hardware sleep when there is no exchange of data and perform the defined task in a particular interval. In sleeping mode, the connected hardware draws very less power and hence the battery can last long. You can also read Minimizing Power Consumption in Microcontrollers, if you want to know more about power consumption techniques.
ESP8266 modules are the most widely used Wi-Fi modules comes with many features in small size having different modes including sleep mode and these modes can be accessed using some modification in hardware and software. To learn more about ESP8266, you can check our IoT based projects using ESP826 Wi-Fi module, some of them are listed below:
- Interfacing ESP8266 NodeMCU with Atmega16 Microcontroller to Send an Email
- Sending Temperature and Humidity sensor data to Firebase Real-Time Database using NodeMCU ESP8266
- IoT Controlled LED using Google Firebase Console and ESP8266 NodeMCU
Here we will explain different sleep modes available in ESP8266 and demonstrate them by sending temperature data to Thingspeak server in a regular interval using the deep sleep mode.
Components Required
- ESP8266 Wi-Fi Module
- LM35 temperature sensor
- Jumper wires
Types of Sleep Modes in ESP8266
Esp8266 module operates in the following modes:
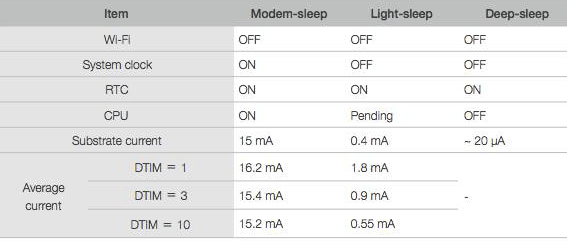
- Active mode: In this mode, whole chip is powered on and chip can receive, transmit the data. Obviously, this is the most power consuming mode.
- Modem-sleep mode: In this mode, the CPU is operational and the Wi-Fi radios are disabled. This mode can be used in the applications which requires the CPU to be working, as in PWM. It makes the Wi-Fi Modem circuit to turn off while connected with the Wi-Fi AP (Access Point) with no data transmission to optimize power consumption.
- Light-sleep mode: In this mode, the CPU and all peripherals are paused. Any wake-up such as external interrupts will wake up the chip. Without data transmission, the Wi-Fi Modem circuit can be turned off and CPU suspended to save power consumption.
- Deep-sleep mode: In this mode only the RTC is functional and all other components of the chip are powered off. This mode is useful where the data is transmitted after a long time intervals.
Deep-Sleep Mode in ESP8266
Modem-sleep and Light-sleep are useful when you need to have ESP8266 module functioning while some of the functions shut down. But if you need some serious power control then go for the Deep-sleep mode. The overall average current is less than 1mA. At 2.5V the current requirement is only 20 μA.
Steps to use the Deep-sleep mode:
- Connect the module with the Wi-Fi AP
- Perform a task like reading a sensor value, publishing an MQTT message, etc.
- Sleep for a defined number of microseconds
- Repeat the above process again
Sleep time is defined in microseconds. According to the ESP8266 SDK, you can only sleep for 4,294,967,295 µs which is about ~71 minutes.
Setting up the ESP8266 Module:
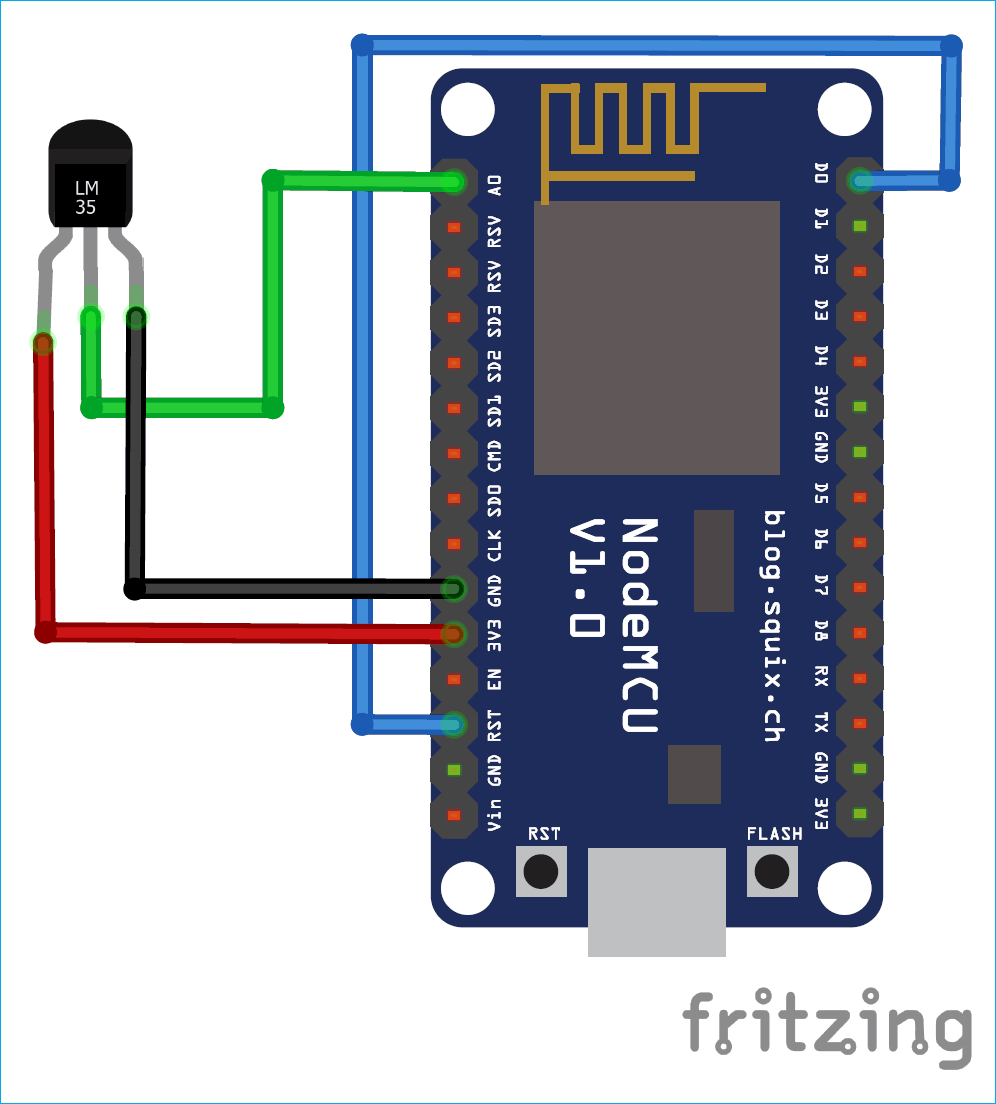
Connect the RST pin of ESP8266 with the GPIO 16 i.e. D0 pin. GPIO 16 is important pin which has a WAKE feature.
Connect the LM35 temperature sensor with the A0 pin of NodeMCU.
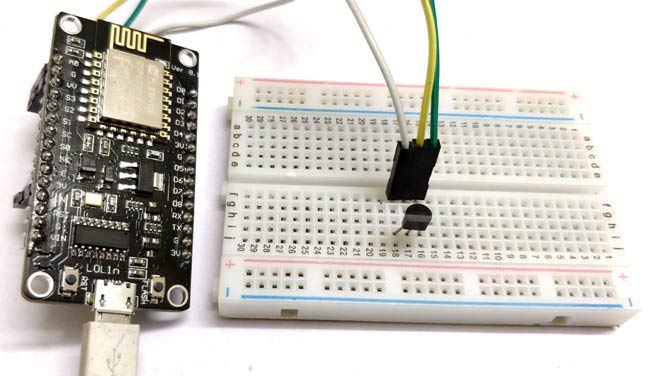
When the ESP module has HIGH on RST pin, it is in running state. As soon as it receives LOW signal on RST pin, the ESP restarts.
Set timer using deep sleep mode, once the timer ends then the D0 pin sends the LOW signal to RST pin and the module will wake up by restarting it.
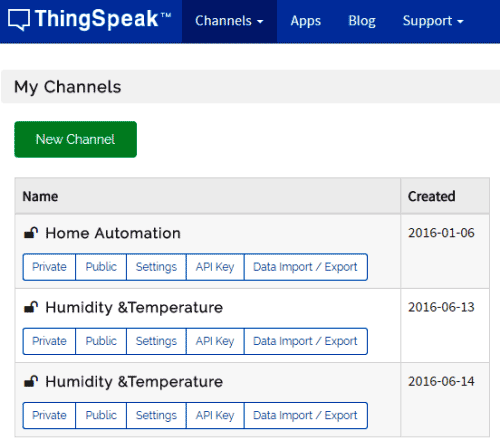
Now, the hardware is ready and well configured. The temperature readings will be sent on the Thingspeak server. For this, make an account on thingspeak.com and create a channel by going through the below steps.
Now, copy the Write API key. Which will be used in the ESP code.
ESP8266 Deep Sleep Mode Programming
The easily available Arduino IDE will be used to program ESP8266 module. Make sure that all the ESP8266 board files are installed.
Start with including all the important libraries required.
#include <ESP8266WiFi.h>
Once all libraries are included for accessing the functions then assign the API write key, configure your Wi-Fi name and password. Then declare all the variables for further use where data to be stored.
String apiWritekey = "*************"; // replace with your THINGSPEAK WRITEAPI key here
char ssid[] = "******"; // your wifi SSID name
char password[] = "******" ;// wifi pasword
Now, make a function to connect the module with the Wi-Fi network using wifi.begin() function and then check continuously till the module is not connected to Wi-Fi using while loop.
void connect1() {
  WiFi.disconnect();
  delay(10);
  WiFi.begin(ssid, password);
  while (WiFi.status() != WL_CONNECTED) {
Make another function to send the data to thingspeak server. Here, a string will be sent which contains the API write key, field number and data that have to be sent. Then send this string using client.print() function.
void data() {
  if (client.connect(server,80))
  {
    String tsData = apiWritekey;
           tsData +="&field1=";
           tsData += String(tempF);
           tsData += "\r\n\r\n";
     client.print("POST /update HTTP/1.1\n");
     client.print("Host: api.thingspeak.com\n");
Call the connect1 function which will call the function to connect Wi-Fi then take the readings of the temperature and convert it into Celsius.
void setup() {
  Serial.begin(115200);
  Serial.println("device is in Wake up mode");
  connect1();
  int value = analogRead(A0);
  float volts=(value/1024.0)*5.0;
  tempC = volts*100.0;
Now, call the data() function to upload the data on thingspeak cloud. Finally, the important function to call is ESP.deepSleep(); this will make the module to sleep for the defined interval of time which is in microseconds.
 data();
 Serial.println("deep sleep for 15 seconds");
 ESP.deepSleep(15e6);
Loop function will remain empty as all the task has to be performed once and then reset the module after the defined interval of time.
The working video and full code is given at the end of this tutorial. Upload the code in the ESP8266 module. Remove the RST and D0 connected wire before uploading the program else it will give an error.
Testing DeepSleep in the ESP8266
After uploading the program you will see that temperature readings are uploading on the ThingSpeak cloud after every 15 seconds and then module go in the deep sleep mode.
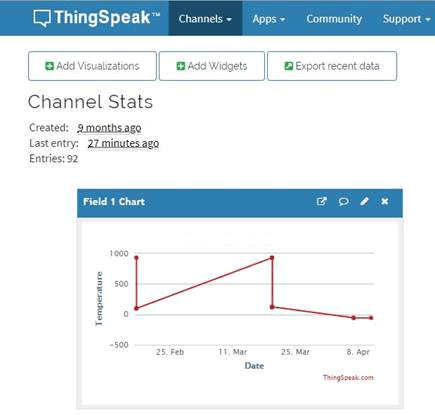
This completes the tutorial on using Deep Sleep in ESP8266 module. The deepsleep is very important feature and it has been included in most of the devices. You can refer this tutorial and apply this method for different projects. In case of any doubts or suggestion, then please write and comment below. Also you can reach to our forum.
// esp8266 deepsleep
#include <ESP8266WiFi.h>
String apiWritekey = "*************";
char ssid[] = "XXXXXXXXXX"; // enter your wifi home router ssid
char password[] = "XXXXXXXXXX" ; // enter your wifi home router ssid
char server[] = "api.thingspeak.com";
double tempF;
double tempC;
WiFiClient client;
void connect1() {
WiFi.disconnect();
delay(10);
Serial.print("Connecting to ");
Serial.println(ssid);
WiFi.begin(ssid, password);
while (WiFi.status() != WL_CONNECTED) {
delay(500);
Serial.print(".");
}
Serial.println("");
Serial.print("NodeMcu connected to wifi...");
}
void data() {
if (client.connect(server,80))
{
String Data = apiWritekey;
Data +="&field1=";
Data += String(tempF);
Data += "\r\n\r\n";
client.print("POST /update HTTP/1.1\n");
client.print("Host: api.thingspeak.com\n");
client.print("Connection: close\n");
client.print("X-THINGSPEAKAPIKEY: "+apiWritekey+"\n");
client.print("Content-Type: application/x-www-form-urlencoded\n");
client.print("Content-Length: ");
client.print(Data.length());
client.print("\n\n");
client.print(Data);
Serial.println("uploaded to Thingspeak server....");
}
client.stop();
}
void setup() {
Serial.begin(115200);
Serial.println("device is in Wake up mode");
while (!Serial) { }
connect1();
int value = analogRead(A0);
float volts=(value/1024.0)*5.0; //conversion to volts
tempC = volts*100.0; //conversion to temp Celsius
Serial.print("Temperature C: ");
Serial.println(tempC);
data();
Serial.println("deep sleep for 15 seconds");
ESP.deepSleep(15e6);
}
void loop() {
}

