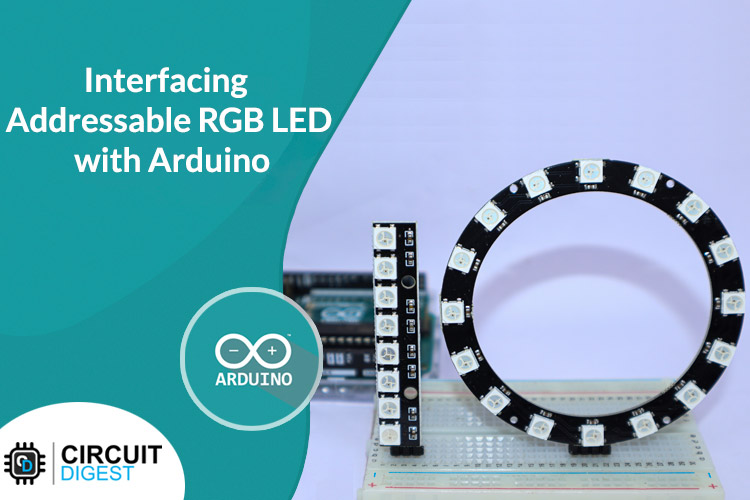
When you require a dynamic lighting solution, LED strips are a great choice. They may be mounted almost anywhere, available in a variety of colours, and require very little maintenance. Finding another lighting system that offers as much value and style would be challenging. And even this standard is raised to a completely new level by addressable LED strips. They provide you with more control options and fun effects to add even more glitz to your lighting setup. These addressable LEDs can be easily controlled by an Arduino. So, in this Arduino inerfacing tutorial series, we are going to look at how to interface such LEDs with Arduino. We will be interfacing the WS2812B LEDs which are also known as NeoPixel. We can build many Neopixel led projects previously, you can check them out if you are interested.
Types of Addressable RGB LEDs - A Comparison
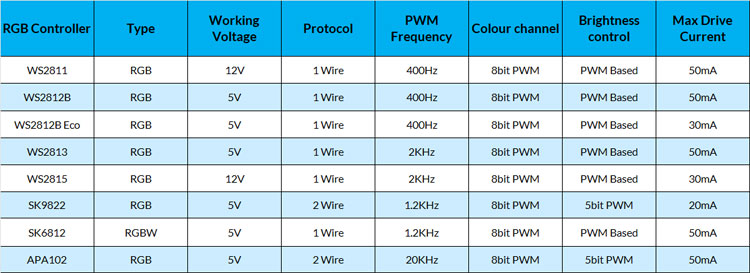
There are multiple types of addressable RGB LEDs available in the market. They come in different sizes and pinouts. But the major difference between them is the controller used in them. There are many popular RGB-LED controllers available in the market including the WS281x Series, SK6812, SK9822, and APA102. The table below shows the major differences between these popular controllers.
WS2812B Module
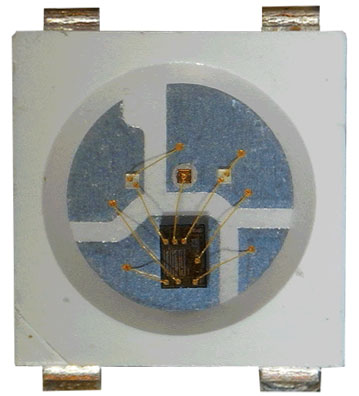
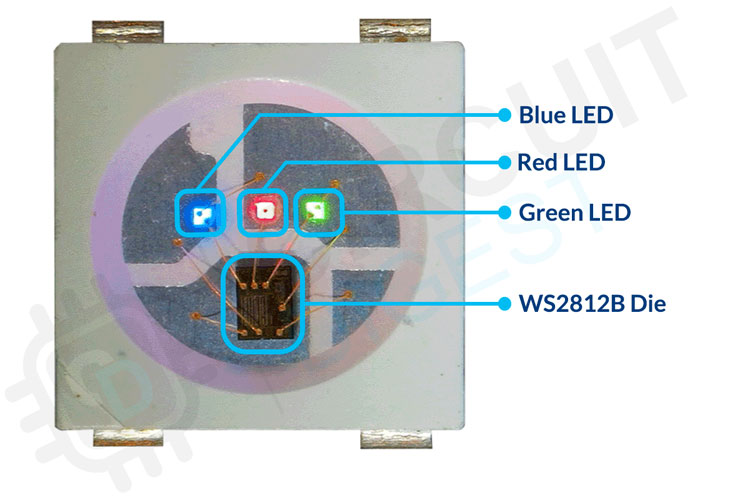
The real-life closeup image of a WS2812B LED is given below. You can see that the WS2812B die is connected to 3 individual LEDs namely Red, Green and Blue using gold wires.
The video below shows the working of an actual WS2812B LED.
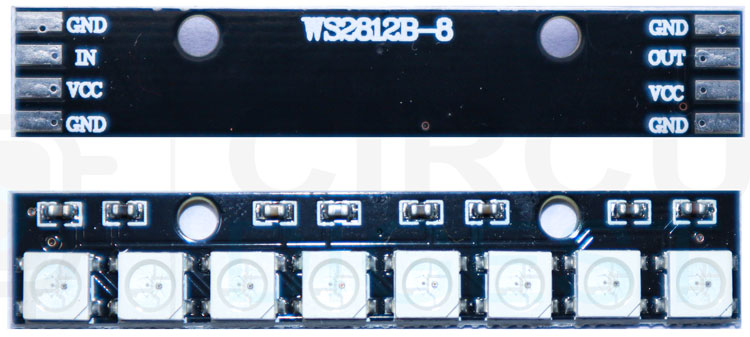
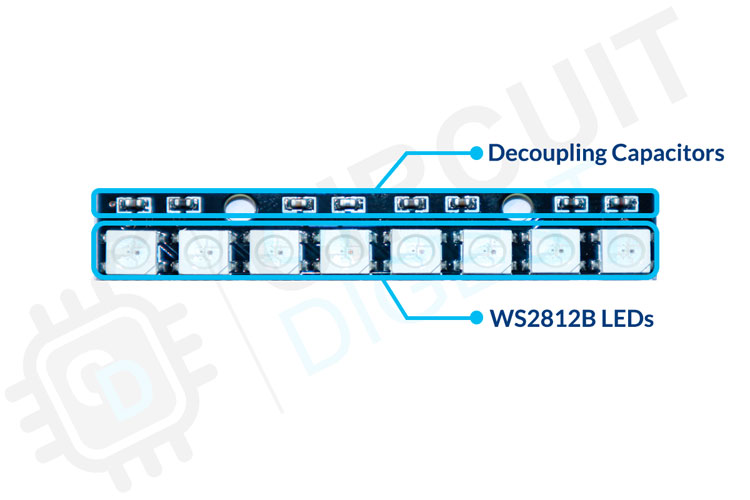
The image below shows the RGB LED module with 8 WS2812B LEDs in series. Each of these LEDs can be controlled individually using just one wire. The data in of the first LED is connected to the microcontroller pin and the DO or the data output pin is connected to the DI or the Data input pin of the next RGB LED. Similarly, the entire LEDs are connected one by one.
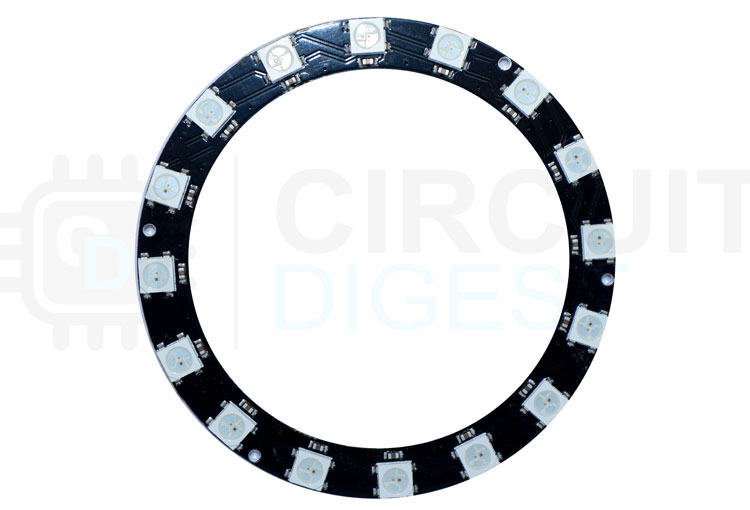
The next image (shown below) is of a the RGB Neopixel LED Ring module with 16 addressable RGB LEDs in a circular formation. Just like the previous module, all the LEDs are connected in series. Apart from these two types of neopixels led we also have another version called the WS2812B RGB LED Matrix, we have already discussed on how to interface it with arduino so we will not be discussing it for this tutorial.
WS2812B LED Pinout
The WS2812B LED has a total of 4 pins, among which two are for power, one for data in and the other for data out. The pinout of the WS2812B LED is as follows:
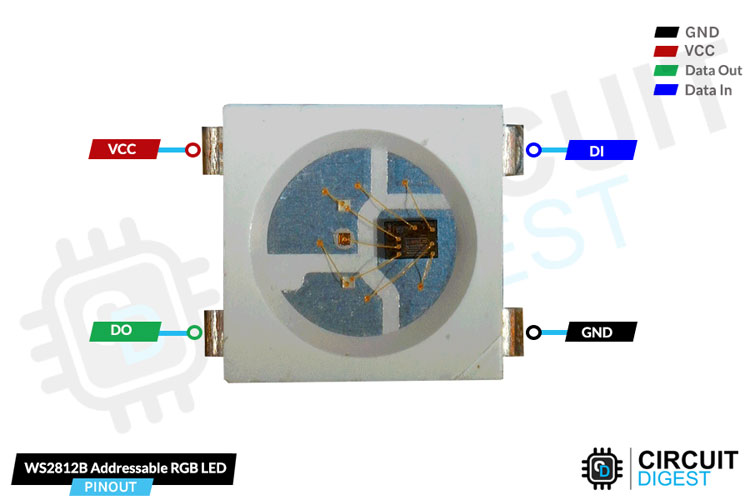
VCC - Provides power for the module, Connect to the 5V pin of the Arduino.
GND - Ground Connected to Ground pin of the Arduino.
DO – Data Input from the microcontroller.
DI – Data output to the next module or LED.
WS2812B Neopixel Strip Module Pinout
And here is the pinout of an 8Bit WS2812B module. Similar to the WS2812B LED, the module also has the power inputs, the data input, and the data output pins. The data output pin can be connected to the data input of the next module.
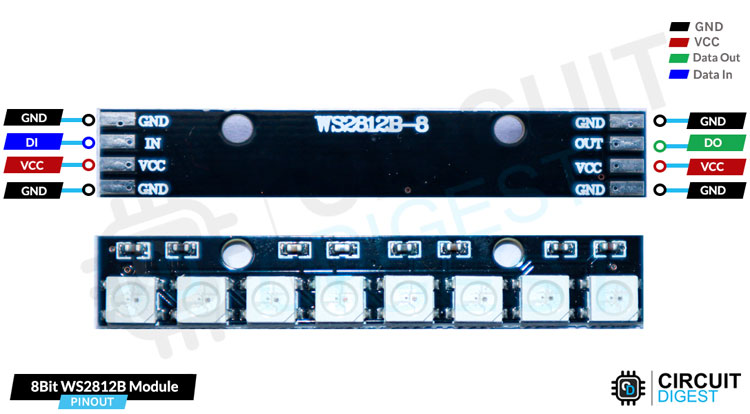
VCC - Provides power for the module, Connect to the 5V pin of the Arduino.
GND - Ground Connected to Ground pin of the Arduino.
DO – Data Input from the microcontroller.
DI – Data output to the next module or LED.
WS2812B Neopixel LED Parts
As you can see in the below image, the LED has 3 individual LEDs for red, green and blue colour. The anodes of these LEDs are directly connected to the VCC pin. The cathodes are connected to the WS2812B chip die. DI, DO and GND pins are connected to the die in a similar manner.
WS2812B Neopixel Strip Parts
The module we are testing has 8 WS2812B RGB LEDs along with decoupling capacitors. Other than these decoupling capacitors, we don’t need any other components for the LEDs.
WS2812B Neopixel Strip Module Circuit Diagram
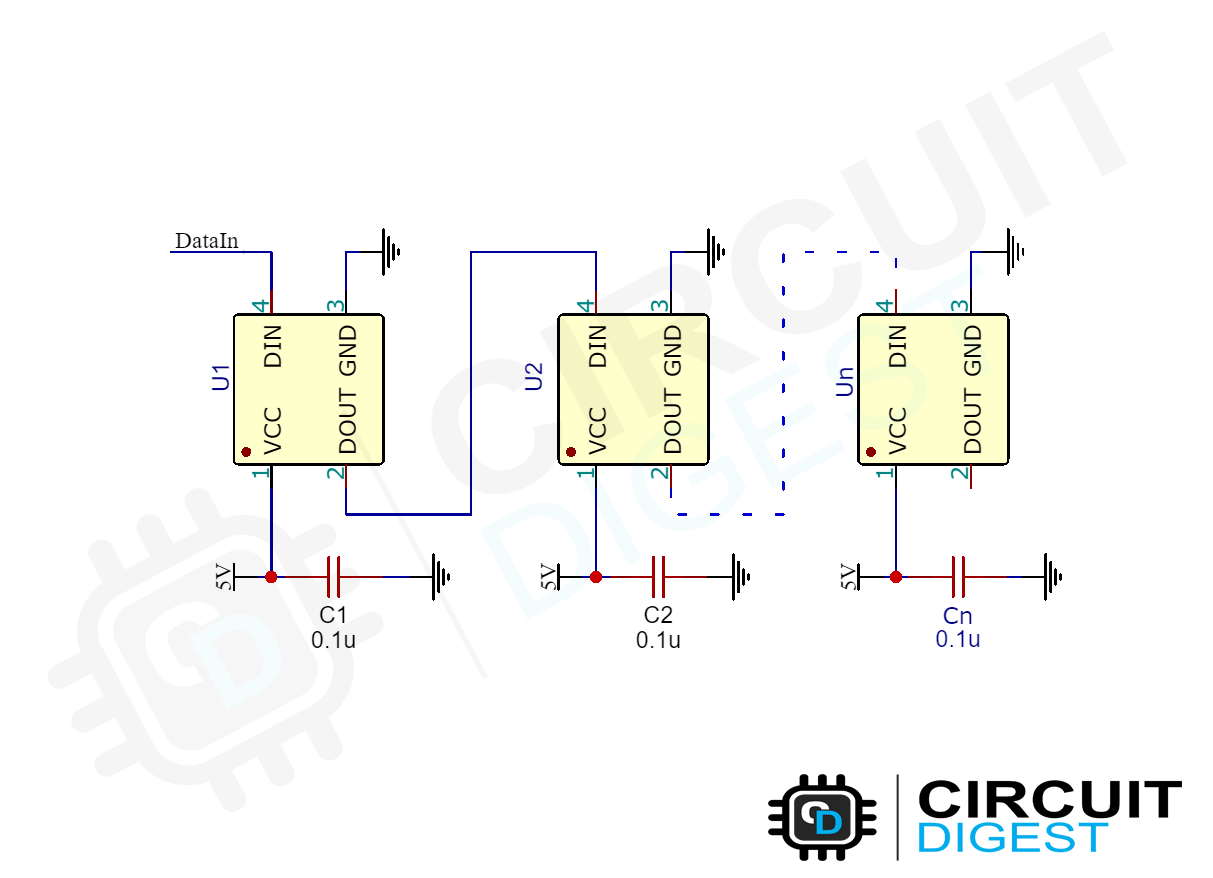
The schematic diagram from the WS2812B module is given below. As we have mentioned earlier, the schematics is pretty simple. It contains the LEDs and the decoupling capacitors. The below image shows only three LEDs connected in series but the actual neopixel led strip with will have 8 RGB LEDs and the neopixel Ring module will have 16 LEDs in them.
Commonly Asked Questions
What is RGB addressable LED?
An addressable RGB lighting strip lets users control every single LED individually. In fact, each RGB cluster in an LED strip can have a unique colour combination and display multiple colours at the same time.
How do you control addressable RGB LED strips?
To control an addressable LED strip using Arduino, you will need to install a library. A library is a software that is designed for inputting commands on the physical board of the Arduino which relays them to the addressable LED strip. There are many libraries that you can choose from, and some are even free.
What is the difference between WS2812 and WS2812B?
WS2812B has a better structure than WS2812, after we modified the structure, the control circuit and the RGB light have been separated, and it has a better heat dissipation performance.
What is the difference between SK6812 and WS2812B?
The main difference between the two drivers is that the SK6812 has voltage-independent colour and brightness over a wide voltage range, which means that the colours of the LEDs should not be affected by a drop in the supply voltage as much as they are on the WS2812B.
WS2812B strip or module Not working at all or not working properly? Here is what you should check.
If the module or strip not working at all make sure the connections are correct and the correct chip is selected in the code. If the colours are wrong, change the colour order in the code. And if your problem is that some LEDs not working, make sure that the number of LEDs in the code is correct. If the number is correct but still some are not working, then you must check for hardware failure. If there is a dead WS2812B LED in the strip, the LEDs after this dead LED might not work. If that’s the case, replace or bypass the faulty LED.
Interfacing Neopixel Strip with Arduino
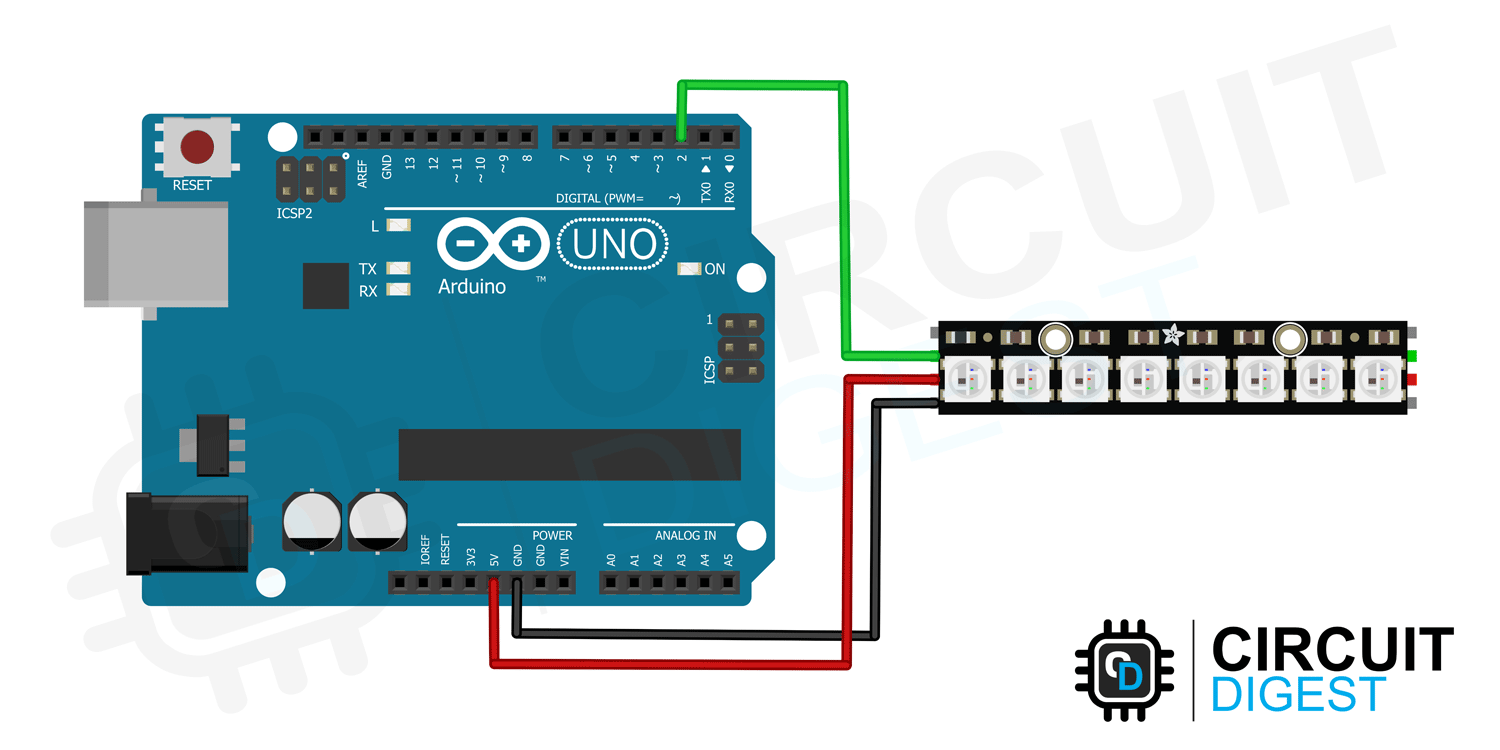
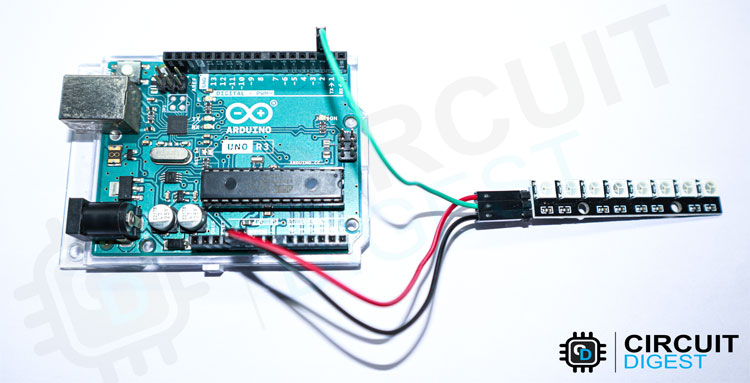
The following image shows the circuit diagram for interfacing the WS2812B Neopixel module with Arduino. Connect the VCC and GND pins of the module to the 5V and GND pins of the Arduino respectively. Connect the DI pin to Arduino’s pin D2.
Here is how the real-life connection looks. The connection will remain the same irrespective of how many LEDs are present on our strip. You can also follow similar connections to interface your neopixel ring with Arduino, we will see more on this later in this article.
Program to interface WS2812B neopixel LED with Arduino
Once the connections are made, install the FastLED library through the library manager or manually by downloading the FastLED library. Once it’s done create a new sketch and paste the code given below. Make the necessary changes as per your module or strip. Compile the code and upload it to Arduino. The code will cycle through different LED effects.
Code Explanation
The sketch starts with including the FastLED library. Then the connected pin, number of LEDs, brightness, LED type and colour order are defined. You can change these values as per your LED strip or module. If your LED strip or module shows the wrong colour you change it by changing the COLOR_ORDER. Other necessary variables and instances are also defined.
#include <FastLED.h>
#define LED_PIN     2
#define NUM_LEDS    8
#define BRIGHTNESS  10
#define LED_TYPE    WS2812B
#define COLOR_ORDER GRB
CRGB leds[NUM_LEDS];
#define UPDATES_PER_SECOND 100
CRGBPalette16 currentPalette;
TBlendType    currentBlending;
extern CRGBPalette16 myRedWhiteBluePalette;
extern const TProgmemPalette16 myRedWhiteBluePalette_p PROGMEM;
In the setup() function, we initialized the FastLED library and set the brightness too. Then we set the first palette to Rainbow colour.
void setup() {
    delay( 3000 ); // power-up safety delay
    FastLED.addLeds<LED_TYPE, LED_PIN, COLOR_ORDER>(leds, NUM_LEDS).setCorrection( TypicalLEDStrip );
    FastLED.setBrightness(  BRIGHTNESS );
    currentPalette = RainbowColors_p;
    currentBlending = LINEARBLEND;
}
In the loop() function, we continuously cycle through each effect by calling the function ChangePalettePeriodically. This function will change the patterns after a certain time as the name indicates. The FillLEDsFromPaletteColors function is used to set the colour of each pixel from the selected palette. Then all the indexed colours are pushed to the LED strip or module by calling the function FastLED.show(). You must call this function after indexing all the LEDs. Then only the changes will be pushed to the LEDs.
void loop() {
    ChangePalettePeriodically();
    static uint8_t startIndex = 0;
    startIndex = startIndex + 1; /* motion speed */
    FillLEDsFromPaletteColors( startIndex);
    FastLED.show();
    FastLED.delay(1000 / UPDATES_PER_SECOND);
}
Effects created by each palette function are mentioned in the code itself. You may experiment with these palettes to create new effects and colours.
WS2812B Module Interfacing with Arduino
The below GIF shows the effects we have just uploaded. We can create our own custom effects with the WS2812B LED strips. The only limit is our imagination.
Interfacing the 16Bit WS2812B Neopixel Ring module with Arduino
The module is nothing but 16 WS2812B LEDs arranged in a round formation. Connections are the same and you may refer to the Schematics below if you have any doubts.
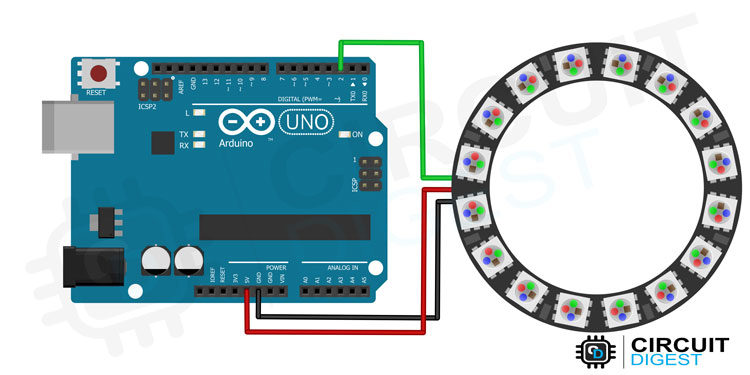
Here is how the the Arduino neopixel ring looks after the connections are done.
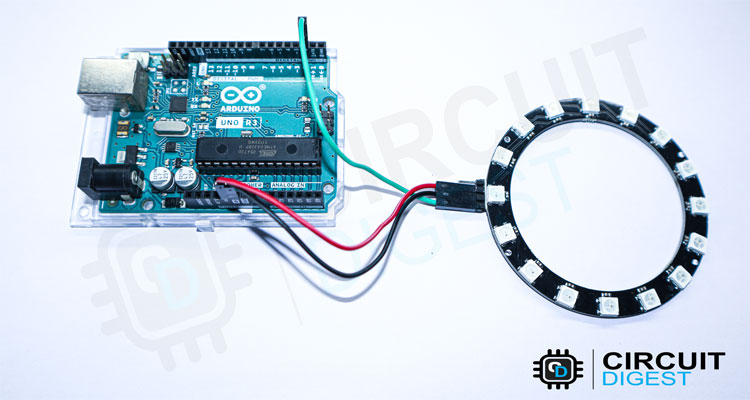
Once the connection is made, upload the very same code we have used in the 8bit module example with only changing the LED numbers to 16. Once done, we can observe the interesting effects. You can see that in the below GIF.
Supporting Files
#include <FastLED.h>
#define LED_PIN 2
#define NUM_LEDS 8
#define BRIGHTNESS 10
#define LED_TYPE WS2812B
#define COLOR_ORDER GRB
CRGB leds[NUM_LEDS];
#define UPDATES_PER_SECOND 100
// This example shows several ways to set up and use 'palettes' of colours
// with FastLED.
// These compact palettes provide an easy way to re-colourize your
// animation on the fly, quickly, easily, and with low overhead.
// USING palettes is MUCH simpler in practice than in theory, so first just
// run this sketch, and watch the pretty lights as you then read through
// the code. Although this sketch has eight (or more) different colour schemes,
// the entire sketch compiles down to about 6.5K on AVR.
// FastLED provides a few pre-configured colour palettes, and makes it
// extremely easy to make up your color schemes with palettes.
// Some notes on the more abstract 'theory and practice of
// FastLED compact palettes are at the bottom of this file.
CRGBPalette16 currentPalette;
TBlendType currentBlending;
extern CRGBPalette16 myRedWhiteBluePalette;
extern const TProgmemPalette16 myRedWhiteBluePalette_p PROGMEM;
void setup() {
delay( 3000 ); // power-up safety delay
FastLED.addLeds<LED_TYPE, LED_PIN, COLOR_ORDER>(leds, NUM_LEDS).setCorrection( TypicalLEDStrip );
FastLED.setBrightness( BRIGHTNESS );
currentPalette = RainbowColors_p;
currentBlending = LINEARBLEND;
}
void loop() {
ChangePalettePeriodically();
static uint8_t startIndex = 0;
startIndex = startIndex + 1; /* motion speed */
FillLEDsFromPaletteColors( startIndex);
FastLED.show();
FastLED.delay(1000 / UPDATES_PER_SECOND);
}
void FillLEDsFromPaletteColors( uint8_t colorIndex) {
uint8_t brightness = 255;
for( int i = 0; i < NUM_LEDS; ++i) {
leds[i] = ColorFromPalette( currentPalette, colorIndex, brightness, currentBlending);
colorIndex += 3;
}
}
// There are several different palettes of colours demonstrated here.
// FastLED provides several 'preset' palettes: RainbowColors_p, RainbowStripeColors_p,
// OceanColors_p, CloudColors_p, LavaColors_p, ForestColors_p, and PartyColors_p.
// Additionally, you can manually define your color palettes, or you can write
// code that creates color palettes on the fly. All are shown here.
void ChangePalettePeriodically() {
uint8_t secondHand = (millis() / 1000) % 60;
static uint8_t lastSecond = 99;
if( lastSecond != secondHand) {
lastSecond = secondHand;
if( secondHand == 0) { currentPalette = RainbowColors_p; currentBlending = LINEARBLEND; }
if( secondHand == 10) { currentPalette = RainbowStripeColors_p; currentBlending = NOBLEND; }
if( secondHand == 15) { currentPalette = RainbowStripeColors_p; currentBlending = LINEARBLEND; }
if( secondHand == 20) { SetupPurpleAndGreenPalette(); currentBlending = LINEARBLEND; }
if( secondHand == 25) { SetupTotallyRandomPalette(); currentBlending = LINEARBLEND; }
if( secondHand == 30) { SetupBlackAndWhiteStripedPalette(); currentBlending = NOBLEND; }
if( secondHand == 35) { SetupBlackAndWhiteStripedPalette(); currentBlending = LINEARBLEND; }
if( secondHand == 40) { currentPalette = CloudColors_p; currentBlending = LINEARBLEND; }
if( secondHand == 45) { currentPalette = PartyColors_p; currentBlending = LINEARBLEND; }
if( secondHand == 50) { currentPalette = myRedWhiteBluePalette_p; currentBlending = NOBLEND; }
if( secondHand == 55) { currentPalette = myRedWhiteBluePalette_p; currentBlending = LINEARBLEND; }
}
}
// This function fills the palette with totally random colors.
void SetupTotallyRandomPalette()
{
for( int i = 0; i < 16; ++i) {
currentPalette[i] = CHSV( random8(), 255, random8());
}
}
// This function sets up a palette of black and white stripes,
// using code. Since the palette is effectively an array of
// sixteen CRGB colors, the various fill_* functions can be used
// to set them up.
void SetupBlackAndWhiteStripedPalette()
{
// 'black out' all 16 palette entries...
fill_solid( currentPalette, 16, CRGB::Black);
// and set every fourth one to white.
currentPalette[0] = CRGB::White;
currentPalette[4] = CRGB::White;
currentPalette[8] = CRGB::White;
currentPalette[12] = CRGB::White;
}
// This function sets up a palette of purple and green stripes.
void SetupPurpleAndGreenPalette() {
CRGB purple = CHSV( HUE_PURPLE, 255, 255);
CRGB green = CHSV( HUE_GREEN, 255, 255);
CRGB black = CRGB::Black;
currentPalette = CRGBPalette16(
green, green, black, black,
purple, purple, black, black,
green, green, black, black,
purple, purple, black, black );
}
// This example shows how to set up a static color palette
// which is stored in PROGMEM (flash), which is almost always more
// plentiful than RAM. A static PROGMEM palette like this
// takes up 64 bytes of flash.
const TProgmemPalette16 myRedWhiteBluePalette_p PROGMEM = {
CRGB::Red,
CRGB::Gray, // 'white' is too bright compared to red and blue
CRGB::Blue,
CRGB::Black,
CRGB::Red,
CRGB::Gray,
CRGB::Blue,
CRGB::Black,
CRGB::Red,
CRGB::Red,
CRGB::Gray,
CRGB::Gray,
CRGB::Blue,
CRGB::Blue,
CRGB::Black,
CRGB::Black
};

