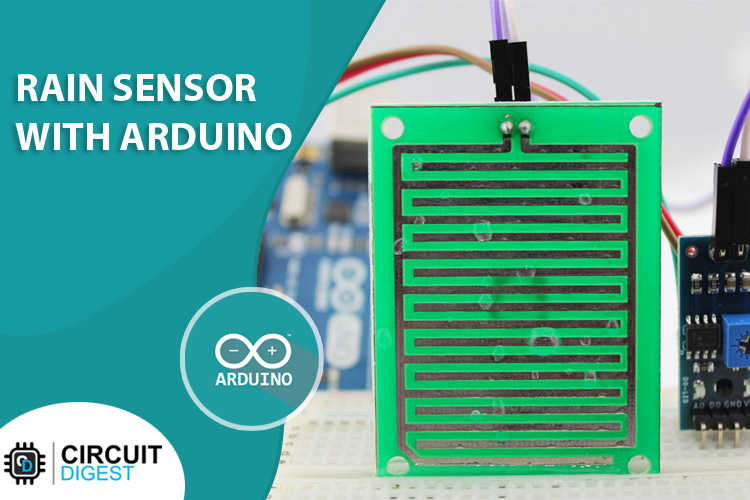
When it comes to detecting certain changes in weather conditions, it's pretty unpredictable, and rainfall is one of the most unexpected parameters of weather. So in this article, we decided to Interface the Rain Sensor with an Arduino. The raindrop sensor also known as rain detector sensor is an easy-to-use device that can detect rainfall. It acts as a switch when raindrops fall on the sensor, other than that with slight tweaks in the code, it can also measure the intensity of the rainfall. This sensor also has a separate indicator led and an onboard potentiometer through which you can adjust the sensitivity of the output digital signal provided by the sensor.
If you have just started to work with Arduino do check out our Arduino Projects and Tutorials. We have a collection of almost 500+ Arduino projects with Code, Circuit Diagram, and detailed explanations completely free for everyone to build and learn on their own.
Rain Detection Sensor Pinout
Like Soil Moisture Sensor, the Rain detection sensor module also has four pins VCC, GND, Aout, and Dout that can be used to get the needful information out of the sensor, The pinout of the Rain Detection Sensor is given below:
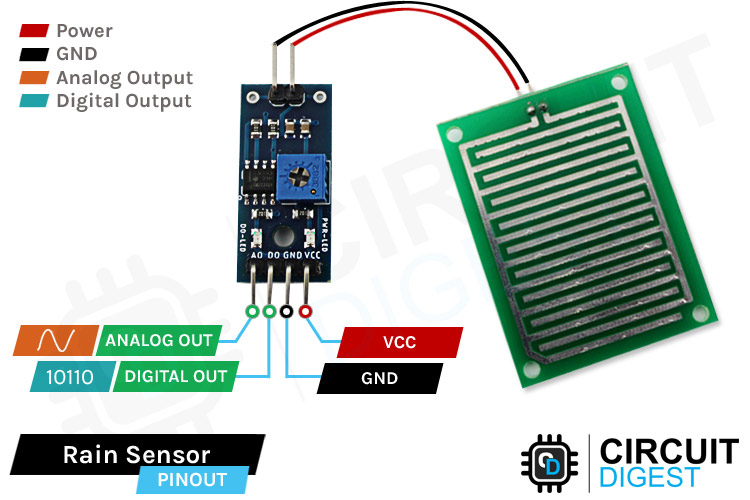
VCC is the power supply pin of the Rain Detection Sensor that can be connected to 3.3V or 5V of the supply. But do note that the analog output will vary depending upon the provided supply voltage.
GND is the ground pin of the board and it should be connected to the ground pin of the Arduino.
DOUT is the Digital output pin of the board, output low indicates rain is detected, and high indicates no rain condition.
AOUT is the Analog output pin of the board that will give us an analog signal in between vcc and ground.
How does a Rain Detection Sensor Works
The working principle of the Rain Detection Sensor is pretty simple, as you can see in the image below. The PCB is made out of multiple exposed log conductive plates arranged in a grid format. When rain falls on top of the sensor the resistivity of the conductive plates changes, and by measuring the changes in the resistance, we can determine the intensity of the rainfall. The more intense the rainfall the lower the resistance.
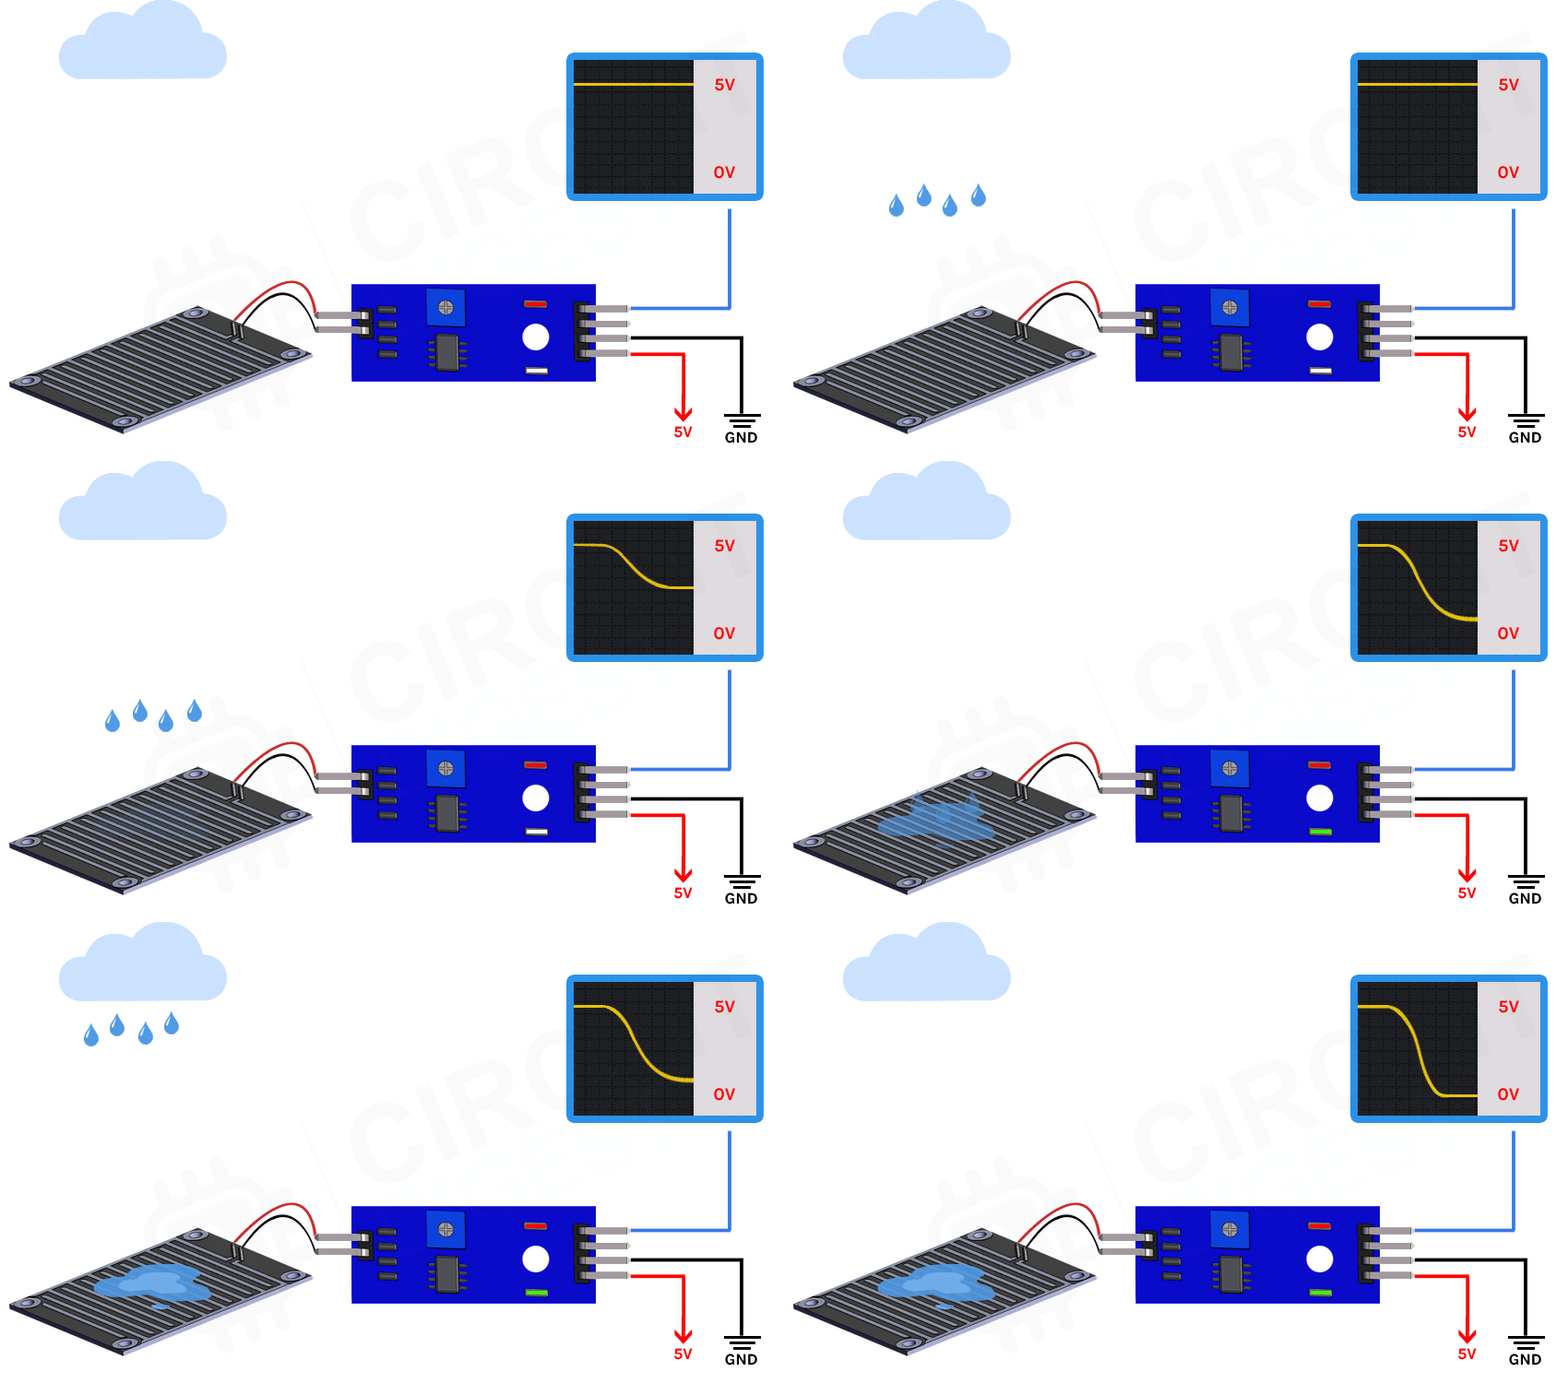
The above Animation of the Rain Detection Sensor shows how the analog output of the sensor changes based on the water droplets falling on top of it. As you can see in the animation above the voltage slowly drops from VCC to 0V when water droplets start falling from the top, you can also see that the trigger LED on the board turns on when a certain threshold is reached which can be set by the potentiometer. For the sake of simplicity, we did not make any visual representation of how the digital part of the circuit works, but it's pretty simple when a certain threshold is reached (that we can set by a potentiometer) the output of the rain detection sensor module goes low and that lights up the onboard trigger LED.
Rain Detection Sensor - Parts
The entire rain detection sensor module consists of two parts: the rain detection sensor PCB and the signal processing module. The module processes the incoming data from the sensor PCB and it can output both analog and digital data simultaneously.
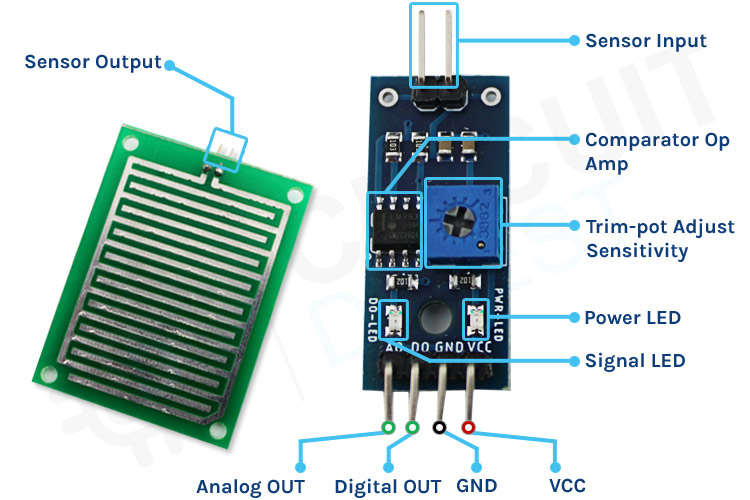
The sensor module has four pins, two of which are for VCC and Gnd and the other two can simultaneously output analog and digital data. As you can see in the image above the module has two onboard LEDs. The power led turns on when power is applied to the board and another one turns on when the set value by the potentiometer is reached. This board also has a comparator OP-Amp onboard that is responsible for converting the incoming analog signal from the photodiode to a digital signal. We also have a sensitivity adjustment potentiometer, with that, we can adjust the sensitivity of the device. And finally, we have the rain detection PCB together with the signal processing module that makes the rain detection sensor.
Commonly Asked Questions about Rain Detection Sensor Board
Why do we need rain sensors?
The primary purpose of rain sensors is to conserve water by detecting natural rain and turning off the sprinklers. When there is enough rainfall, the irrigation and sprinkler systems will stop automatically. As a result, water wastage will be reduced.
Can an IR sensor detect rain?
Yes, it's possible to detect rain with an IR sensor. The most common application is in the detection of raindrops on a windshield, which involves sensing infrared light conducted through the internal walls of the windshield glass, and in some cases enhancing these reflections by adding other physical components to the glass.
Is the rain sensor analog or digital?
The rain sensor can provide both analog and digital output. AO (Analog Output) pin gives us an analog signal between the supply value 5V to 0V. DO (Digital Output) pin gives Digital output of internal comparator circuit.
How do you set a rain detector alarm?
If your objective is to build a minimal circuit without a microcontroller, then it can be done with some basic components like resistors, capacitors, transistors, diodes, and op-amps in analog circuitry.
Rain Detection Sensor Module Circuit Diagram
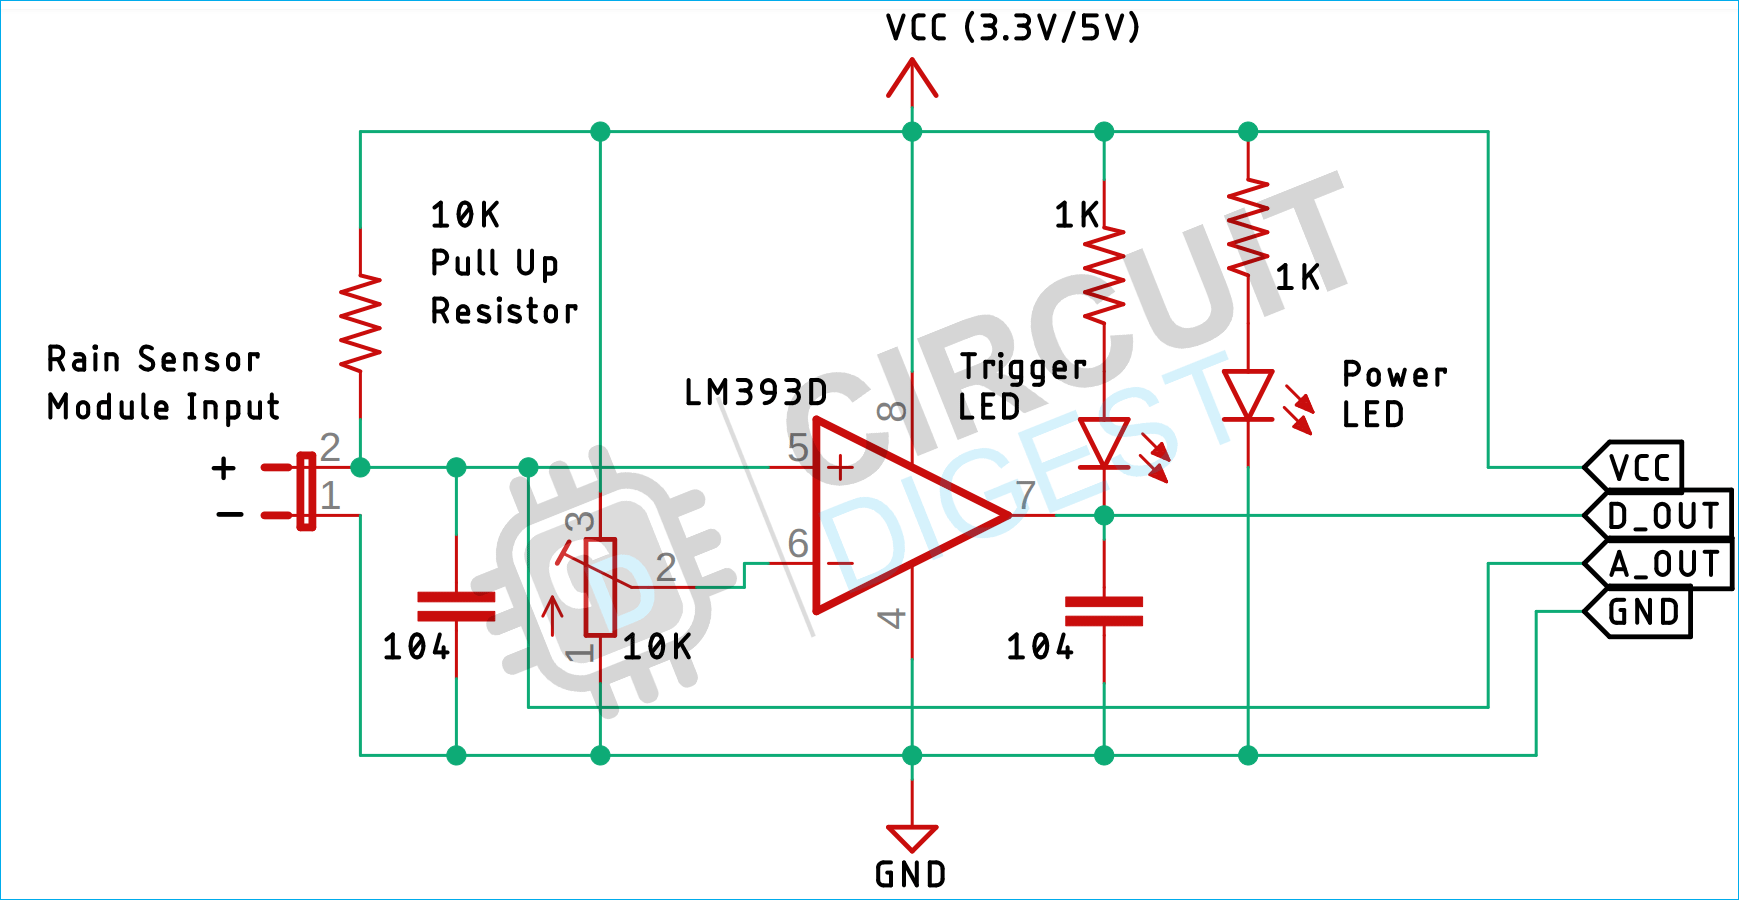
The schematic diagram for the Rain Detection Sensor module is shown below. The schematic itself is very simple and needs a handful of generic components to build. If you don't have a prebuilt module on hand but still want to test your project, the schematic below will come in handy.
In the schematic, we have a LM393 op-amp that is a low-power, low offset voltage op-amp that can be powered from a 3.3V or 5V supply. Please note that the analog output voltage of the device will depend on the supply voltage of the device. The main job of this op-amp is to convert the incoming analog signal from the sensor probe to a digital signal. There is also this 10K potentiometer that is used to set a reference voltage for the op-amp, if the input voltage of the sensor goes below the threshold voltage set by the potentiometer, the output of the op-map goes low. Other than that we have two LEDs. The first one is a power LED and the other one is the trigger LED. The power LED turns on when power is applied to the board and the trigger LED turns on when a certain set threshold is reached. This is how this basic circuit works.
Interfacing the Rain Sensor with Arduino
Now that we completely understand how the Rain Detection Sensor works, we can connect all the required wires to the Arduino UNO board. This section of the article will be divided into two parts, one shows analog output and another one shows digital output. Let's begin with analog circuitry-
Rain Detection Sensor - Analog Output:
To work with the sensor, we need to power the sensor first and for that, we are using the 5V and GND pin of the Arduino UNO Board. The connection diagram of the analog circuitry is shown below.
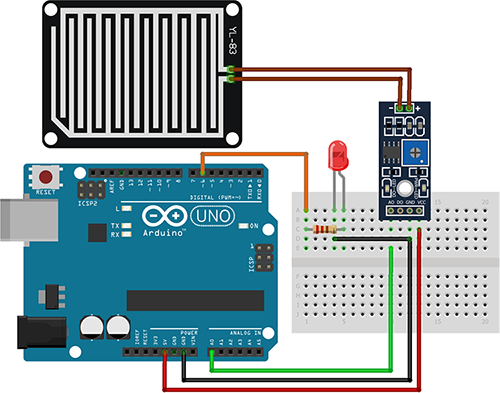
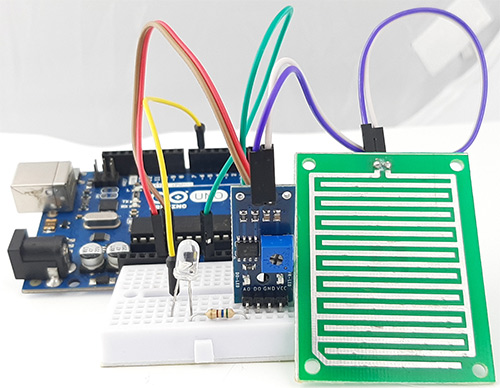
In the above figure, the connection diagram for the analog part is shown. We have connected an LED to the PWM pin6 of the Arduino board and the analog output pin is connected to the A0 pin of the Arduino. The ground pin is common in between the module and the sensor and the VCC is taken from the 5V pin of the Arduino. We will program the Arduino so that the brightness of the LED will change depending on the amount of water on top of the sensor.
Rain Detection Sensor - Digital Output:
For the digital interface part, we are also using the +5V and Ground from the Arduino to power the sensor module.
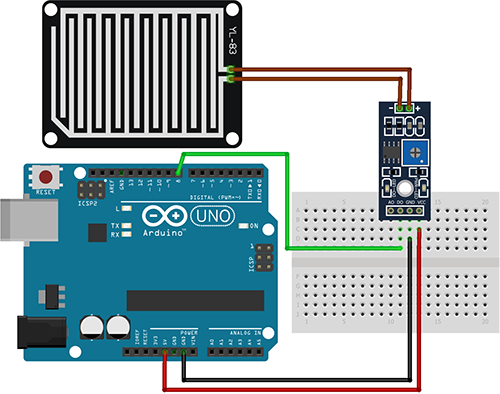
As the digital part is very simple, we did not demonstrate that in our practical gif as you can already see in the practical gif the onboard trigger LED on the module lights up when we spray water on the module.
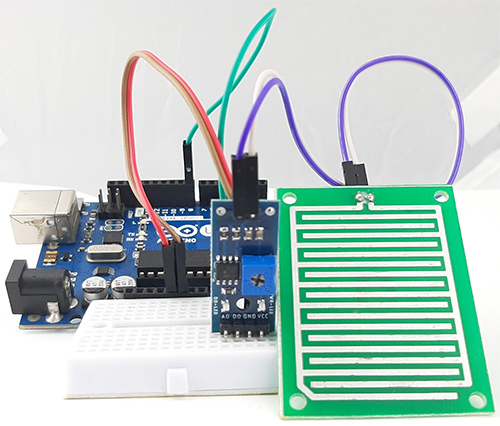
With that, you’re now ready to upload some code to our Arduino UNO board and get the Rain Detection Sensor working. You can also check out the above module in action at the bottom of this article.
Arduino Code for Processing Incoming Data from Rain Detection Sensor
The Arduino Rain Sensor code is very simple and easy to understand. We just have to read the analog data out of the sensor and we can approximate the average rainfall on top of the sensor. This can be easily done in analog mode. In digital mode, we just need to set the potentiometer and we will get a digital output. You can verify the digital trigger point just by looking at the onboard LED on the sensor.
For demonstration in the analog mode, we have connected an LED to the digital pin 6 of the Arduino and we will change the brightness of the LED depending upon the water droplets on top of the sensor.
We initialize our code by declaring two macros, the first one is for the led where we will connect an LED and the second one is the sensorPin through which we are reading the data coming out of the sensor.
// Sensor pins pin D6 LED output, pin A0 analog Input
#define ledPin 6
#define sensorPin A0
Next, we have our setup() function. In the setup function, we initialize the serial with 9600 baud. We also set the ledPin as output, and make the pin LOW. This way the pin will not float and turn the LED on.
void setup() {
  Serial.begin(9600);
  pinMode(ledPin, OUTPUT);
  digitalWrite(ledPin, LOW);
}
Next, we have our loop() function, in the loop function we print "Analog output:" as text on the serial monitor window and then we call the readSensor() function inside a Serial.println() function so that once the readSensor() function is executed, it returns the data and it also gets printed on the serial monitor window,
void loop() {
  Serial.print("Analog output: ");
  Serial.println(readSensor());
  delay(500);
}
Finally, we have our custom readSensor() function which returns the analog value that is read through the A0 pin of the Arduino. In the first line of this function, we have declared and defined a variable called sensorValue where we are putting the raw data that is read through the A0 in the Arduino. This data is in 10-bit format and it goes from 0 -1023 so to convert that 10-bit data to 8-bit data. That is why we have used the map function, once the map function outputs the data we have initiated another variable outputValue and put the mapped data inside that variable. Finally, we have used the built-in analogWrite(ledPin, outputValue) function of the Arduino to generate a PWM signal that is proportional to the input data read by the ADC of the arduino.
int readSensor() {
  int sensorValue = analogRead(sensorPin);  // Read the analog value from sensor
  int outputValue = map(sensorValue, 0, 1023, 255, 0); // map the 10-bit data to 8-bit data
  analogWrite(ledPin, outputValue); // generate PWM signal
  return outputValue;             // Return analog moisture value
}
This marks the end of the code portion of the Arduino-based Rain Sensor. If you have any questions regarding the code do not hesitate to comment it down below.
Working of the Arduino Rain Detection Sensor Module
The gif down below shows the Rain Detection Sensor in working. At first, you can see the intensity of the LED on the breadboard is off but when we spray a little bit of water to the module the intensity of the LED increases, and with that, the onboard led of the module also lights up.
Projects using the Rain Detection Sensor Module
Previously we have used this Rain Detection sensor to build many interesting projects. If you want to know more about those topics, links are given below.
Build your own basic rain alarm with generic readily available parts and analog circuitry. If you are a beginner at electronic and circuit design, and you are interested in rain sensors this simple project could be for you.
Build a basic rain detection system using an arduino and a piece of copper clad board as a rain sensor. This circuit is very easy to make and it also has a buzzer which will start beeping when rainfall is detected.
Build your own automatic window wiper circuit with basic analog components and a rain sensor. This system can be found in luxury cars where the windshield wiper automatically gets activated when the car detects rain or water in the windshield.
Supporting Files
// Sensor pins pin D6 LED output, pin A0 analog Input
#define ledPin 6
#define sensorPin A0
void setup() {
Serial.begin(9600);
pinMode(ledPin, OUTPUT);
digitalWrite(ledPin, LOW);
}
void loop() {
Serial.print("Analog output: ");
Serial.println(readSensor());
delay(500);
}
// This function returns the analog data to calling function
int readSensor() {
int sensorValue = analogRead(sensorPin); // Read the analog value from sensor
int outputValue = map(sensorValue, 0, 1023, 255, 0); // map the 10-bit data to 8-bit data
analogWrite(ledPin, outputValue); // generate PWM signal
return outputValue; // Return analog rain value
}

