India being a sports-loving country loves to watch sports in a group where the whole neighborhood comes and enjoys the sports together, be it cricket or football. But doing so, one of the problems we face is that the scoreboard on the bottom of our television screen becomes very small and hard to read. So, today we are going to build an IoT and Arduino-based IPL Scoreboard using NodeMCU and P10 display Module, which will be big enough to display the live score and it will be very easy and simple to make. So let’s dive into the complete process of building the project.
Previously, we have built a Simple Display Board using the P10 Display, you can check that out if you want to learn more about the display itself. We have also built many IoT related projects:
IoT based Door Security Alarm with Google Assistant
IoT Based Patient Health Monitoring System using ESP8266 and Arduino
IoT Based Electricity Energy Meter using ESP12 and Arduino
Components Required to Build IoT Score Board
The project is relatively simple and there are not many components required. Just gather the items listed below.
- Arduino Nano
- ESP8266 NodeMCU
- Perf board
- Male and Female headers
- 9V DC, 2 Amp Power supply
- 5AMP, 3 AMP SMPS
- Connecting wires
Node MCU and Arduino Based IoT Score-Board Working
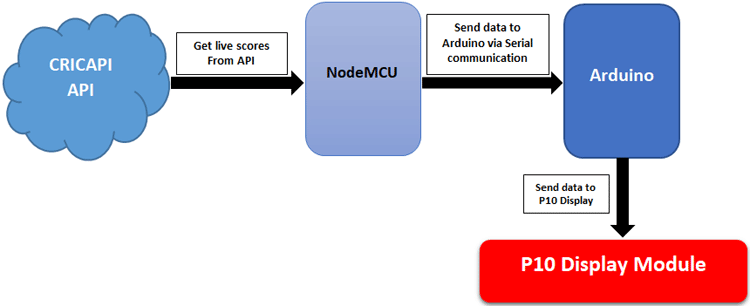
The complete working of the project is shown in the block diagram above. Here, “CRICAPI” API service is used to get the Live IPL scores, which are then decoded by the ESP8266 nodeMCU and again sent to the Arduino Nano which controls the display. Here, serial communication is used to send information from NodeMCU to the Arduino Uno. Then Arduino sends the required information which needs to be displayed to the p10 display.
Basic Working Principle of P10 LED Matrix Module
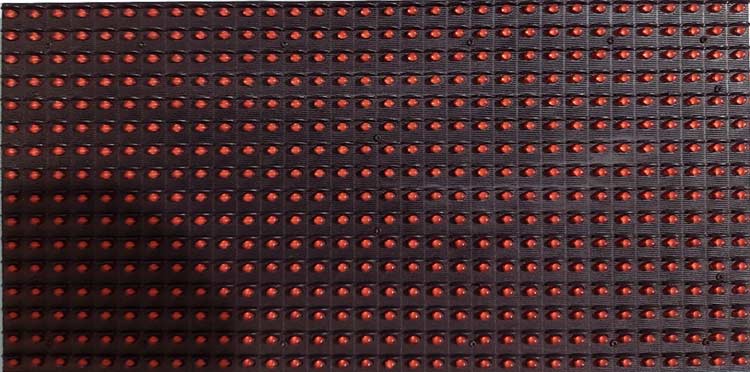
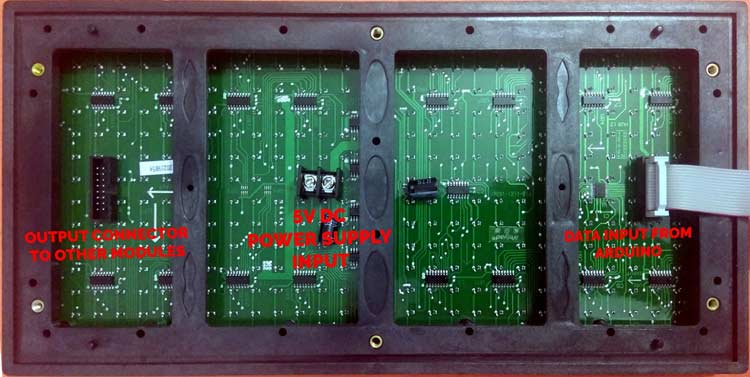
A P10 LED display module is a very popular matrix display built to advertise outdoor or indoor conditions. Each p10 display module has a total of 512 high brightness LEDs mounted on a plastic housing designed for best display results. Any number of such panels can be combined in any row and column structures to design a LED notice/advertisement board. The 32*16 module size means that there are 32 LEDs in each row and 16 LEDs in each column. So there are 512 LEDs present in each module unit.
This module has many features like it has a total of 512 LED which makes it quite cool for making advertisement boards and it's required where we need to display. It has a total brightness of 3500-4500 nits so you can see it very clearly in a broad daylight. It has a max. power consumption of 20W so it can be powered by a small Switching Mode Power Supply Module. It also needs a separate 5V power supply to power the logic section. It has an IP65 waterproof rating so it can be easily used outdoors in humid and rainy weather.
Pin Description of P10 Display Module:
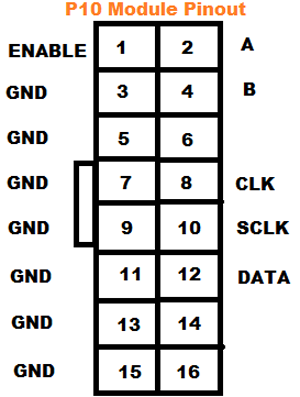
- Enable: This pin is used to control the brightness of the LED panel by giving PWM pulse to it.
- A, B: These are called multiplex select pins. They take digital input to select any multiplex rows.
- Shift clock (CLK), Store clock (SCLK), and Data: These are the normal shift register control pins. Here, a shift register 74HC595 is used.
Connection Diagram of P10 Display Module:
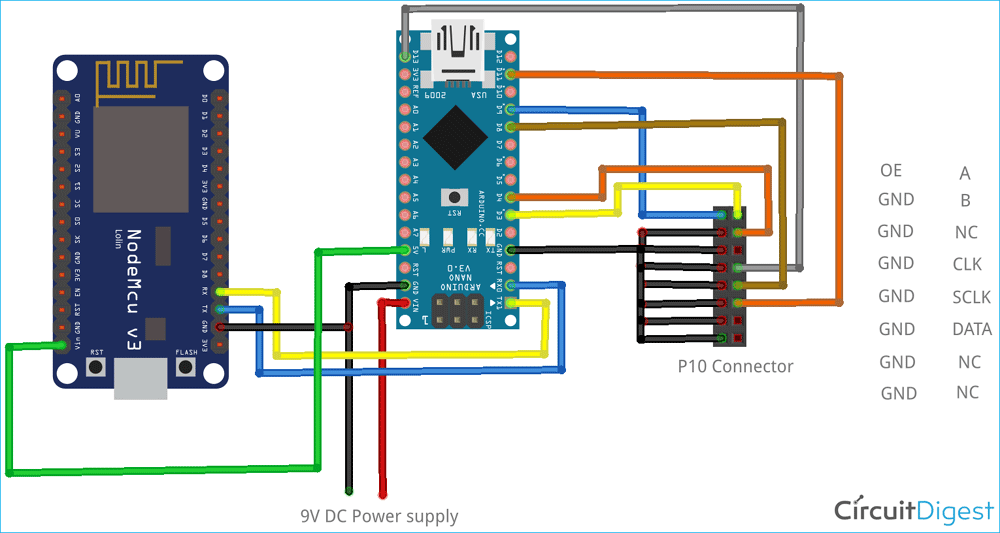
Arduino UNO and P10 display modules are interconnected as per the pin mapping shown below:
|
P10 LED Module |
Arduino UNO |
|
ENABLE |
9 |
|
A |
6 |
|
B |
7 |
|
CLK |
13 |
|
SCLK |
8 |
|
DATA |
11 |
|
GND |
GND |
Connect the power terminal of the P10 module to 5V DC SMPS separately. It is recommended to connect a 5V, 3 Amp DC power supply to a single unit of P10 LED module. If you are planning to connect more modules, then increase your SMPS rating accordingly.
NodeMCU and IoT Based Live Score Board - Schematic Diagram
The Complete Schematic Diagram for the IoT-based Live Score Board is shown above. As shown in the circuit diagram, first a 9V DC power supply is connected to Arduino Nano, and the regulated 5V DC supply from Arduino is supplied to the NodeMCU. For communication between Arduino and NodeMCU, TX and RX pins are used, which are connected as shown in the diagram. Finally, the P10 display is connected to Arduino as per the circuit diagram shown above.
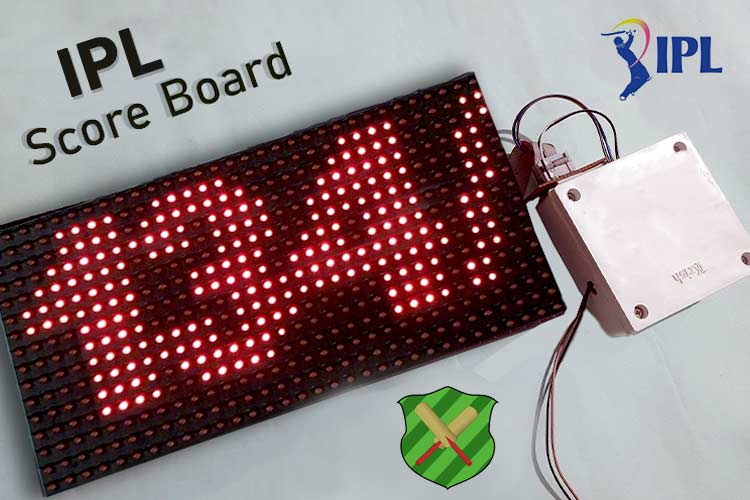
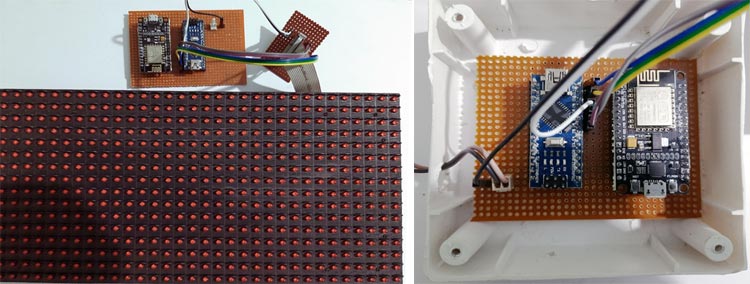
In this project, all the connections have been made as per the above diagram and soldered in a perfboard. After completion of the circuit diagram, the Circuit board looks like as shown in the image below:

After successful connection, I have connected the board to the p10 display and enclosed the circuit in an enclosure as shown below:
Software Setup For IoT Based Score Board
After a successful hardware setup, now it’s time to set up the software parts before doing the code. First, the API setup needs to be completed. For that, go to URL: https://www.cricapi.com/ and sign up to create a new account. We can also log in using our Google account.
Login to your CricAPI account, which is free up to 100 hits/day. The dashboard looks like below:
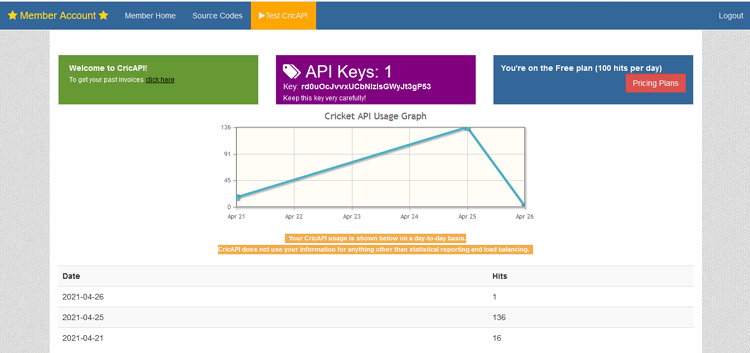
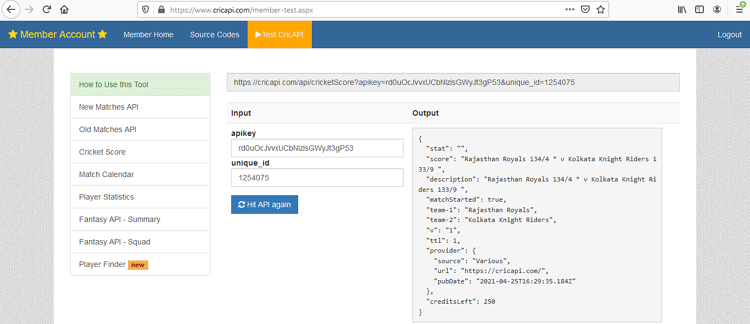
Click on the “Test CricAPI” option and go to the “Cricket score” option. A window will appear as shown below, which consists of a URL and sample output. Copy the URL for our future reference. I am in India and I love cricket so I am configuring it to display the cricket score. If you want it to configure it for any other purpose, you can do it very easily by altering the code a little bit.
NodeMCU and IoT based Live Cricket Board Code
In this section, we will be discussing the code that is required to get the data from the HTTP website and display it to the P10 display as we are using a NodeMCU and an Arduino so these will be divided into two sections. First Arduino code configures the NodeMCU and the second one configures the Arduino Nano.
Setup NodeMCU to upload the code:
If you are uploading the code to nodeMCU for the first time, then you have to include the board first, using the following steps.
To upload code to NodeMCU, follow the steps below:
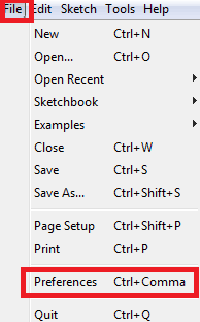
1. Open Arduino IDE, then go to File–>Preferences–>Settings.
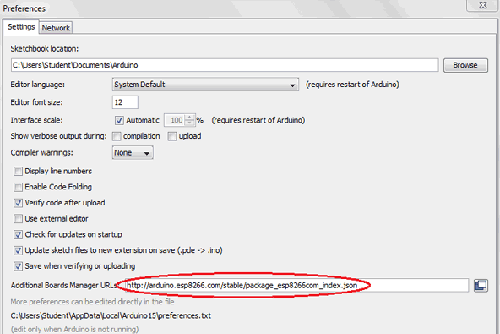
2. Type https://arduino.esp8266.com/stable/package_esp8266com_index.json in the ‘Additional Board Manager URL’ field and click ‘Ok’.
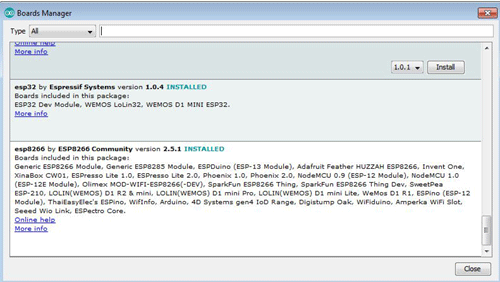
3. Now, go to Tools > Board > Boards Manager. In the Boards Manager window, Type ESP8266 in the search box, select the latest version of the board, and click on install.
4. After installation is complete, go to Tools ->Board -> and select NodeMCU 1.0(ESP-12E Module). Now you can program NodeMCU with Arduino IDE.
Once you have completed the above steps, now you are ready to upload the code to NodeMCU, the complete code needs to be uploaded to NodeMCU. First, all the required library files are to be included in the code. Here, in this project ESP8266WiFi.h and ESP8266HTTPClient.h is used for using ESP8266 NodeMCU Wi-Fi module, and ArduinoJson.h is used for using JSON library which is used to receive information from CricAPI.
#include <ESP8266WiFi.h>
#include <ESP8266HTTPClient.h>
#include <ArduinoJson.h>
Now, the network credentials are defined, i.e. SSID and password. It is required to connect NodeMCU to the internet.
const char* ssid = "admin";
const char* password = "123456789";
Then, to connect nodeMCU to the internet, WiFi.begin is called passing SSID and password as its arguments. Also, initialize the Serial communication with Baud rate=115200.
Serial.begin(115200);W
iFi.begin(ssid, password);
Inside loop (), pass the API URL, which we have noted down earlier to get the live cricket scores. In http.begin() function to get the information.
http.begin("http://cricapi.com/api/cricketScore?apikey=rd0uOcJvvxUCbNlzlsGWyJt3gP53&unique_id=1254075");
Now, verify the received JSON file by reading it and print JSON data on the serial monitor. Then if the data received is correct, print it on Serial to send it to Arduino.
int httpCode = http.GET();
      if (httpCode > 0)
      {
        String payload = http.getString();
        const size_t bufferSize = JSON_OBJECT_SIZE(2) + JSON_OBJECT_SIZE(3) + JSON_OBJECT_SIZE(5) + JSON_OBJECT_SIZE(8) + 370;
        DynamicJsonBuffer jsonBuffer(bufferSize);
        JsonObject& root = jsonBuffer.parseObject(http.getString());
        const char* name1 = root["description"];
        Serial.println(name1);
        delay(10000);
      }
After the code is complete, compile the code and upload it to the NodeMCU. After successful uploading, now it’s time to write code for Arduino.
Programming the Arduino Nano:
Similar to NodeMCU, we need to program the Arduino before we can move forward and complete the code.
For the Arduino Nano, we have to include all the libraries which are used in the application. Here, the “DMD.h” library and “TimerOne.h” are used in this code, both of the libraries can be downloaded by following the link given below.
Download DMD.h library from GitHub
Download TimerOne.h library from GitHub
After you have downloaded and included both the libraries, start the code by including all the required libraries.
#include <SPI.h>
#include <DMD.h>
#include <TimerOne.h>
#include "SystemFont5x7.h"
#include "Arial_black_16.h"
In the next step, the number of rows and columns is defined for the LED matrix. Here in this project, only one module is used, so both ROW value and COLUMN value can be defined as 1.
#define ROW 1
#define COLUMN 1
#define FONT Arial_Black_16
DMD led_module(ROW, COLUMN);
A Function scan_module() is defined, which continuously checks for any incoming data from Arduino Nano through the SPI Terminals. If yes, then it will trigger an interrupt for doing certain events as defined by the user in the program.
void scan_module()
{
  led_module.scanDisplayBySPI();
}
Inside setup(), the timer is initialized, and the interrupt is attached to the function scan_module, which was discussed earlier. Initially, the screen was cleared using the function clear screen(true) which means all the pixels are defined as OFF.
Here, serial communication was also enabled using the function Serial. begin(115200) where 115200 is the baud rate for the Serial communication.
void setup()
{
  Serial.begin(115200);
  Timer1.initialize(2000);
  Timer1.attachInterrupt(scan_module);
  led_module.clearScreen( true );
}
Here, the serial data availability is checked, if there is valid data coming from nodeMCU or not. The received data is stored in a variable and then printed on the p10 display.
void loop()
{
  if (Serial.available())
{
data=Serial.readString();
}
Serial.println(data);
 (String("Score:")+String(data)).toCharArray(cstr1, 100);
    led_module.selectFont(FONT);
Then, to display information in the module, the font is selected using selectFont() function. Then drawMarquee() function is used to display the desired information on the p10 board.
 led_module.drawMarquee(cstr1,100, (32 * ROW), 0);
    long start = millis();
    long timming = start;
    boolean flag = false;
Finally, as we need a scrolling message display, we have written a code to shift our whole message from Right to Left directions using a certain period.
    while (!flag)
    {
      if ((timming + 30) < millis())
      {
        flag = led_module.stepMarquee(-1, 0);
        timming = millis();
      }
   }
}
After completion of the Code, compile the code and upload it to Arduino. Then switch ON the Power supply and make sure that the Network Router/Hotspot device is turned ON. After some time, the NodeMCU will be connected to Network and the live scores will be shown on the display. This marks the end of our project. If you have any questions regarding the article, you can leave a comment below.
NodeMCU Code:
#include <ESP8266WiFi.h>
#include <ESP8266HTTPClient.h>
#include <ArduinoJson.h>
const char* ssid = "admin";
const char* password = "123456789";
int count = 0;
void setup()
{
Serial.begin(115200);
WiFi.begin(ssid, password);
while (WiFi.status() != WL_CONNECTED)
{
delay(1000);
}
}
void loop()
{
if (WiFi.status() == WL_CONNECTED)
{
HTTPClient http;
http.begin("http://cricapi.com/api/cricketScore?apikey=rd0uOcJvvxUCbNlzlsGWyJt3gP53…");
int httpCode = http.GET();
if (httpCode > 0)
{
String payload = http.getString();
const size_t bufferSize = JSON_OBJECT_SIZE(2) + JSON_OBJECT_SIZE(3) + JSON_OBJECT_SIZE(5) + JSON_OBJECT_SIZE(8) + 370;
DynamicJsonBuffer jsonBuffer(bufferSize);
JsonObject& root = jsonBuffer.parseObject(http.getString());
const char* name1 = root["description"];
Serial.println(name1);
delay(10000);
}
http.end();
}
}
Arduino Code:
#include <SPI.h>
#include <DMD.h>
#include <TimerOne.h>
#include "SystemFont5x7.h"
#include "Arial_black_16.h"
#define ROW 1
#define COLUMN 1
#define FONT Arial_Black_16
char input;
int a = 0, b = 0;
int flag = 0;
char cstr1[100];
DMD led_module(ROW, COLUMN);
String data="";
void scan_module()
{
led_module.scanDisplayBySPI();
}
void setup()
{
Serial.begin(115200);
Timer1.initialize(2000);
Timer1.attachInterrupt(scan_module);
led_module.clearScreen( true );
}
void loop()
{
if (Serial.available())
{
data=Serial.readString();
}
Serial.println(data);
(String("Score:")+String(data)).toCharArray(cstr1, 100);
led_module.selectFont(FONT);
led_module.drawMarquee(cstr1,100, (32 * ROW), 0);
long start = millis();
long timming = start;
boolean flag = false;
while (!flag)
{
if ((timming + 30) < millis())
{
flag = led_module.stepMarquee(-1, 0);
timming = millis();
}
}
}

