A Rotary encoder is an input device which helps the user to interact with a system. It looks more like a Radio potentiometer but it outputs a train of pulses which makes its application unique. When the knob of the Encoder is rotated it rotates in form of small steps which helps it to be used for stepper/Servo motor controlling, navigating through a sequence of the menu and Increasing/decreasing the value of a number and much more.
In this article, we will learn about the different types of Rotary Encoders and how it works. We will also interface it with PIC Microcontroller PIC16F877A and control the value of an integer by rotating the Encoder and display its value on a 16*2 LCD screen. At the end of this tutorial, you will be comfortable with using a Rotary Encoder for your projects. So let’s get started...
Rotary Encoder and its Types
Rotary encoder often called a shaft encoder. It is an electromechanical transducer, meaning it converts mechanical movements into electronic pulses or in other words it converts angular position or motion or shaft position to a digital or analog signal. It consists of a knob which when rotates will move step by step and produce a sequence of pulse trains with pre-defined width for each step.
There are many types of rotary encoder in the market the designer can choose one according to his application. The most common types are listed below
- Incremental Encoder
- Absolute Encoder
- Magnetic Encoder
- Optical Encoder
- Laser Encoder
These encoders are classified based on the Output signal and sensing technology, the Incremental Encoder and Absolute Encoders are classified based on Output signal and the Magnetic, Optical and Laser Encoder are classified based on Sensing Technology. The Encoder used here is an Incremental type Encoder.
Absolute encoder stores the position information even after the power is removed, and the position information will be available when we again apply power to it.
The other basic type, Incremental encoder provides data when the encoder change its the position. It could not store the position information.
KY-040 Rotary Encoder Pinout and description
The pinouts of the KY-040 Incremental type rotary encoder is shown below. In this project, we will interface this Rotary Encoder with the popular microcontroller PIC16F877A from microchip.
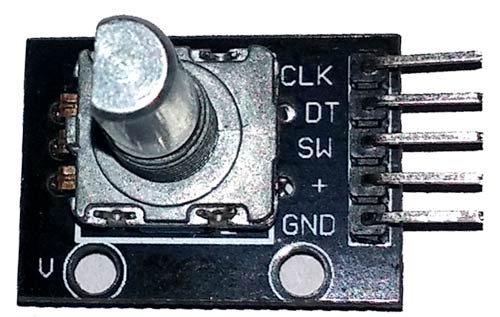
The first two pins (Ground and Vcc) is used to power the Encoder, typically +5V supply is used. Apart from rotating the knob in clock wise and anti-clockwise direction, the encoder also has a switch (Active low) which can be pressed by pressing the knob inside. The signal from this switch is obtained through the pin 3 (SW). Finally it has the two output pins (DT and CLK) which produce the waveforms as already discussed below. We have interfaced this Rotary Encoder previously with Arduino.
How Rotary Encoder Works
The output entirely depends on the internal copper pads which provide the connection with GND and VCC with the shaft.
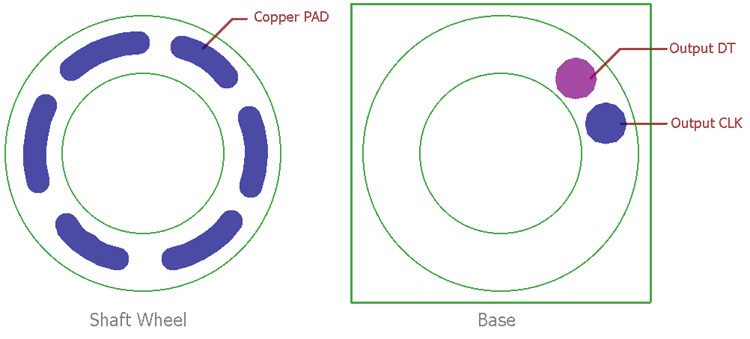
There are two parts of the Rotary Encoder. Shaft Wheel which is connected with the shaft and rotates clockwise or anti-clockwise depending on the rotation of the shaft, and the base where the electrical connection is done. The base has ports or points which is connected to DT or CLK in such a way that when the shaft wheel rotates, it will connect the base points and provide square wave on both DT and CLK port.
The output will be like when the shaft rotates-

Two ports provide the square wave but there is slight difference in the timing. Due to this, if we accept the output as 1 and 0, there can be only four state, 0 0, 1 0, 1 1, 0 1. The sequence of the binary output determines the clockwise turn or anti-clockwise turn. Like, for example, if the Rotary Encoder provides 1 0 in idle condition and provide 1 1 after that, that means the encoder change it’s position a single step to the clockwise direction, but if it is providing 0 0 after the idle 1 0, means the shaft is changin its positions in anti-clockwise direction with one step.
Components Required
It is the time to identify what we need to interface Rotary Encoder with PIC Microcontroller,
- PIC16F877A
- 4.7k resistor
- 1k resistor
- 10k pot
- 33pF ceramic disc capacitor – 2pcs
- 20Mhz crystal
- 16x2 Display
- Rotary Encoder
- 5V adapter.
- Bread Board
- Hookup wires.
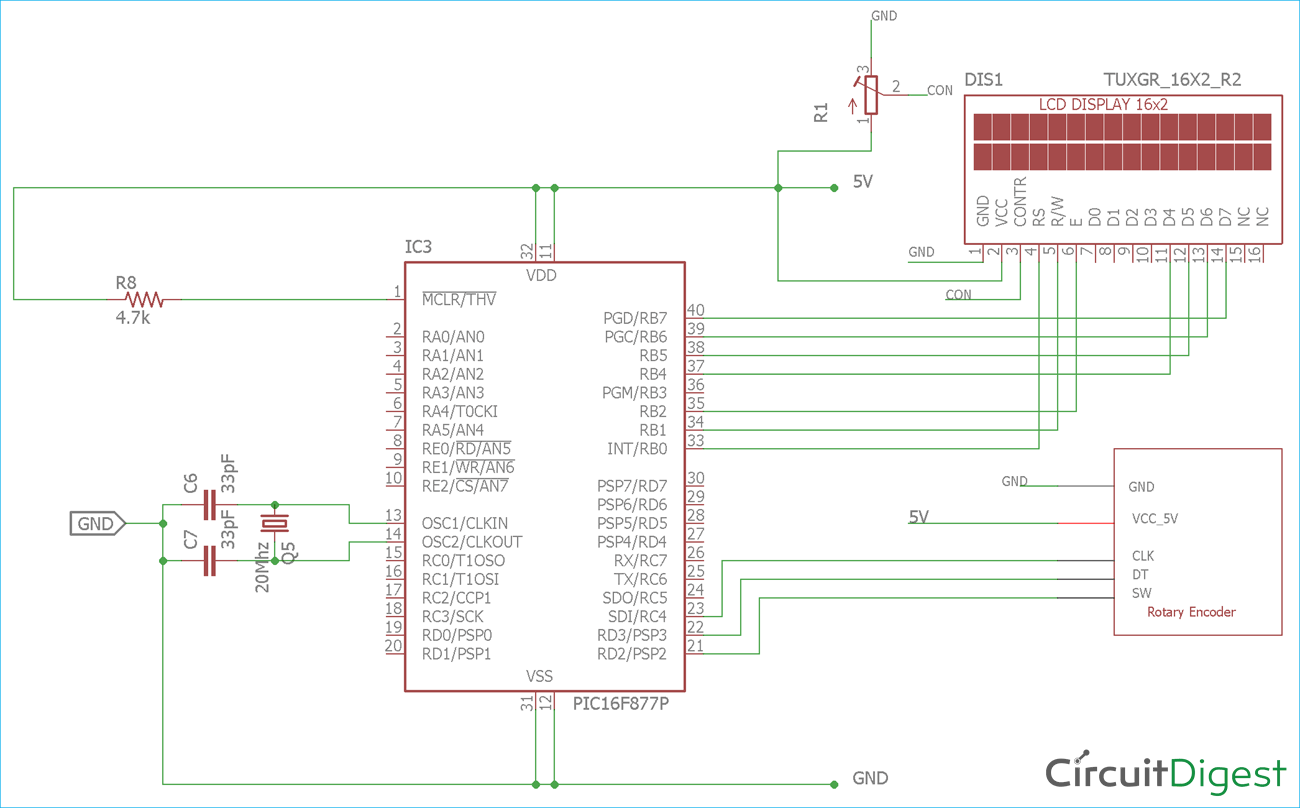
PIC16F877A Rotary Encoder Interfacing Circuit Diagram
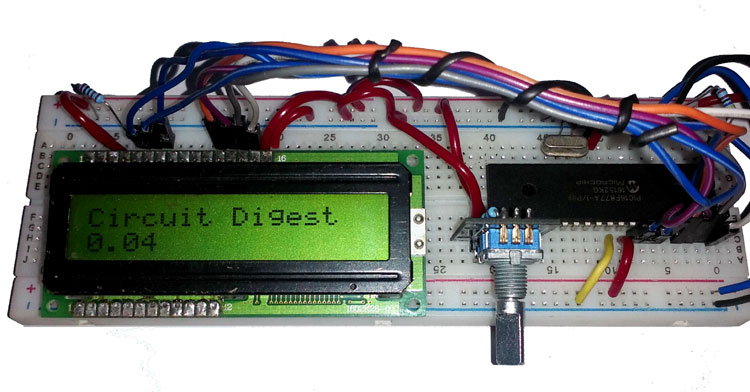
Below is the picture of final setup after connecting the components according to Circuit Diagram:

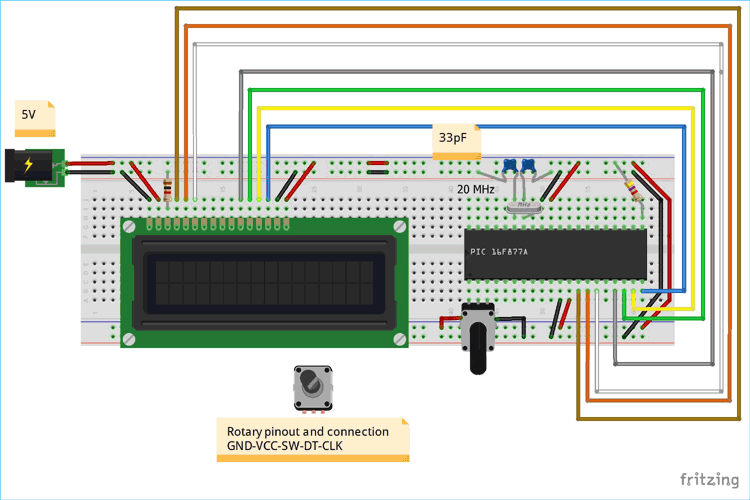
We have used a single 1K resistor for the contrast of the LCD instead of using a potentiometer. Also, check the full working video given at the end.
Code Explanation
Complete PIC code is given at the end of this project with a demonstration video, here we are explaining a few important parts of the code. If you are new with PIC Microcontroller then follow our PIC tutorials from the beginning.
As we discussed before, we need to check the output and differentiate the binary output for both DT and CLK, so we created an if-else part for the operation.
  if (Encoder_CLK != position){
            if (Encoder_DT != position){
               // lcd_com (0x01);
                counter++; // Increase the counter which will be printed on the lcd
                lcd_com (0xC0);
                lcd_puts("                ");
                lcd_com (0xC0);
                lcd_bcd(1,counter);
            }

            else{
              // lcd_com (0x01);
                lcd_com (0xC0);
                counter--; // decrease the counter
                lcd_puts("                ");
                lcd_com (0xC0);
                lcd_bcd(1,counter);
                //lcd_puts("Left");
            }
        }
We also need to store the position on each step. To do this, we used a variable “position” which stores the current position.
position = Encoder_CLK; // It is to store the encoder clock position on the variable. Can be 0 or 1.
Other than this an option is provided to notify about switch press on the LCD.
if (Encoder_SW == 0){
            sw_delayms(20); //debounce delay
            if (Encoder_SW == 0){
                //lcd_com(1);
                //lcd_com(0xC0);
                lcd_puts ("switch pressed");
//                itoa(counter, value, 10);
//                lcd_puts(value);
The system_init function is used to initialize the pin I/O operation, LCD and to store the Rotary Encoder position.
void system_init(){
    TRISB = 0x00; // PORT B as output, This port is used for LCD
    TRISDbits.TRISD2 = 1;
    TRISDbits.TRISD3 = 1;
    TRISCbits.TRISC4 = 1;
    lcd_init(); // This will Initialize the LCD
    position = Encoder_CLK;// Sotred the CLK position on system init, before the while loop start.
}
The LCD function is written on the lcd.c and lcd.h library where the lcd_puts(), lcd_cmd() are declared.
For the variable declaration, configuration bits and other code snippets, please find the full code below.

