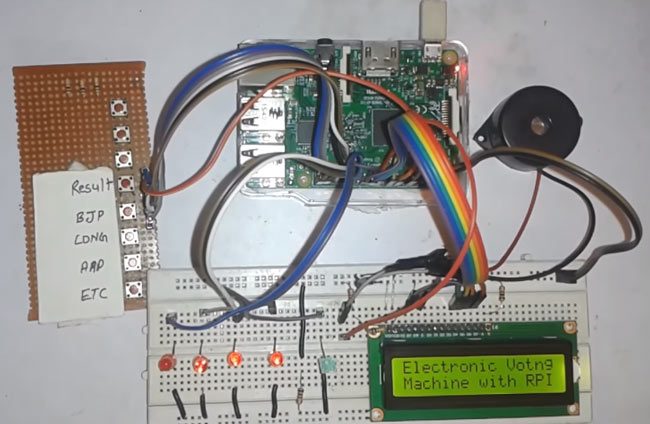
Raspberry Pi is an ARM cortex based popular development board designed for Electronic Engineers and Hobbyists. It’s a single board computer working on low power with a very good processing speed and memory. Raspberry Pi can be used for performing different functions at a time, like a normal PC, and hence it is called Mini Computer in your palm.
We have created a series of Raspberry Pi Tutorials, in which we have covered Interfacing of Raspberry Pi with all the basic components, as well as some simple Raspberry Pi projects to start with.
Here we are going to build an Electronic Voting Machine using Raspberry Pi Board. We all are aware about the Electronic Voting Machine (EVM) which is used to vote in Elections, by pressing a simple button. We have already covered Electronic Voting Machine using different Microcontrollers like EVM with AVR microcontroller and EVM with Arduino. We have also built a Voting Machine in which Voter is authenticated by RFID tag, so that only authenticated votes can be counted.
This Electronic Voting Machine using Raspberry Pi is simpler and easier, in comparison with our previous Voting Machine’s Projects.
Required Components:
- Raspberry Pi - 1
- 16x2 LCD - 1
- Push button - 5
- Bread board - 1
- Connecting wires
- 1K resistor - 1
- 10K resistor - 5
- 10K POT - 1
- LED’s - 5
How it Works:
In this project we have used four buttons to vote for four candidates or parties. We can increase the number of candidates, but for better understanding we have only used four here. When a voter presses any of the four buttons then the ‘voting count’ for the respected party or candidate, is increased by one each time. At the same time LED blinks and buzzer beeps for a second, to indicate that Vote has been given. After the Voting completes, we have a “Result” button, to show the results of the Voting. When we press this button, LCD screen shows the name of the winning Party with the no. of votes given to each party.
Circuit Explanation:
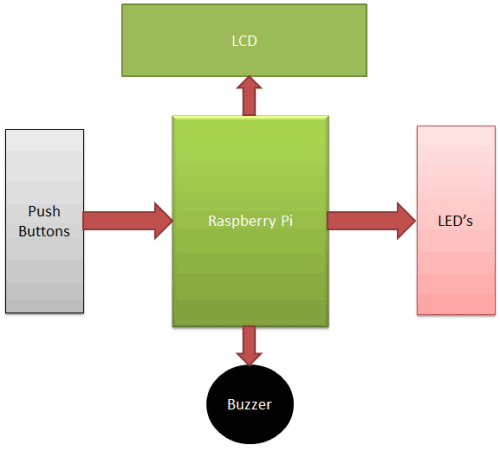
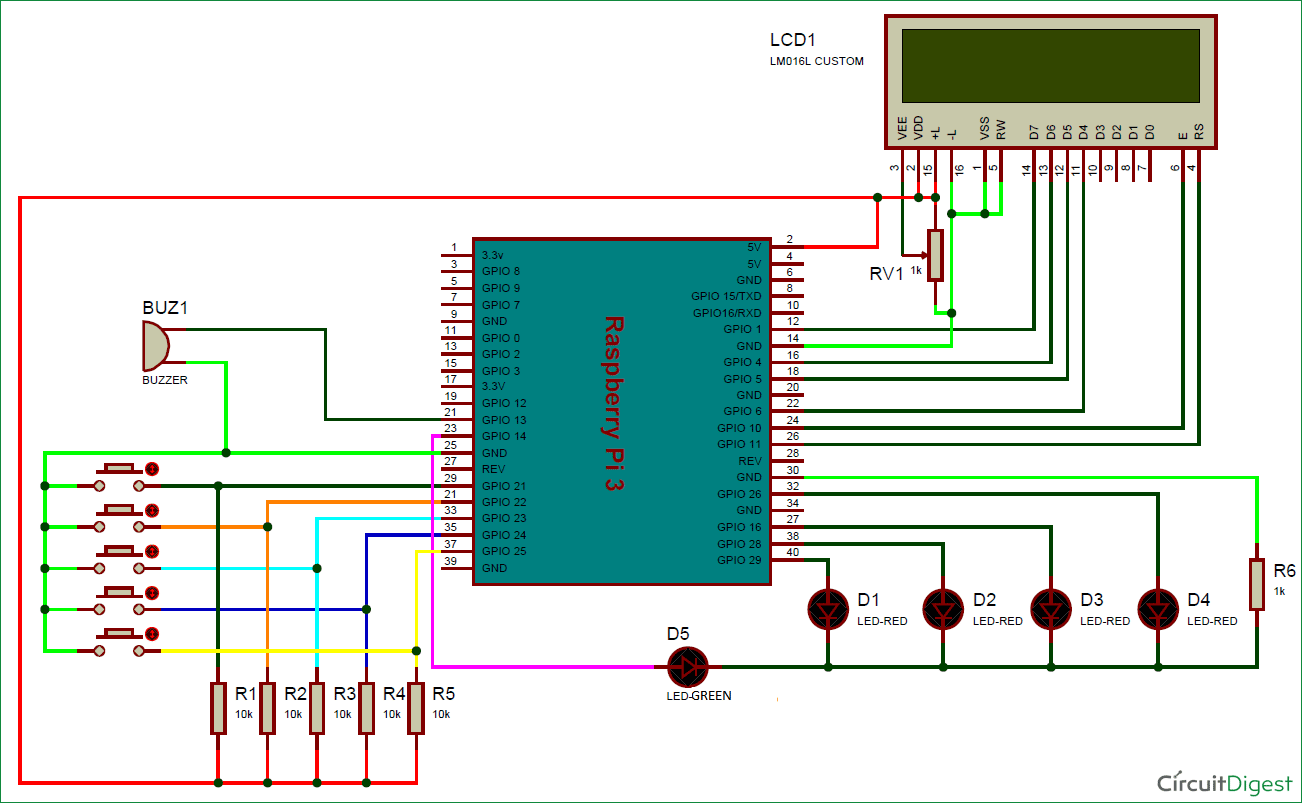
Circuit Diagram of this EVM using Raspberry Pi is given below. Raspberry Pi controls the whole process like Reading the Button, incrementing the vote count, generating result and display all the things on LCD.
Here we have used Raspberry Pi 3 board to perform the all operations in the project and used wiringPi Library for selecting and controlling the GPIO pins of Raspberry Pi. We can also use Raspberry Pi 2 here. Here we have used Five Buttons, in which four have been used to Vote for four different candidates/parties and one button is used for showing the Result on LCD. These five buttons are directly connected to GPIO pins 21 to 25 of RPI3, with respect to ground with 10K pull-up resistor for each one. A 16x2 LCD is connected with Raspberry Pi. Control pin RS, RW and En are connected to GPIO pin 11, GND and 10. And data pin D4-D7 is connected to GPIO pins 6, 5, 4 and 1 of RPI. A buzzer is also used for beep when any of the buttons is pressed by voter. Here we have used a Green LED (D5) for indicating that system is ready and voter can submit their vote in the machine, by pressing the button. A 10k Pot is used for controlling brightness of LCD.
How to run the Code in Raspberry Pi:
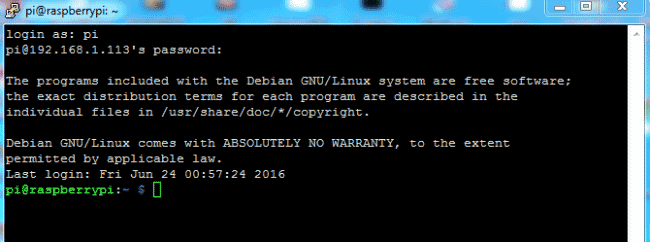
1. Firstly, Login In to your Raspberry Pi using SSH with default user name: ‘pi’ and password: ‘raspberry’. Here we have used SSH client “Putty for Windows” for getting connect with Pi through Windows. If you are on Linux, you can directly connect to Pi using SSH. There are lot of tutorial on the Internet on ‘Getting connect with Raspberry Pi using SSH’, so here we are not going in the details. You should also check How to start with Raspberry Pi to learn more about Pi, OS installation (Raspbian Jessie) and its Hardware and Software requirements.
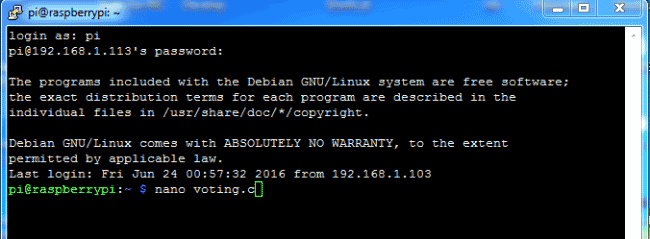
2. Now run the below command to open a new File named voting.c and paste the code (given in code section below) into the file, use “shift + insert” key to paste the code.
sudo nano voting.c
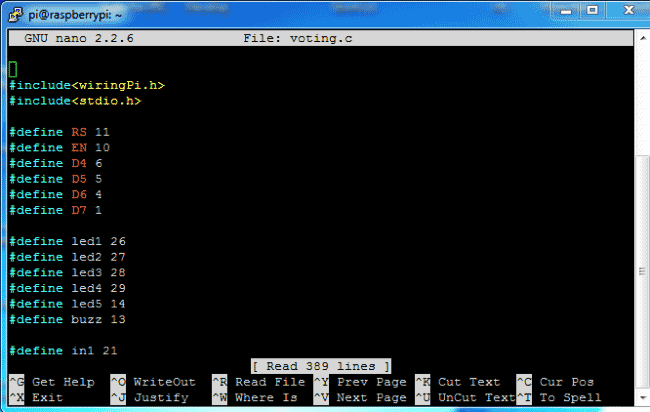
3. After writing the code press ctrl+x and then press y to save the code and press enter.
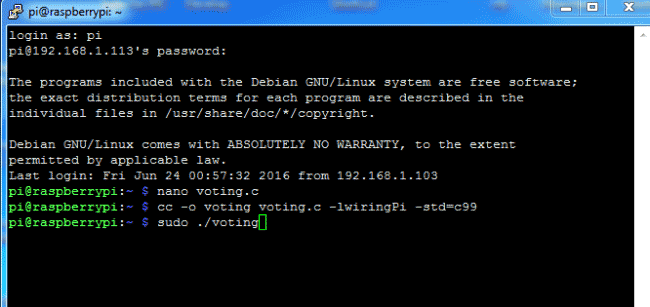
4. Now make the code executable using given command:
cc -o voting voting.c -lwiringPi -std=c99
5. Finally run the code by using given command
sudo ./voting
Programming Explanation:
Here we have used much user familiar C language to write the code and the coding much similar to Arduino coding. We can also use Python language to build this project.
First of all we include header files and define pins for LCD; wiringPi.h header file is used for controlling the GPIO pins of Pi. Then initialize some variables and pins for taking voting input and LED indications.
#include<wiringPi.h>
#include<stdio.h>

#define RS 11
#define EN 10
#define D4 6
#define D5 5
#define D6 4
#define D7 1

#define led1 26
#define led2 27
#define led3 28
#define led4 29
#define led5 14
#define buzz 13
After it, we have given direction to all used GPIO’s in void setup() function.
void setup()
  {
  if(wiringPiSetup()==-1)
  printf("ERROR");
  pinMode(led1, OUTPUT);
  pinMode(led2, OUTPUT);
  pinMode(led3, OUTPUT);
  pinMode(led4, OUTPUT);
  pinMode(led5, OUTPUT);
  pinMode(buzz, OUTPUT);
  pinMode(RS, OUTPUT);
  .... .....
  ..... .....
In code, we have used digitalRead function in void main() to read the Button pressed.
if(digitalRead(in1)==0)
{
        vote1++;
        show();
        digitalWrite(led1, HIGH);
        buzzer();
        digitalWrite(led1, LOW);
        wait();
}
void show() function is used for displaying Voting information on the LCD with the candidate party’s Name.
void show()
{
        setCursor(0,0);
        print("BJP Cong AAP Ex");
        setCursor(1,1);
        sprintf(vote,"%d",vote1);
        print(vote);
        setCursor(6,1);
        sprintf(vote,"%d",vote2);
        .... .....
        ..... ......
Here are some more functions used in this project:
void buzzer() fuction is used for beeping the buzzer as a indicaion that vote has been given. And void wait() fuction for LED D5 (Green LED in hardware), which shows that system is ready for Vote, when the LED is turned ON.
void buzzer()
{
     digitalWrite(buzz, HIGH);
     delay(1000);
     digitalWrite(buzz, LOW);
}

void wait()
{
     digitalWrite(led5, LOW);
     delay(3000);
}
void comapare() function is used, to compare the total votes of each of the candidates, for getting the result and show the status of the result on the LCD.
void compare()
{
    clear();
    print("Please Wait....");
    wait();
   if(vote1 > vote2 && vote1>vote3 && vote1>vote4)
        {
          digitalWrite(led1, HIGH);
          for(i=0;i<2;i++)
          {
           clear();
           setCursor(0,0);
           print("Congrates.......");
           setCursor(0,1);
           print("BJP Won election");
           .... ......
           ..... ......
Check the Full Code below.
#include<wiringPi.h>
#include<stdio.h>
#define RS 11
#define EN 10
#define D4 6
#define D5 5
#define D6 4
#define D7 1
#define led1 26
#define led2 27
#define led3 28
#define led4 29
#define led5 14
#define buzz 13
#define in1 21
#define in2 22
#define in3 23
#define in4 24
#define in5 25
int vote1=0,vote2=0,vote3=0,vote4=0;
int i=0;
char vote[5];
void compare();
void show();
void lcdcmd(unsigned char ch)
{
int temp=0x80;
digitalWrite(D4, temp & ch<<3);
digitalWrite(D5, temp & ch<<2);
digitalWrite(D6, temp & ch<<1);
digitalWrite(D7, temp & ch);
digitalWrite(RS, LOW);
digitalWrite(EN, HIGH);
delay(10);
digitalWrite(EN, LOW);
digitalWrite(D4, temp & ch<<7);
digitalWrite(D5, temp & ch<<6);
digitalWrite(D6, temp & ch<<5);
digitalWrite(D7, temp & ch<<4);
digitalWrite(RS, LOW);
digitalWrite(EN, HIGH);
delay(10);
digitalWrite(EN, LOW);
}
void write(unsigned char ch)
{
int temp=0x80;
digitalWrite(D4, temp & ch<<3);
digitalWrite(D5, temp & ch<<2);
digitalWrite(D6, temp & ch<<1);
digitalWrite(D7, temp & ch);
digitalWrite(RS, HIGH);
digitalWrite(EN, HIGH);
delay(10);
digitalWrite(EN, LOW);
digitalWrite(D4, temp & ch<<7);
digitalWrite(D5, temp & ch<<6);
digitalWrite(D6, temp & ch<<5);
digitalWrite(D7, temp & ch<<4);
digitalWrite(RS, HIGH);
digitalWrite(EN, HIGH);
delay(10);
digitalWrite(EN, LOW);
}
void clear()
{
lcdcmd(0x01);
}
void setCursor(int x, int y)
{
int set=0;
if(y==0)
set=128+x;
if(y==1)
set=192+x;
lcdcmd(set);
}
void print(unsigned char *str)
{
while(*str)
{
write(*str);
str++;
}
}
void begin(int x, int y)
{
lcdcmd(0x02);
lcdcmd(0x28);
lcdcmd(0x06);
lcdcmd(0x0e);
lcdcmd(0x01);
}
void setup()
{
if(wiringPiSetup()==-1)
printf("ERROR");
pinMode(led1, OUTPUT);
pinMode(led2, OUTPUT);
pinMode(led3, OUTPUT);
pinMode(led4, OUTPUT);
pinMode(led5, OUTPUT);
pinMode(buzz, OUTPUT);
pinMode(RS, OUTPUT);
pinMode(EN, OUTPUT);
pinMode(D4, OUTPUT);
pinMode(D5, OUTPUT);
pinMode(D6, OUTPUT);
pinMode(D7, OUTPUT);
pinMode(in1, INPUT);
pinMode(in2, INPUT);
pinMode(in3, INPUT);
pinMode(in4, INPUT);
pinMode(in5, INPUT);
digitalWrite(in1, HIGH);
digitalWrite(in2, HIGH);
digitalWrite(in3, HIGH);
digitalWrite(in4, HIGH);
digitalWrite(in5, HIGH);
begin(16,2);
}
void buzzer()
{
digitalWrite(buzz, HIGH);
delay(1000);
digitalWrite(buzz, LOW);
}
void wait()
{
digitalWrite(led5, LOW);
delay(3000);
}
void main()
{
setup();
print("Electronic Votng");
setCursor(0,1);
print("Machine with RPI");
delay(2000);
clear();
print("Circuit Digest");
setCursor(0,1);
print("Welcomes You");
delay(2000);
clear();
show();
while(1)
{
digitalWrite(led5, HIGH);
digitalWrite(in3, HIGH);
if(digitalRead(in1)==0)
{
vote1++;
show();
digitalWrite(led1, HIGH);
buzzer();
digitalWrite(led1, LOW);
wait();
}
else if(digitalRead(in2)==0)
{
vote2++;
show();
digitalWrite(led2, HIGH);
buzzer();
digitalWrite(led2, LOW);
wait();
while(digitalRead(in2)==0);
}
else if(digitalRead(in3)==0)
{
vote3++;
show();
digitalWrite(led3, HIGH);
buzzer();
digitalWrite(led3, LOW);
wait();
while(digitalRead(in3)==0);
}
else if(digitalRead(in4)==0)
{
vote4++;
show();
digitalWrite(led4, HIGH);
buzzer();
digitalWrite(led4, LOW);
wait();
while(digitalRead(in4)==0);
}
else if(digitalRead(in5)==0)
{
compare();
while(digitalRead(in5)==0);
}
}
}
void show()
{
setCursor(0,0);
print("BJP Cong AAP Ex");
setCursor(1,1);
sprintf(vote,"%d",vote1);
print(vote);
setCursor(6,1);
sprintf(vote,"%d",vote2);
print(vote);
setCursor(10,1);
sprintf(vote,"%d",vote3);
print(vote);
setCursor(14,1);
sprintf(vote,"%d",vote4);
print(vote);
delay(100);
}
void compare()
{
clear();
print("Please Wait....");
wait();
if(vote1 > vote2 && vote1>vote3 && vote1>vote4)
{
digitalWrite(led1, HIGH);
for(i=0;i<2;i++)
{
clear();
setCursor(0,0);
print("Congrates.......");
setCursor(0,1);
print("BJP Won election");
delay(2000);
clear();
setCursor(0,0);
print("BJP Cong AAP Ex");
setCursor(1,1);
sprintf(vote,"%d",vote1);
print(vote);
setCursor(6,1);
sprintf(vote,"%d",vote2);
print(vote);
setCursor(10,1);
sprintf(vote,"%d",vote3);
print(vote);
setCursor(14,1);
sprintf(vote,"%d",vote4);
print(vote);
delay(2000);
}
digitalWrite(led1, LOW);
}
else if(vote2 >vote1 && vote2>vote3 && vote2>vote4)
{
digitalWrite(led2, HIGH);
for(i=0;i<2;i++)
{
clear();
setCursor(0,0);
print("Congrates.......");
setCursor(0,1);
print("Cong Won election");
delay(2000);
clear();
setCursor(0,0);
print("BJP Cong AAP Ex");
setCursor(1,1);
sprintf(vote,"%d",vote1);
print(vote);
setCursor(6,1);
sprintf(vote,"%d",vote2);
print(vote);
setCursor(10,1);
sprintf(vote,"%d",vote3);
print(vote);
setCursor(14,1);
sprintf(vote,"%d",vote4);
print(vote);
delay(2000);
}
digitalWrite(led2, LOW);
}
else if(vote3 > vote2 && vote3>vote1 && vote3>vote4)
{
digitalWrite(led3, HIGH);
for(i=0;i<2;i++)
{
clear();
setCursor(0,0);
print("Congrates.......");
setCursor(0,1);
print("AAP Won election");
delay(2000);
clear();
setCursor(0,0);
print("BJP Cong AAP Ex");
setCursor(1,1);
sprintf(vote,"%d",vote1);
print(vote);
setCursor(6,1);
sprintf(vote,"%d",vote2);
print(vote);
setCursor(10,1);
sprintf(vote,"%d",vote3);
print(vote);
setCursor(14,1);
sprintf(vote,"%d",vote4);
print(vote);
delay(2000);
}
digitalWrite(led3, LOW);
}
else if(vote4 > vote2 && vote4>vote3 && vote4>vote1)
{
digitalWrite(led4, HIGH);
for(i=0;i<2;i++)
{
clear();
setCursor(0,0);
print("Congrates.......");
setCursor(0,1);
print("Ex Won elections");
delay(2000);
clear();
print("BJP Cong AAP Ex");
setCursor(1,1);
sprintf(vote,"%d",vote1);
print(vote);
setCursor(6,1);
sprintf(vote,"%d",vote2);
print(vote);
setCursor(10,1);
sprintf(vote,"%d",vote3);
print(vote);
setCursor(14,1);
sprintf(vote,"%d",vote4);
print(vote);
delay(2000);
}
digitalWrite(led4, LOW);
}
else
{
for(i=0;i<2;i++)
{
clear();
setCursor(0,0);
print("Tie Between Two ");
setCursor(0,1);
print("or more Parties ");
delay(2000);
clear();
print("BJP Cong AAP Ex");
setCursor(1,1);
sprintf(vote,"%d",vote1);
print(vote);
setCursor(6,1);
sprintf(vote,"%d",vote2);
print(vote);
setCursor(10,1);
sprintf(vote,"%d",vote3);
print(vote);
setCursor(14,1);
sprintf(vote,"%d",vote4);
print(vote);
delay(2000);
}
}
vote1=0;
vote2=0;
vote3=0;
vote4=0;
clear();
show();
}
Comments
Vote counting machine using raspberrypi 3
cc -o voting voting.c -lwiringPi -std=c99
After doing this it was showing like this
/use/bin/Id: cannot find -lwiringPi
collect2:error :Id returned 1 exit status
Wireless voting
Nice project!!! Can you help me use this project by voting wirelessly?
Best regards
hello, can you help me write
hello, can you help me write this in python code,please



sir, i need to connect my fingerprint sensor with rasperry pi so please would you provide me circuit diagram..