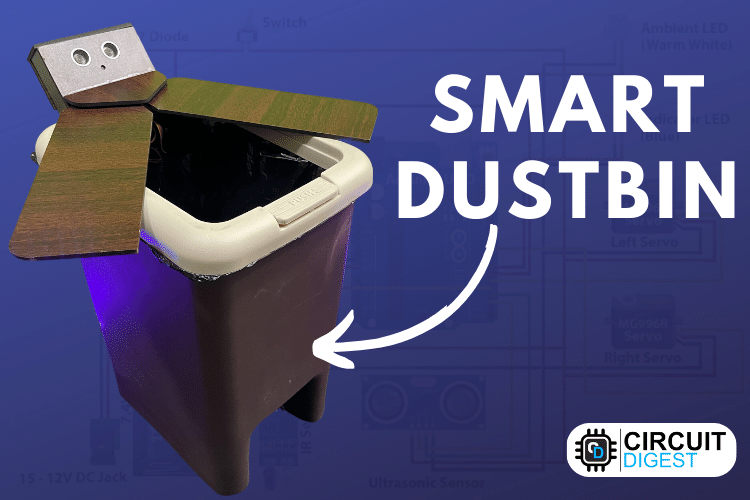
Waste management has become a pressing global issue as urbanization continues to grow. One innovative solution that addresses this challenge is a "Smart Dustbin". In this project, I will show you how to make a Smart Dustbin using Arduino, where the lid of the dustbin will automatically open when you approach with trash. Previously, we have also built a similar project called Smart Dustbin using Arduino and Ultrasonic Sensor. But in this project we interface Ultrasonic sensor and IR sensor to build our Smart trash bin.
Objective
The core objective of the Arduino Smart Dustbin is to detect the presence and open the dustbin, later after the trash is put we have to close it. In a previous project with a Human Following Robot, we used a Ultrasonic sensor that could spot objects, and when it did, the robot changed its route to follow the object (our human). In our Smart Dustbin Arduino project, we there doing something similar. We have put Ultrasonic sensor on top of the dustbin's cover. So, when the sensor sees something like a person's hand, it tells the Arduino to open the lid.
Advantages
The primary advantage of this Arduino Nano smart trash can is that it contributes to maintaining a clean and eco-friendly environment. This endeavor is inspired by the "Swaach Bharat Mission". In this project the Automatic trash bin is built on a microcontroller based platform namely the Arduino Nano board which is interfaced with two Servo motors, one ultrasonic sensor and one IR sensor. Ultrasonic sensor is placed at the top of the dustbin which will detect the object or a person. The threshold stature is set at a particular level. This Arduino Nano Smart Dustbin sense the person or object using Ultrasonic Sensor which send the message to Servo Motor using Arduino Nano. When the person Comes closer this Automatic Smart Dustbin then the Dustbin lid will automatically open for your waste and after some time it will automatically Close.
Components Required to Build an Arduino Smart Dustbin
- Arduino Nano
- Two servo motors (MG996R)
- HC-SR04 Ultrasonic Sensor
- IR Sensor (generic)
- Two LED (for visual feedback)
- 7.4V Li-ion battery
- Lm2596 DC-DC buck convertor
- DC socket and Switch
- Jumper wires
- Breadboard or PCB (Printed Circuit Board)
Circuit Diagram of Smart Dustbin Using Arduino Nano
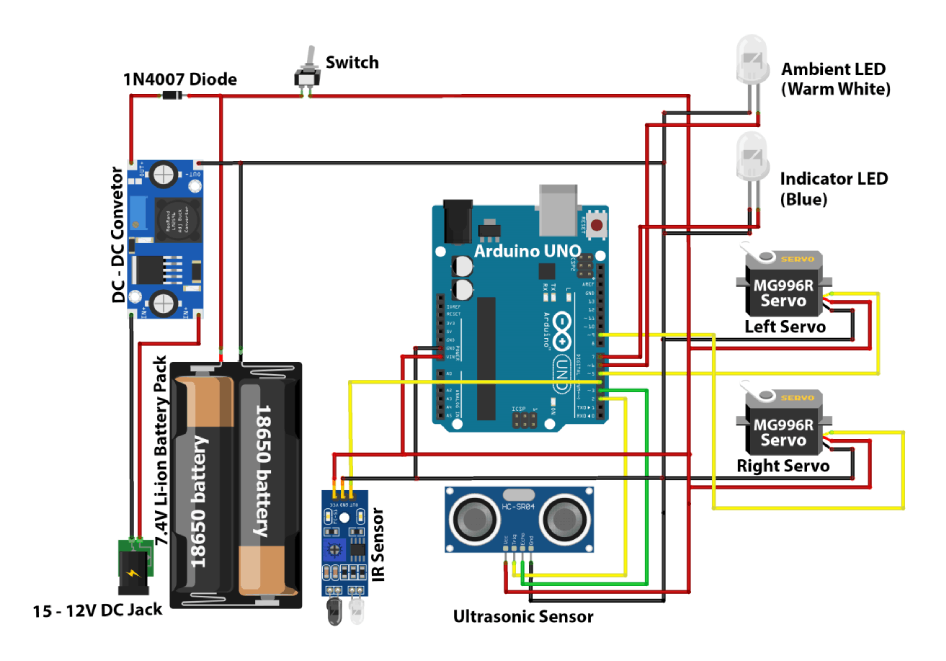
The following image shows the circuit diagram of the Smart Dustbin with Arduino. It is a very simple design as the project involves only three main components (Ultrasonic sensor, IR sensor and Servo motors) other than Arduino Nano.
Important: Adjust the buck converter's output voltage to a range of 8V to 8.2V, as the charging voltage for a 7.4V Li-ion battery is 8.2V. This adjustment is necessary when charging your battery via a 12V charging socket, as the buck converter will effectively reduce the voltage from 12V to 8V.
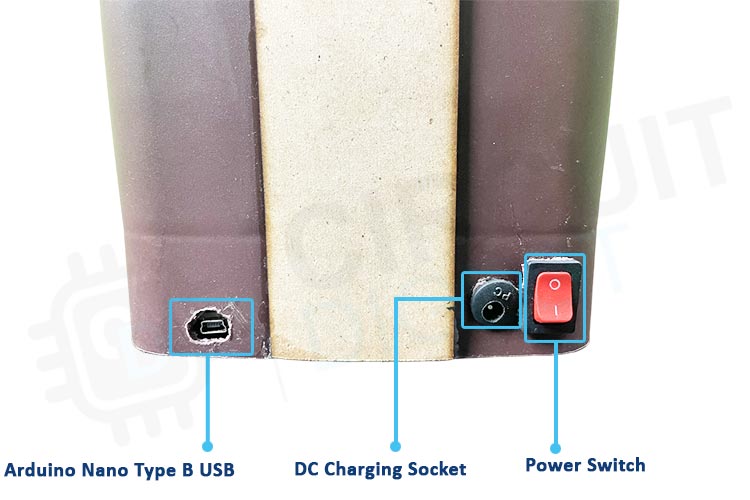
Connect the Arduino Nano to the breadboard or PCB. Make sure to connect the power and ground pins. Connect the 7.4V Li-ion battery to the Vin pin of the Arduino Nano via a switch. This switch allows you to turn the Arduino on and off from external supply. The switch, Charging socket and Arduino nano programming port is shown below.
Connect the positive(red) wire to the 7.5V output of your DC-DC buck converter, and make sure it's adjusted to 8.1V if necessary. Then, attach the ground (black) wire to the ground (GND) on the Arduino Nano. The digital signal (blue) wire should be connected to Digital Pin 2 on the Arduino Nano.
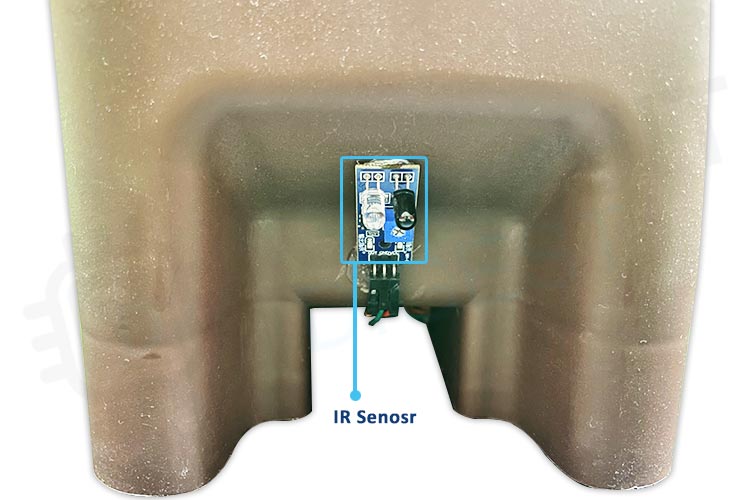
Connect the positive wire to the 7.4V output of your DC-DC buck converter. Ensure it's adjusted to 8.1V if required. Next, connect the ground wire to the ground (GND) on the Arduino Nano. Finally, attach the sensor's data or "Signal" wire to Digital Pin 4 on the Arduino Nano. Both the servo motors that we have used to open and close the lid is shown below.
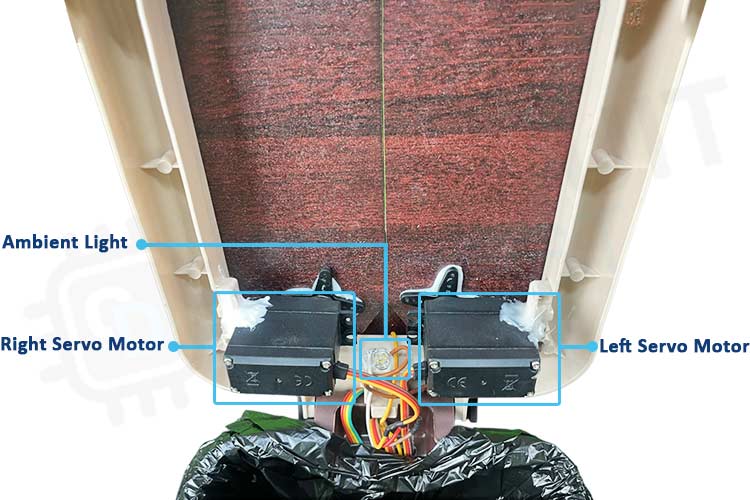
First, take the signal wires from the servo motors (1&2) and connect them to one of the PWM pins on the Arduino, such as pins 9 and 5. Next, attach the power wires from the servo motors to the 7.4V output of the DC-DC converter. Lastly, connect the ground wires from the servo motors to one of the GND pins on the Arduino.
In the power setup, link the positive battery terminal to the LM2596 buck converter's output using a diode, and then connect it to the Vin pin of the Arduino through a switch. Connect the negative battery terminal to the ground (GND) on the Arduino, LM2596 buck converter, and other parts. Lastly, connect the input of the LM2596 to the DC socket.
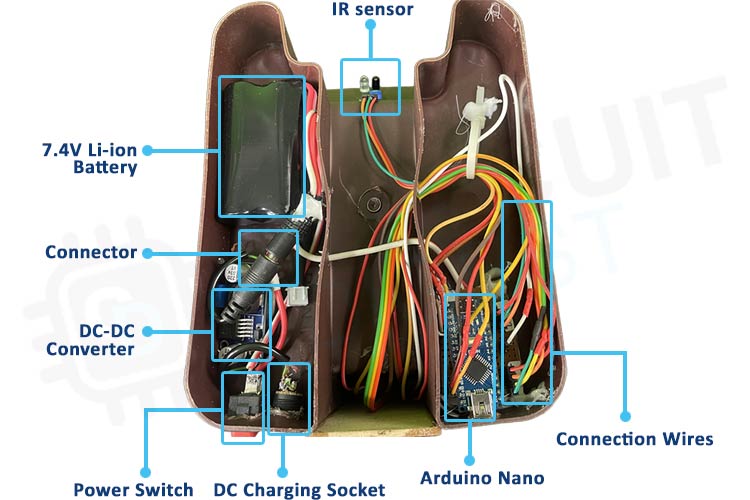
Secure all components to the body frame using screws, nuts, and Hot glue as needed. Ensure that all connections are secure and free from loose wires or potential short circuits. Always double-check your connections before powering on the circuit.
Design of Arduino Smart Dustbin
I created the custom open and close Lid design and Ultrasonic sensor holder specifically for this Arduino Nano Smart dustbin project, and you can see screenshots of the CAD design I made using Onshape, as well as the actual Dustbin I built, in the images below.
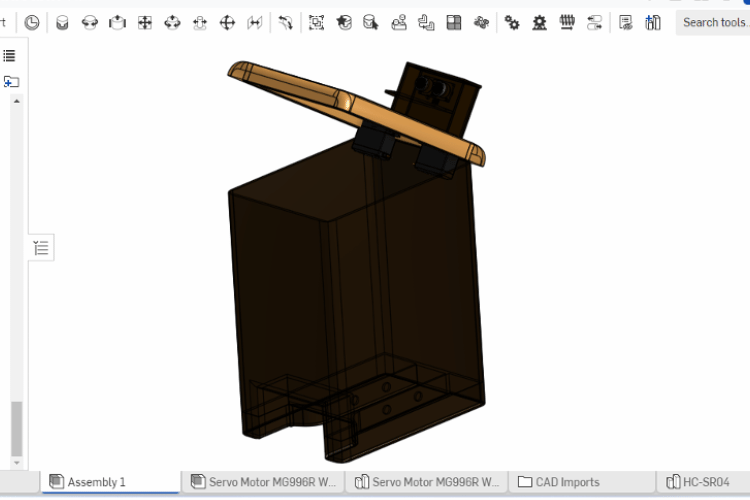
If you're interested in recreating this project or incorporating my design into your own work, I've included the CAD .dxf files, which you can download from thingiverse.
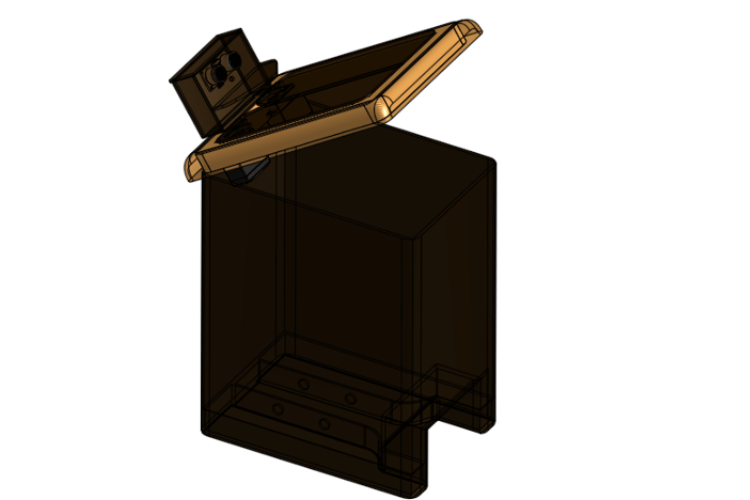
Smart Dustbin using Arduino Code
In the code for this Arduino based smart dustbin, two sensors are used for object detection. The first sensor is an ultrasonic sensor, and the second sensor is an IR sensor. When our hand or foot comes within the range of the ultrasonic or IR sensor, it will send a signal to the Arduino. The Arduino will then rotate both servos in opposite directions, causing the dustbin lid to open. Additionally, an indicator LED will light up. I have set the ultrasonic sensor's range to 40cm, but you can modify it according to your needs. As soon as our hand moves away from the sensor, after a 2-second delay, the servos will rotate back, and the lid will close.
#include <Servo.h>
This line includes the Servo library, which is required for controlling servo motors.
const int trigPin = 2;  // Trig pin of the ultrasonic sensor
const int echoPin = 3;  // Echo pin of the ultrasonic sensor
const int irSensorPin = 4;   // IR sensor pin
const int ledPin = 7;   // LED pin
const int lightPin = 6; // Light pin
These lines declare constants for pin numbers used for various components, such as the ultrasonic sensor (trigPin and echoPin), IR sensor, LED, and another light source.
Servo servo1;
Servo servo2;
bool lidOpen = false;  // Variable to track the lid status
unsigned long lastObjectTime = 0;  // Timestamp to track when object was last detected
These lines create instances of the Servo class, which will be used to control two servo motors (servo1 and servo2).
Here, two variables are declared lidOpen is a boolean variable to track whether the lid is open or closed, and lastObjectTime is an unsigned long variable to record the timestamp when an object was last detected.
void setup() {
  servo1.attach(9);
  servo2.attach(5);
  pinMode(trigPin, OUTPUT);
  pinMode(echoPin, INPUT);
  pinMode(irSensorPin, INPUT);
  pinMode(ledPin, OUTPUT);
// Initialize the servo positions to keep the lid closed
  servo1.write(90); //right
  servo2.write(90); //left
   // Delay for 1 second
  delay(1000);
   // Initialize the serial communication for debugging
  Serial.begin(9600);
}
In the setup() function the servo motors are attached to pins 9 and 5. The ultrasonic sensor pins, IR sensor pin, LED pin, and light pin are configured as either OUTPUT or INPUT. The servo motors are initially positioned to keep the lid closed (90 degrees). There's a delay of 1000 milliseconds (1 second). Serial communication is initialized for debugging at a baud rate of 9600.
void loop() {
  // Check if an object is within a certain range using the ultrasonic sensor
  long duration;
  int distance;

  digitalWrite(trigPin, LOW);
  delayMicroseconds(2);
  digitalWrite(trigPin, HIGH);
  delayMicroseconds(10);
  digitalWrite(trigPin, LOW);

  duration = pulseIn(echoPin, HIGH);
  distance = (duration / 2) / 29.1;  // Calculate distance in centimeters
  Serial.println(distance);
In the loop() function, the code continually measures distance using an ultrasonic sensor. It triggers the sensor, records the time it takes for the signal to return, and calculates the distance in centimeters, displaying the result on the serial monitor
  // Check if the IR sensor is activated
  int irSensorValue = digitalRead(irSensorPin);
 Serial.println(irSensorValue);
The code checks the status of the IR sensor (either HIGH or LOW) and prints the value to the serial monitor.
// If distance is less than 40 cm or the IR sensor is activated
  if (distance < 40 || irSensorValue == LOW ) {  // Change the threshold value as needed
     // If the lid is not open, open it and set the status
   if (!lidOpen) {
      lidOpen = true;
      digitalWrite(ledPin, HIGH);
      digitalWrite(lightPin, HIGH);
      Serial.println("Led On");
This block starts with an if statement that checks two conditions first distance is less than 40 cm, which is detected by the ultrasonic sensor and second irSensorValue is in a LOW state, which indicates the IR sensor is activated (i.e., an object is detected).If either of the conditions is met, the code checks if the lidOpen variable is false. If the lid is not open (!lidOpen is true), it proceeds to open the lid lidOpen is set to true, indicating that the lid is open. The LED (ledPin) and light (lightPin) are turned on by setting them to a HIGH state, providing visual feedback. a message, "Led On" is printed to the serial monitor for debugging.
for (int angle = 90; angle <= 180; angle++) {
      servo1.write(angle);
      servo2.write(180 - angle);
      delay(10);
    }
   }
Inside the lid opening section, a for loop is used to gradually open the lid. This loop iterates from an initial angle of 90 degrees to a final angle of 180 degrees. It changes the angles of servo1 and servo2 in a coordinated manner to create a smooth lid opening motion. A small delay of 10 milliseconds is added at each step to control the speed of the servo motors.
lastObjectTime = millis(); // Record the time when an object was detected
After opening the lid, the code records the current time using millis(). This timestamp is stored in the lastObjectTime variable to keep track of when an object was last detected.
else {
    // If the lid was open and it's been more than 2 seconds since an object was detected, close it
    if (lidOpen && millis() - lastObjectTime >= 2000)
If neither of the conditions in Block 1 is met (i.e., no object is detected or the object is out of range), the code proceeds to check if the lid is open.It verifies that lidOpen is true, indicating that the lid is currently open.It further checks if it has been more than 2 seconds since an object was last detected, using the millis() function to calculate the time difference.
{
    for (int angle = 180; angle >= 90; angle--) {
      servo1.write(angle);
      servo2.write(180 - angle);
      delay(20);
    }
    lidOpen = false;
    // Turn off the LED
    digitalWrite(ledPin, LOW);
    digitalWrite(lightPin,LOW);
    Serial.println("Led Off");
  }
  }}
If the lid was open and it has been more than 2 seconds since an object was last detected, the lid is gradually closed. The Led and light are turned off, and the lidOpen variable is set to false.
In summary, this code controls a "smart dustbin" by opening the lid when it detects an object (either by the ultrasonic sensor or IR sensor) and closing the lid after a specified period of inactivity(2sec). The use of servo motors ensures smooth lid motion, and the visual feedback is provided through the Led and light.
Working of Smart Dustbin
In the video, you can observe that the ultrasonic sensor plays a crucial role in the automatic operation of the dustbin's lid. When any object or your hand approaches the ultrasonic sensor positioned above the dustbin, the sensor gets activated, causing the lid’s to open. The lid’s remains in the open position as long as it continues to detect the presence of your hand.
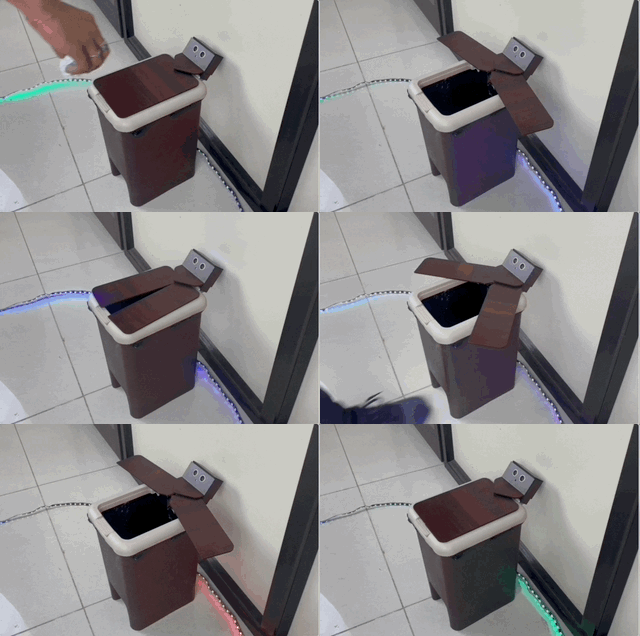
However, the lid’s is designed to be responsive to changes in the sensor's field. As soon as you withdraw your hand beyond the sensor's range, a brief 2-second delay elapses before the lid automatically closes. This feature ensures that the lid closes smoothly and conveniently after you've finished using the dustbin.
Furthermore, an infrared (IR) sensor has been integrated into the system, positioned at the lower part of the dustbin. This innovation means that you don't even need to physically approach the IR sensor with your hand. If you simply bring your foot or any part of your body close to the IR sensor from a distance, it will detect the movement and activate, causing the lid to open. Similarly, when you step away from the IR sensor's range, the lid will close again, maintaining a hands-free and hygienic experience.
Conclusion
The core concept of the Smart Dustbin is centered around the recognition of objects, and it accomplishes this through the use of an HC-SR04 Ultrasonic Sensor and an IR Sensor. The project is inspired by the "Swaach Bharat Mission" emphasizing cleanliness and sanitation. Its main objective is to build a dustbin that can autonomously open its lid when a person or an object approaches, making waste disposal a more convenient and hygienic experience.
The project's design and build involve the creation of a custom lid mechanism and sensor holder, demonstrating the flexibility of using 3D design tools. The inclusion of an IR sensor adds to the hands-free experience, allowing users to open the lid without physical contact.
// Arduino Code for Smart dustbin using Arduino Nano
// Created by Circuitdigest
#include <Servo.h>
const int trigPin = 2; // Trig pin of the ultrasonic sensor
const int echoPin = 3; // Echo pin of the ultrasonic sensor
const int irSensorPin = 4; // IR sensor pin
const int ledPin = 7; // LED pin
const int lightPin = 6; // Light pin
Servo servo1;
Servo servo2;
bool lidOpen = false; // Variable to track the lid status
unsigned long lastObjectTime = 0; // Timestamp to track when object was last detected
void setup() {
servo1.attach(9);
servo2.attach(5);
pinMode(trigPin, OUTPUT);
pinMode(echoPin, INPUT);
pinMode(irSensorPin, INPUT);
pinMode(ledPin, OUTPUT);
// Initialize the servo positions to keep the lid closed
servo1.write(90); //right
servo2.write(91); //left
// Delay for 1 second
delay(1000);
// Initialize the serial communication for debugging
Serial.begin(9600);
}
void loop() {
// Check if an object is within a certain range using the ultrasonic sensor
long duration;
int distance;
digitalWrite(trigPin, LOW);
delayMicroseconds(2);
digitalWrite(trigPin, HIGH);
delayMicroseconds(10);
digitalWrite(trigPin, LOW);
duration = pulseIn(echoPin, HIGH);
distance = (duration / 2) / 29.1; // Calculate distance in centimeters
Serial.println(distance);
// Check if the IR sensor is activated
int irSensorValue = digitalRead(irSensorPin);
Serial.println(irSensorValue);
// If distance is less than 40 cm or the IR sensor is activated
if (distance < 40 || irSensorValue == LOW ) { // Change the threshold value as needed
// If the lid is not open, open it and set the status
if (!lidOpen) {
lidOpen = true;
digitalWrite(ledPin, HIGH);
digitalWrite(lightPin, HIGH);
Serial.println("Led On");
for (int angle = 90; angle <= 170; angle++) {
servo1.write(angle);
servo2.write(170 - angle);
delay(10);
}
}
lastObjectTime = millis(); // Record the time when an object was detected
} else {
// If the lid was open and it's been more than 2 seconds since an object was detected, close it
if (lidOpen && millis() - lastObjectTime >= 2000) {
for (int angle = 170; angle >= 90; angle--) {
servo1.write(angle);
servo2.write(181 - angle);
delay(20);
}
lidOpen = false;
// Turn off the LED
digitalWrite(ledPin, LOW);
digitalWrite(lightPin,LOW);
Serial.println("Led Off");
}
}
}

