If you are a maker or an electronics enthusiast, then you must be familiar with the Arduino platform and their boards. As we know, the Arduino platform made it easier for makers like us to make our own microcontroller projects with ease and versatility. Even though there are many Arduino boards, the Arduino Uno has become the most popular Arduino board and still is even after almost 15 years after its launch. If you want to know about all of the Arduino boards, look at our Arduino boards quick comparison guide. Even though it is a solid board for basic projects, newer and more advanced projects need a much more powerful development board. That is why Arduino released the Arduino Uno R4. While keeping the same form factor, size and compatibility with existing Arduino Uno shields, the Arduino Uno R4 packs a very powerful Arm SoC for more advanced use cases. Previously we have done a comprehensive comparison between the Arduino Uno R3 and Arduino Uno R4 with the main focus on the hardware specifications and features of each board.
In this article, we will be reviewing the Arduino Uno R4 WiFi development board, featuring the Renesas RA4M1 ARM Cortex-M4 MCU for general-purpose applications and the ESP32-S3 SoC for WiFi and Bluetooth. We will go through its features, uses, and how to upload a code with a simple example using the Arduino IoT Cloud. We have also selected Arduino Uno R4 WiFi for our IoT & Edge AI Project Challenge as one of three boards you can choose from. Check out the contest page for more information and don’t miss the chance to get an Arduino Uno R4 WiFi and other interesting goodies along with a chance to win prizes upto Rs.7,00,000.
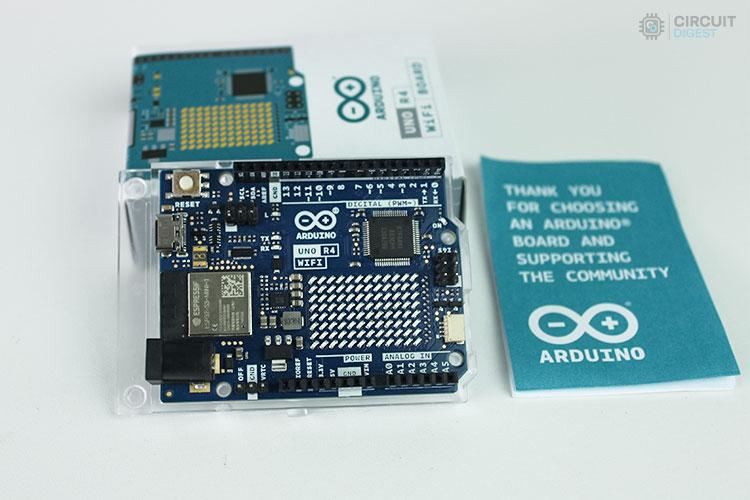
It’s Unboxing Time
Now let’s unbox the Arduino Uno R4 WiFi. The Arduino Uno R4 WiFi comes with very minimal packaging. The box contains the board itself with an acrylic base for protection, along with a thank you note and some cool Arduino stickers.
The Board Overview
Now, if we look at the Arduino Uno R4 WiFi development board, we can see that it comes with many hardware upgrades over its predecessor. Here is a part marking image of the Arduino Uno R4 WiFi for better understanding.
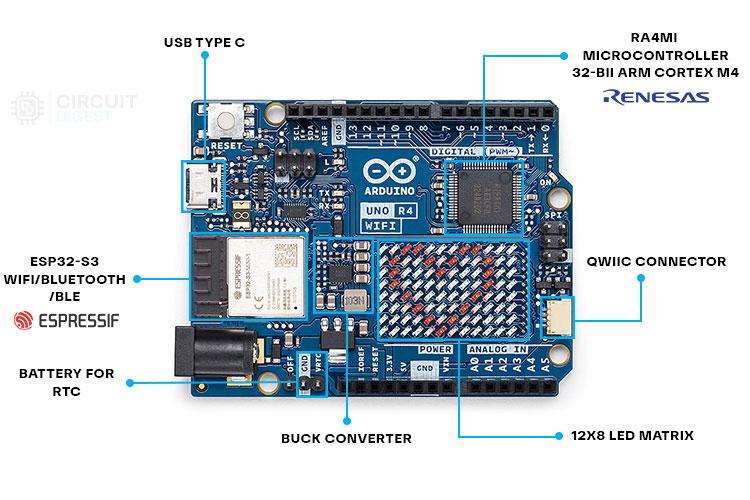
Here as you can see the Arduino Uno R4 WiFi comes with two microcontrollers, one is the ESP32-S3 from Esperissif for WiFi and Bluetooth connectivity and the other is the RA4M1 32bit Arm Cortex M4 microcontroller from Renesas for handling all the GPIOs. Another interesting feature up its sleeve is the 12x8 LED matrix, which can be used to display text, icons, simple indications or even for some bare minimal gaming. This avoids the need for any external displays for the basic use cases such as debugging and such. The board also comes with Arduino IoT cloud support, which makes it very easy to develop IoT projects. In the later parts of this article, we will see how to make a simple IoT project using this board.
Now if we come back to the hardware feature the Arduino Uno R4 comes with 14-bit ADC, which is a huge improvement over the 10-bit ADC on the Arduino Uno R3. One another addition is the 12-bit DAC, which will come in handy when building sophisticated audio projects. It also comes with built-in RTC and supports CAN and HID protocols. This makes it easier to build automotive, industrial and other interfacing projects, without the need for any external transceivers or modules.
Arduino Uno R4 WiFi Development Board Pinout
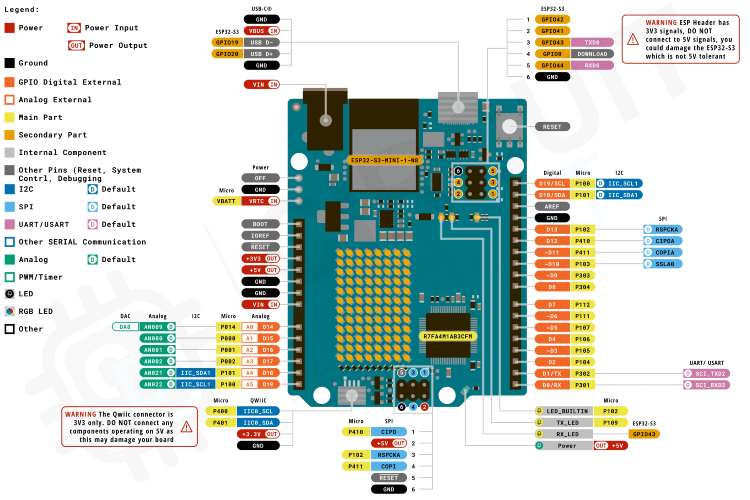
Now let's look at the pinout for the Arduino Uno R4 WiFi development board. As you can see it is very similar to the Uno R3 development board but with each pin with more functions. It also provided some of the ESP32-S3 pins broken out through a 6-pin header and even some through test points for the hardcore developers. But keep in mind the ESp32 pins and the Quick connector pins are only 3.3V tolerant, so keep that in consideration when using them.
Let’s Code - First IoT Example: Blinking an LED
To start with the IoT example let's make an Arduino Cloud account. To do so, navigate to the Arduino Cloud website and click on the get started button. If you haven’t already logged in create an account, or sign in if you already have an account. Now you will be redirected to the Arduino Cloud app. Once you are in, go through the initial setup as shown in the video and it will ask for you to install the Arduino Cloud agent. Install it if you already haven't and proceed by launching the app. Once launched click on the cloud agent app and select Go to Arduino Cloud, which will get you back to the Arduino Cloud app.
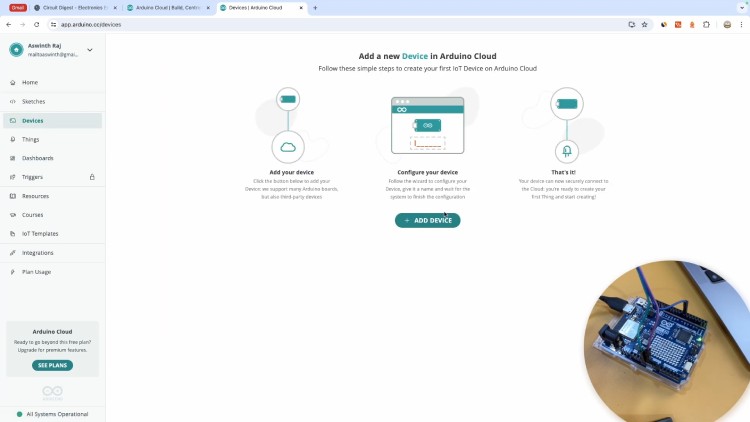
Now in the Arduino cloud app, click on Devices and then on Add Devices and then select the Arduino board in the popup. Make sure the board is connected to the PC and wait for the Arduino Cloud to detect the board. Once detected click on configure and follow the onscreen instructions to name and configure the device. follow the instructions provided in the video to set up the Uno R4. Once done it will redirect you back to the Cloud app.
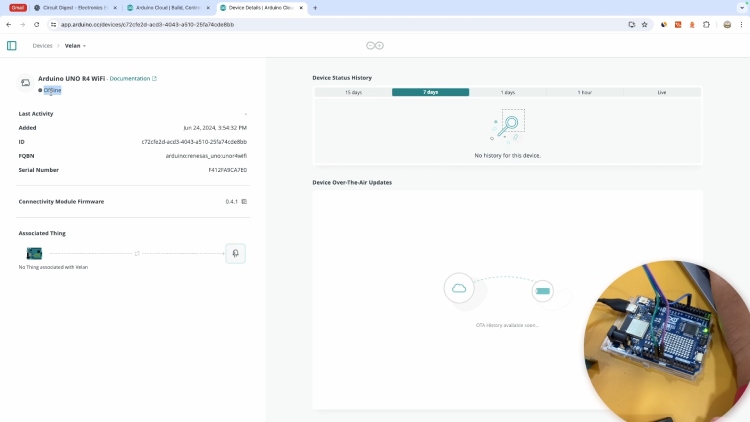
Now you can see that the device is successfully added to the cloud, but it is in the offline state. It is because there is no program in the Uno R4 and so it is not connected to the cloud. So, to proceed further, expand the left panel by clicking on the button on the top left corner and selecting things.

On the Things page click on Create Thing and it will send you to the page where you can add the cloud variables. A thing can be simply explained as a virtual representation of the hardware, which can be used to control the actual board or read back from it. It is like a virtual pin. Or in layman's terms, any input or output devices or sensors connected to the board can be considered as a Thing.
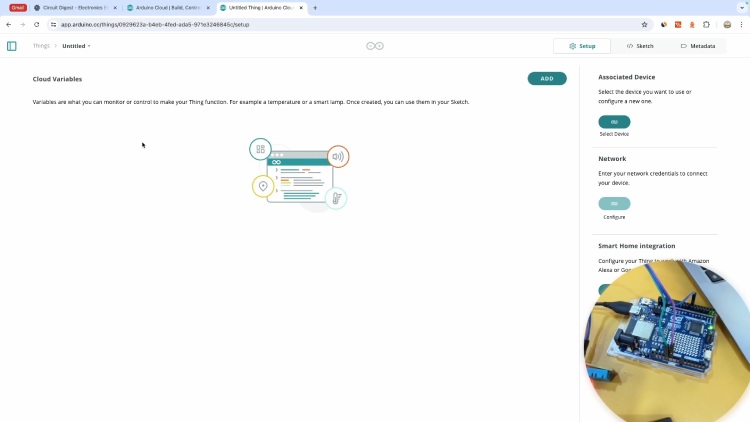
In the things page first, associate the previously added device by clicking on the button under the Associate device section and selecting our device. Then click on the add button to create a new variable.

Name the variable as led and select the type as boolean. Set the variable permission to read & write and the variable update policy to on change. Click on add variable to complete the procedure and the new variable will be created. Once added click on the configure button under the network section, enter your WiFi SSID and password into the corresponding fields in the popup form and click on save.
Now go back to the sketches page by selecting it from the left panel or by clicking on the sketch button on the top. There you will find a newly created sketch and open it.
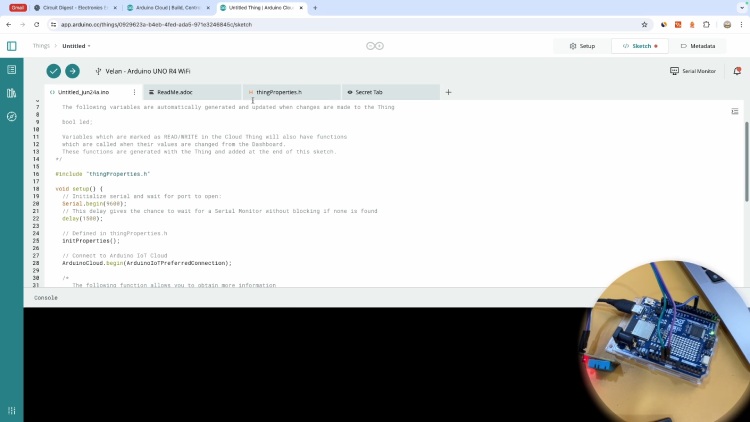
In the sketch editor, you can see some files have been already opened that include the sketch itself along with the thingsProperties.h header file. This header file will contain all the necessary declarations related to the IoT cloud including wifi credentials, variable declarations and other necessary declarations. In the secret tab, you can find the actual wifi credentials.
So, to blink the LED modify the sketch as given below and upload it to the Arduino board.
#include "thingProperties.h"

void setup() {
  // Initialize serial and wait for port to open:
  Serial.begin(9600);
  // This delay gives the chance to wait for a Serial Monitor without blocking if none is found
  delay(1500);

  pinMode(13,OUTPUT);

  // Defined in thingProperties.h
  initProperties();

  // Connect to Arduino IoT Cloud
  ArduinoCloud.begin(ArduinoIoTPreferredConnection);

  setDebugMessageLevel(2);
  ArduinoCloud.printDebugInfo();
}

void loop() {
  //ArduinoCloud.update();
  // Your code here
  digitalWrite(13, HIGH);
  delay(1000);
  digitalWrite(13, LOW);
  delay(1000);
}
void onLedChange()  {
  // Add your code here to act upon Led change
}
Keep in mind that the functions related to the cloud are not necessary to blink the LED, only the pin initialization in the setup function and digital write and delay function in the loop are needed. But since we are going to use the same sketch for the next example we just kept the remaining code there. Now once the code is uploaded you can see the LED on the Uno R4 starts blinking every second.
Example 2: Controlling the LED using IoT Dashboard
To control the LED from the Dashboard, first go to the dashboard on the left panel and click on Create Dashboard.

On the dashboard page, you can see two icons to switch the mods, one to view the dashboard and the other to edit the dashboard. Change the mode to edit. And now there will be a new button called Add, click on it and select the switch.
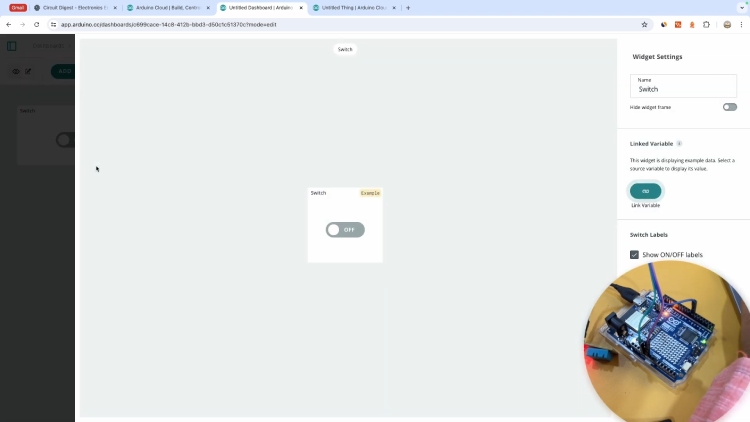
Once added click on the link variable button within the property panel of the switch, select the LED variable we have previously added and click on done. Then go back to the view mode. In the sketch change the code to the following and upload the code.
#include "thingProperties.h"

void setup() {
  // Initialize serial and wait for port to open:
  Serial.begin(9600);
  // This delay gives the chance to wait for a Serial Monitor without blocking if none is found
  delay(1500);
  pinMode(13,OUTPUT);
  // Defined in thingProperties.h
  initProperties();

  // Connect to Arduino IoT Cloud
  ArduinoCloud.begin(ArduinoIoTPreferredConnection);

   setDebugMessageLevel(2);
  ArduinoCloud.printDebugInfo();
}

void loop() {
  ArduinoCloud.update();
}

/*
  Since Led is READ_WRITE variable, onLedChange() is
  executed every time a new value is received from IoT Cloud.
*/
void onLedChange()  {
  if(led == 1)
    digitalWrite(13, HIGH);
  if(led == 0)
    digitalWrite(13, LOW);
}
Once uploaded got to the dashboard and now you can control the LED using the switch.
Example 3: Interfacing a Temperature Sensor
For this example, we will use a DHT11 sensor. For that follow the circuit below and connect the DHT11 sensor to the Arduino Uno R4 WiFi Board.

Connect the power pins to the 5V and GND pins or Arduino and the signal pin to the D7 pin of Arduino. After that go to the Things page, edit the existing thing, and create a new variable named temperature, with type integer, and set variable permission to read & write and the variable update policy to periodically. Then go to the dashboard and add a new gauge widget, link it to the variable temperature and set the minimum and maximum value for the gauge.
Later go to the sketches and edit the existing sketch. The new variable will be automatically added to the sketch. Modify the sketch as follows and upload the code to the board.
#include "thingProperties.h"
#include <DHT11.h>
DHT11 dht11(7);
void setup() {
  // Initialize serial and wait for port to open:
  Serial.begin(9600);
  // This delay gives the chance to wait for a Serial Monitor without blocking if none is found
  delay(1500);
  pinMode(13,OUTPUT);
  // Defined in thingProperties.h
  initProperties();

  // Connect to Arduino IoT Cloud
  ArduinoCloud.begin(ArduinoIoTPreferredConnection);

   setDebugMessageLevel(2);
  ArduinoCloud.printDebugInfo();
}

void loop() {
  temperature = dht11.readTemperature();
  Serial.print("Temperature: ");
  Serial.print(temperature);
  Serial.println(" °C");
  ArduinoCloud.update();
}

void onLedChange()  {
  if(led == 1)
    digitalWrite(13, HIGH);
  if(led == 0)
    digitalWrite(13, LOW);
}

void onTemperatureChange()  {
  // Add your code here to act upon Temperature change
}
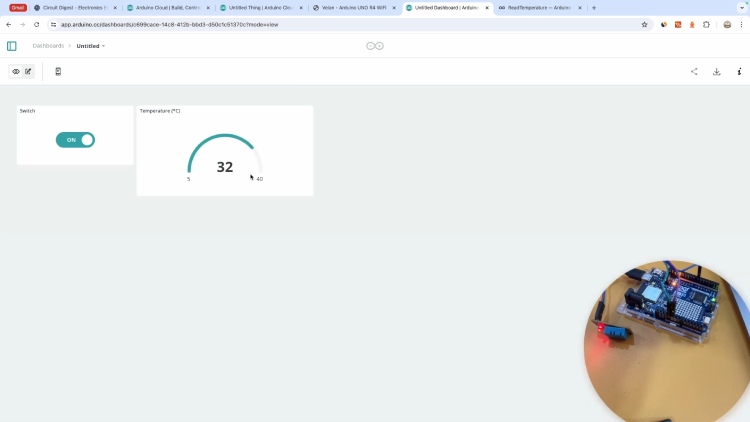
Once the code is uploaded open the dashboard, there you can see the temperature gauge is getting updated with the values from the DHT11 sensor.
As we know these are only some of the basic tasks, we can do with the Arduino Uno R4 WiFi. The Uno R4 WiFi is a very powerful and versatile board and can be used as a substitution for many existing IoT solutions. Stay tuned for more projects using the all-new Uno R4 WiFi board, and you can also check out our Arduino project collection for more interesting projects.
#include "thingProperties.h"
void setup() {
// Initialize serial and wait for port to open:
Serial.begin(9600);
// This delay gives the chance to wait for a Serial Monitor without blocking if none is found
delay(1500);
pinMode(13,OUTPUT);
// Defined in thingProperties.h
initProperties();
// Connect to Arduino IoT Cloud
ArduinoCloud.begin(ArduinoIoTPreferredConnection);
setDebugMessageLevel(2);
ArduinoCloud.printDebugInfo();
}
void loop() {
//ArduinoCloud.update();
// Your code here
digitalWrite(13, HIGH);
delay(1000);
digitalWrite(13, LOW);
delay(1000);
}
void onLedChange() {
// Add your code here to act upon Led change
}
#include "thingProperties.h"
void setup() {
// Initialize serial and wait for port to open:
Serial.begin(9600);
// This delay gives the chance to wait for a Serial Monitor without blocking if none is found
delay(1500);
pinMode(13,OUTPUT);
// Defined in thingProperties.h
initProperties();
// Connect to Arduino IoT Cloud
ArduinoCloud.begin(ArduinoIoTPreferredConnection);
setDebugMessageLevel(2);
ArduinoCloud.printDebugInfo();
}
void loop() {
ArduinoCloud.update();
}
/*
Since Led is READ_WRITE variable, onLedChange() is
executed every time a new value is received from IoT Cloud.
*/
void onLedChange() {
if(led == 1)
digitalWrite(13, HIGH);
if(led == 0)
digitalWrite(13, LOW);
}
#include "thingProperties.h"
#include <DHT11.h>
DHT11 dht11(7);
void setup() {
// Initialize serial and wait for port to open:
Serial.begin(9600);
// This delay gives the chance to wait for a Serial Monitor without blocking if none is found
delay(1500);
pinMode(13,OUTPUT);
// Defined in thingProperties.h
initProperties();
// Connect to Arduino IoT Cloud
ArduinoCloud.begin(ArduinoIoTPreferredConnection);
setDebugMessageLevel(2);
ArduinoCloud.printDebugInfo();
}
void loop() {
temperature = dht11.readTemperature();
Serial.print("Temperature: ");
Serial.print(temperature);
Serial.println(" °C");
ArduinoCloud.update();
}
void onLedChange() {
if(led == 1)
digitalWrite(13, HIGH);
if(led == 0)
digitalWrite(13, LOW);
}
void onTemperatureChange() {
// Add your code here to act upon Temperature change
}