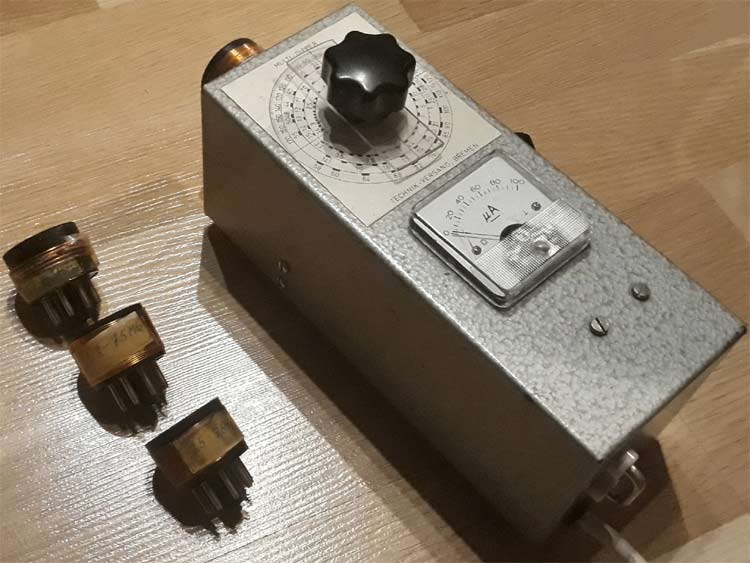
The Grid Dip Meter (GDM) or the Grid Dip Oscillator (GDO) is an electronic instrument used in measurement and testing of radio frequency circuits. It is basically an oscillator with an exposed coil and oscillation amplitude readout. It has three main functions:
- Measuring the resonant frequency
- of an LC resonant circuit,
- a Crystal/Ceramic resonator,
- or an Antenna,
- Measuring inductance or capacitance,
- Measuring the frequency of a signal,
- Generation of RF sine wave signals.
In the above image of GDM, you can see the knob hat steers the tuning capacitor with a frequency scale and on the left side there are exchangeable coils for different frequency bands and just under the frequency scale, there is a meter that reads out the oscillator output voltage. Learn more about various types of oscillators here.
What’s behind the name?
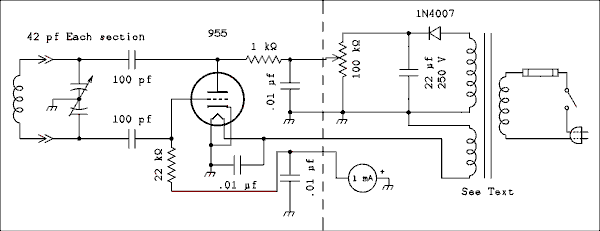
Grid Dip Meters are called like that because back in the day they were made using triodes and used to measure the oscillator amplitude by measuring the current flowing through the grid resistor.
Modern GDOs are not made with vacuum tubes, but with transistors – preferably JFETs or Dual-Gate MOSFETs due to their high input impedance that makes the oscillator more stable. GDO’s with transistors can be called as TDO or TDM (Trans dip oscillator/meter). They can also be made with a tunnel diode (tunnel dip oscillator/meter) instead of a transistor or tube.
The Basic Circuit
The circuit shown here comes from a book called “Konstrukcje krótkofalarskie dla początkujących” by Andrzej Janeczek, call sign SP5AHT. It is quite possibly the simplest GDM circuit using a BJT,
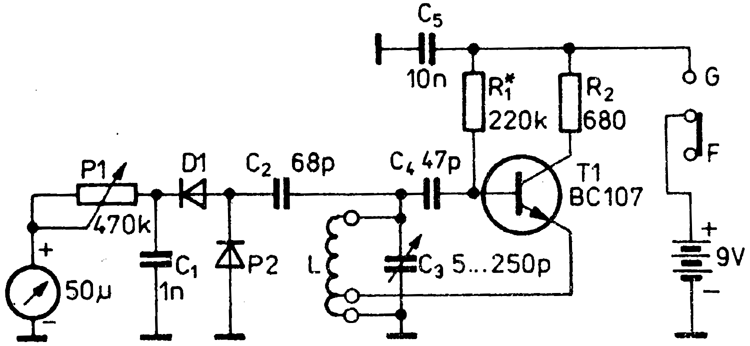
At the heart of this circuit lies an VFO in a Hartley configuration, R1 provides base bias, R2 limits collector current, C5 decouples the power supply switched by the GF switch, C4 prevents base bias being shorted to ground by L. C3 and L form a resonant circuit that sets the frequency, C2, P2 (printing error, should be D2) and D1 form a voltage doubler that rectifies (magnetic meters can’t measure AC) the signal, which is then filtered by C1 and fed to the 50uA meter via the sensitivity setting pot P1.
L should be mounted outside the case on a socket so it can be exchanged for different coils for different bands. The socket and coil plug could be a 5 or 3 pin DIN, a stereo 3.5mm socket/jack or whatever you have on hand that also prevents the coil from being plugged the wrong way around (grounded part to the base and vice versa), as it may prevent oscillation. C3 can be a standard variable capacitor from a transistor radio, although one without anything between the plates (air type) is preferable for higher frequency stability. T1 can be any NPN BJT with hFE of over 150 and transition frequency of over 100MHz, such as 2SC1815, 2N2222A, 2N3904, BF199. L depends on the desired band, for LW and MW it can be wound on a ferrite rod but at SW and up air core is better. For 3MHz – 8MHz band it’s 11uH but can be calculated using the many coil calculators online for different bands
Measuring Resonance of an LC Circuit

The use of a Grid Dip Meter as an inductor-capacitor resonant circuit resonance measuring device depends on the circuit. If it is just a resonant circuit, not connected to anything and with the coil exposed, you just need to put the coil of the resonant circuit close to the exposed coil of the GDM, tune your GDM until the meter drops. This drop is caused by the resonant circuit coupled to the coil in the GDM absorbing some of the energy in the resonant circuit, causing a drop in the oscillator’s output voltage and a change in the meter’s displayed value.
If the coil is shielded (IF transformers for example) you need to couple the GDM by winding a few turns of wire and connecting it between
Measuring Resonance of a Resonator
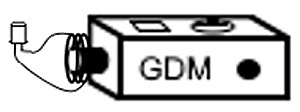
Measuring crystal resonators with GDM is easy but not very accurate. This method is useful for determining the crystal frequency when the label has worn off. All you need to do is connect a few turns of wire around the GDM coil and connecting that loop to the crystal. The resonance will be very steep so you need to tune the GDM very slowly.
Measuring Antenna Resonance
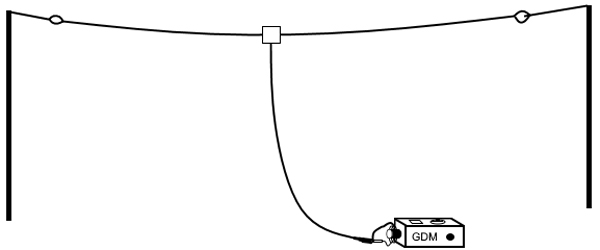
To measure the resonance frequencies of an antenna (such as a dipole) wind a few turns of wire around the GDM coil and connect it to the antenna connector. Tune the GDM and exchange coils until you see the dip on the meter. You can also measure how wideband is the antenna is by noting how fast the needle drops during tuning.
Measuring Inductance or Capacitance
You can measure the inductance of an inductor or a capacitor by making a resonant circuit with the measured inductor or capacitor and a known value capacitor/inductor in parallel and tuning the GDM and changing coils until you see the dip on the meter, just like with a regular LC circuit. Input the resonance frequency and the known capacitance/inductance into an LC resonance calculator to get the unknown inductance/capacitance.
We previously made an Arduino based Capacitance meter and frequency meter to measure the capacitance and the frequency.
Measuring the Frequency of a Signal
There is two way of measuring the frequency using the GDM:
- Absorptive frequency measurement
- Heterodyne frequency measurement

Absorptive frequency measurement works when the GDM is turned off, the signal is applied to a few turns of wire looped around the GDM coil, then the meter is tuned and the coils are changed until the meter readout goes up and that is the signal frequency.
The absorptive frequency measurement mode works similarly to a crystal radio, the GDM tuned circuit rejects all signals from frequencies other than it’s resonant frequency, the diode turns the high-frequency AC of the signal to DC because meters can only work with DC. It only works with those GDM types that have the meter connected to the resonant circuit via a diode, such as the one in the Basic TDO circuit explained earlier. The signal amplitude has to be relatively high, no less than 100mV, because of the forward voltage of the diode. It can be also used to see the level of harmonic distortion in the signal, simply tune the GDM to a frequency 2, 3 or 4 times higher than the measured signal frequency and also tune to a frequency 2 or 3 times lower to see if you didn’t measure a harmonic in the first place.
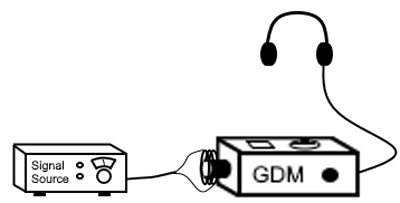
Heterodyne frequency measurement mode only works with those GDM that have a dedicated phone jack. It works on the principle of mixing frequencies, for example, if our GDM oscillates at 1000kHz and there is a 1001kHz signal coupled to the GDM coil the frequencies heterodyne (mix) creating a signal on 1kHz (1001kHz – 1000kHz = 1kHz) which can be heard if there are headphones plugged into the jack.
This is a much more sensitive and accurate method of frequency measurement and can be used to match crystals for crystal filter.

Signal Generation
To use your GDM as a variable frequency oscillator all you to do is wind a coil over the original GDM coil and connect a buffer amplifier to it. The use of a buffer amplifier is recommended because taking the output directly from the coil wound over the GDM coil will load it and cause amplitude and frequency instability and maybe even the oscillations dying down.
Generation of modulated RF signals
Some grid meters are capable of generating AM modulated signals, they either do it by modulating it with 60Hz AC from the power transformer, 120Hz AC after rectification (first two are the usual methods in old tube GDM) or by having an onboard AF generator (more often found in fancy transistor TDMs). If the modulation happens at the generator, there might be a small FM component in the AM signal.


