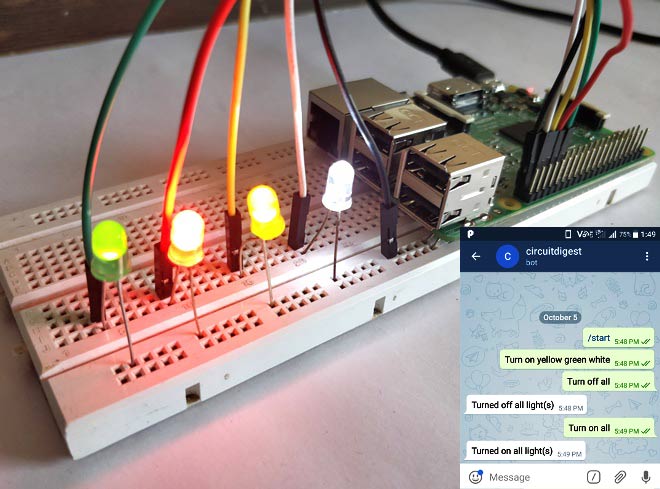
Telegram is an optimal application to combine with Raspberry Pi for all our mobile control purpose. It has very good developer support and lots of features are being planned to be released soon to enhance the performance of Telegram Bots. In our previous tutorial we learnt how we can set up a telegram bot for raspberry pi and also learnt have to have a chat with it and share images, documents and Audio files.
Now, we will proceed to next step by learning How we can control the GPIO pins on Raspberry Pins using Telegram, so that we provide some hardware support for our bot. In this tutorial we will Connect four LEDs to Raspberry Pi GPIO pins and toggle them using natural language (chatting like) from Telegram. Sounds interesting right? Let us get started.
Materials Required:
- Four LED (any color)
- Raspberry Pi (with internet connection)
- Breadboard
- Connecting wires
Pre-Requisites:
Before proceeding with the tutorial make sure your Raspberry Pi is connected to internet and you can run python programs on your Pi. Also read the previous tutorial to know how to set up Telegram bot with Raspberry Pi Pi, since I will assume you are familiar with that stuff to proceed with the project.
If you are new to Raspberry Pi then follow our Raspberry Pi Introduction article and other Raspberry Pi Tutorials.
Circuit Diagram:
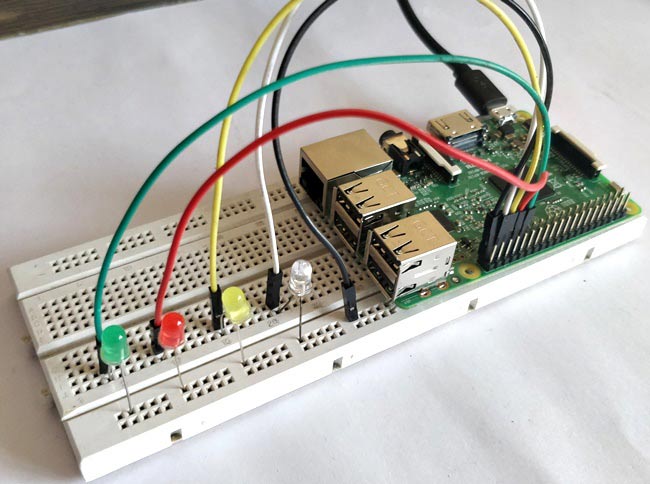
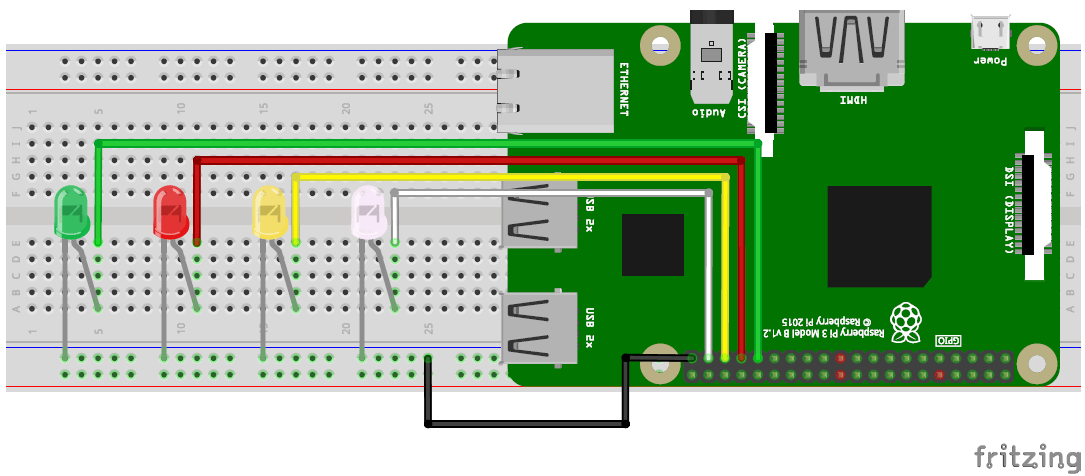
The circuit Diagram for Controlling LEDs using Raspberry Pi and Telegram Android App is nothing more than four LEDs and some connecting wires. We will not need the current limiting resistors since the Raspberry Pi GPIO pins work on 3.3V TTL. Follow the circuit below and connect your LED.
The following table will help you determine the pin number and GPIO number for the connection of four leds.
|
Led Terminal |
Pin Number |
GPIO Number |
|
Green Anode |
Pin 31 |
GPIO 6 |
|
Red Anode |
Pin 33 |
GPIO 13 |
|
Yellow Anode |
Pin 35 |
GPIO 19 |
|
White Anode |
Pin 37 |
GPIO 26 |
|
Cathode of all four |
Pin 39 |
Ground |
Below is the Circuit diagram in which four LEDs are connected according to the Table given above:
Once your connections your hardware set-up should look like something like this below.
Raspberry Python Program:
Once the hardware is ready, we can proceed with the Python Program. In this program we have to read the data (message) sent from the Telegram bot and toggle the LED accordingly. To make it more natural, instead of checking each sentence and hard coding those sentence inside our program we can check for words and proceed accordingly.
So the program will primarily check for two words, they are on and off. Once detecting either one of these two words, it will look for other keywords like white, yellow, green and red. The respective colour LED will be toggled only if the word is detected. We will also update a string for the detected words to send a message back to telegram bot.
The complete program can be found at the bottom of this page; just below I have explained the program by breaking it into small meaningful junks.
For this program to work, we need the telepot downloaded and imported in our Raspberry Pi. In our previous tutorial we have already downloaded the teleport inside our Raspberry Pi, so now we just have to import it into our program along with the GPIO library as shown below.
import RPi.GPIO as GPIO
import telepot
from telepot.loop import MessageLoop
We will be controlling for LED lights using this program and the colour of the LEDs will be White, Yellow, Red and Green. They are connected to the pins shown in circuit diagram; let us define the pin names for these LEDs based on their colour so that it is use them in the program.
white = 26
yellow = 19
red = 13
green = 6
The next step would be to define all these LED pins as output pins and define them as turned off by default by using the below lines.
#LED White
GPIO.setup(white, GPIO.OUT)
GPIO.output(white, 0) #Off initially
#LED Yellow
GPIO.setup(yellow, GPIO.OUT)
GPIO.output(yellow, 0) #Off initially
 #LED Red
GPIO.setup(red, GPIO.OUT)
GPIO.output(red, 0) #Off initially
#LED green
GPIO.setup(green, GPIO.OUT)
GPIO.output(green, 0) #Off initially
As we learnt in our previous tutorial all the actions that has to be done by the Raspberry bot will be defined inside the function action. Here we have to make the bot to listen to the message send from mobile, compare it to some keywords and toggle LED accordingly.
For each message we send from mobile, there will be a chat id and command. This chat id is required by the program to reply back to the sender. So we save the chat id and, message as shown below.
chat_id = msg['chat']['id']
command = msg['text']
Now, whatever we send from the phone will be saved as string in the variable command. So, all we have to do is check for key words in this variable. Python has a command make things easy here. For example, if we have to check if the word “on” is present in the string stored in command variable we can simply use the below line.
if 'on' in command:
Similarly we check for all keywords, once we receive an “on”, we proceed to check for which colour the user has mentioned. This is also done by the same commands by comparing the same keywords. We also update a string named message that can be replied back to the user as a status message.
    if 'on' in command:
        message = "Turned on "
        if 'white' in command:
            message = message + "white "
            GPIO.output(white, 1)
        if 'yellow' in command:
            message = message + "yellow "
            GPIO.output(yellow, 1)
        if 'red' in command:
            message = message + "red "
            GPIO.output(red, 1)
        if 'green' in command:
            message = message + "green "
            GPIO.output(green, 1)
        if 'all' in command:
            message = message + "all "
            GPIO.output(white, 1)
            GPIO.output(yellow, 1)
            GPIO.output(red, 1)
            GPIO.output(green, 1)
        message = message + "light(s)"
        telegram_bot.sendMessage (chat_id, message)
As shown above we look for keywords like ‘green’, ‘white’, ‘red’, ‘yellow’ and ‘all’ and ‘Turned on’ that particular LED alone. Once the job is done we send a message back to the user about what just happened. The same method can be used to turn off the lights off well.
    if 'off' in command:
        message = "Turned off "
        if 'white' in command:
            message = message + "white "
            GPIO.output(white, 0)
        if 'yellow' in command:
            message = message + "yellow "
            GPIO.output(yellow, 0)
        if 'red' in command:
            message = message + "red "
            GPIO.output(red, 0)
        if 'green' in command:
            message = message + "green "
            GPIO.output(green, 0)
        if 'all' in command:
            message = message + "all "
            GPIO.output(white, 0)
            GPIO.output(yellow, 0)
            GPIO.output(red, 0)
            GPIO.output(green, 0)
        message = message + "light(s)"
        telegram_bot.sendMessage (chat_id, message)
Controlling LEDs with Raspberry Pi and Telegram bot:
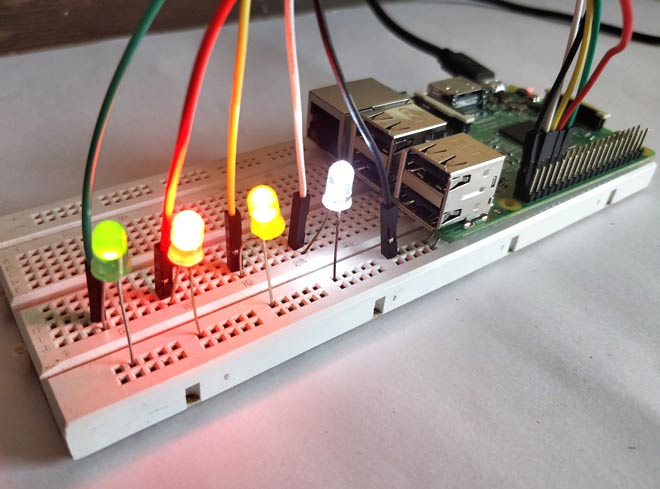
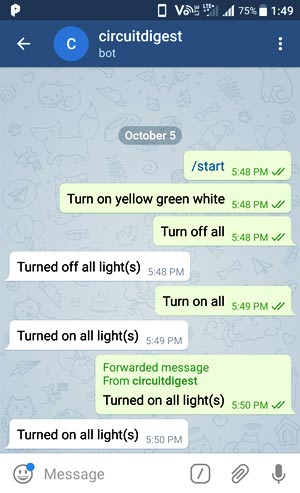
Connect your LEDs and launch your program on python. Make sure you have changed the Token address for your bot. And start typing in the commands you wish. For example to turn on the red and yellow light you can use any of the following command.
1.Turn on Red and Yellow Light
2.Switch on Red and Yellow colour right
3.On red and yellow
4.Please put on the yellow and red light
What not.......
As you can see the bot only looks for the Keywords and will ignore the other words in the Sentence, this way you can speak to it naturally. The complete working of the project can be found at the Video given at the end of this page.
Go ahead! play with your project and have fun. You can take it to a whole new level now. With both the tutorial combined we have the power to control any hardware from our Smart phone anywhere from the world and also get inputs/results from our Raspberry Pi in form of message, Audio, Image and even as document. If you replace the LEDs with Relays and AC appliances, then it could be a Smart Phone controlled Home Automation. So, use your creativity and build your own cool projects...
Hope you liked the project and enjoyed building something similar. Let me know if you have any problems through the comment section and I will be happy to help you. Also share your cool idea with me and let us see what we can build.
import time, datetime
import RPi.GPIO as GPIO
import telepot
from telepot.loop import MessageLoop
white = 26
yellow = 19
red = 13
green = 6
now = datetime.datetime.now()
GPIO.setmode(GPIO.BCM)
GPIO.setwarnings(False)
#LED White
GPIO.setup(white, GPIO.OUT)
GPIO.output(white, 0) #Off initially
#LED Yellow
GPIO.setup(yellow, GPIO.OUT)
GPIO.output(yellow, 0) #Off initially
#LED Red
GPIO.setup(red, GPIO.OUT)
GPIO.output(red, 0) #Off initially
#LED green
GPIO.setup(green, GPIO.OUT)
GPIO.output(green, 0) #Off initially
def action(msg):
chat_id = msg['chat']['id']
command = msg['text']
print 'Received: %s' % command
if 'on' in command:
message = "Turned on "
if 'white' in command:
message = message + "white "
GPIO.output(white, 1)
if 'yellow' in command:
message = message + "yellow "
GPIO.output(yellow, 1)
if 'red' in command:
message = message + "red "
GPIO.output(red, 1)
if 'green' in command:
message = message + "green "
GPIO.output(green, 1)
if 'all' in command:
message = message + "all "
GPIO.output(white, 1)
GPIO.output(yellow, 1)
GPIO.output(red, 1)
GPIO.output(green, 1)
message = message + "light(s)"
telegram_bot.sendMessage (chat_id, message)
if 'off' in command:
message = "Turned off "
if 'white' in command:
message = message + "white "
GPIO.output(white, 0)
if 'yellow' in command:
message = message + "yellow "
GPIO.output(yellow, 0)
if 'red' in command:
message = message + "red "
GPIO.output(red, 0)
if 'green' in command:
message = message + "green "
GPIO.output(green, 0)
if 'all' in command:
message = message + "all "
GPIO.output(white, 0)
GPIO.output(yellow, 0)
GPIO.output(red, 0)
GPIO.output(green, 0)
message = message + "light(s)"
telegram_bot.sendMessage (chat_id, message)
telegram_bot = telepot.Bot('470583174:AAG7MPZc93qchp-tjqA_K2meRYcQiOR7X7Y')
print (telegram_bot.getMe())
MessageLoop(telegram_bot, action).run_as_thread()
print 'Up and Running....'
while 1:
time.sleep(10)
Comments
'telepot' library
When I try to run the program, it says 'no module named telepot'. How do I fix this? Please help!
https://circuitdigest.com
https://circuitdigest.com/microcontroller-projects/raspberry-pi-telegra… follow this tutorial and install the required modules, then run this program
It is showing line 46,
It is showing line 46, unindent does not match any outer indentation level. I tried everything but it is not working. I am doing it in Thonny Python IDE.
It is showing line 46,
It is showing line 46, unindent does not match any outer indentation level. I tried everything but it is not working. I am doing it in Thonny Python IDE.



After or before each diode must hava be a resistor to limit the amount of current.